
We are pleased to bring you the latest edition of our Workbench blog, with all the news, updates and modelling exclusives from the fascinating world of Airfix.
After the frenetic activity of range launch week, it can be quite therapeutic to get back to the comfort zone of a standard edition of Workbench, even though we have a busy schedule of content to get through over the coming months. With new tooling projects, kits benefiting from the addition of new parts and a host of re-issued models featuring new schemes and box artwork to get through, it’s already clear that every edition is going to be packed full of exclusives, but that’s just the way our readers like it. There are also lots of plans afoot at Airfix HQ for modellers and blog regulars alike and we are very much looking forward to bringing you all these details as soon as we are in a position to do so - these are exciting times!
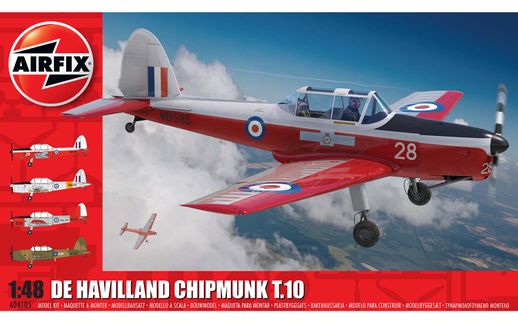
For this first standard edition of Workbench for 2021, we start with a real new tooling bang, as we take a detailed look at one of the new projects announced with the launch of the 2021 model range, the hugely popular de Havilland Chipmunk T.10. This latest addition to our 1/48th scale kit range caught many people off guard when it took its place as one of the headline releases in the new range, but from the order numbers which have come flooding in over the past two weeks, we are already fully aware of how popular this famous training aeroplane is with modellers. Appearing in a Workbench blog for the very first time, we have been lucky enough to speak with the designer responsible for this project and have been given an exclusive selection of development images to share with our readers. Matt has also kindly given us an insight into the project and allowed us to ask one or two questions on behalf of our readers, as we find out how he went about incorporating this extremely famous aeroplane into the Airfix kit range. Proudly taking its place as our first major subject of the new year, strap yourself in for a first flight with the new Airfix de Havilland Chipmunk T.10.
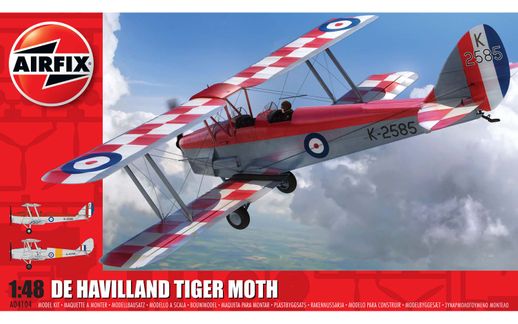
There can be absolutely no doubting the aviation pedigree of the de Havilland Tiger Moth and just as the de Havilland designers had to come up with a replacement for this aviation classic back in the 1940s, so did one of our product designers, when he took on a similar task in a scale modelling sense
Now already a hugely popular model in the Airfix 1/48th scale kit range, it could be argued that the de Havilland Tiger Moth biplane is perhaps the most famous training aeroplane type in the world, familiar to many millions of people and responsible for training many tens of thousands of pilots all over the world. An absolutely crucial component in the Allied wartime elementary flying training of so many young men destined to contest the war in the air during WWII and the men and women who ferried aircraft between factories and active stations during the Second World War, the Tiger Moth may not have sported any guns or bombs (we will overlook Operation Banquet Light in 1940), but it was still very much a war winner nonetheless.
After becoming such a famous aircraft the world over and generally regarded as being exceptional in the role for which it was intended, it must have been quite a headache for various former Allied air forces, as the aviation world headed towards the jet age and they were faced with accepting the fact that they were in need of a modern replacement for the venerable old Tiger Moth. How do you replace an aviation classic of such magnitude? With another classic, of course! To that end, the de Havilland Aircraft Company were ideally placed to begin work on developing the new aircraft, but as they were heavily engaged in producing new jet powered aircraft designs in the UK, this new trainer was not going to be a Hatfield designed aircraft.
With huge pressure being placed on de Havilland’s manufacturing capacity during the final few years of the Second World War and with a desire to support increasing numbers of Allied airmen being trained across the Atlantic and away from the rigors of war, de Havilland established an overseas subsidiary in Canada, the de Havilland Aircraft Company of Canada. Following the end of WWII, the company began design work on a new aircraft, one intended as a replacement for the ageing Tiger Moths still in RCAF service. A tandem two seat monoplane, the new trainer incorporated many advances over its predecessor, but shared many of its design philosophies, in that it was intended to be both simple to maintain and relatively forgiving to fly - these aircraft needed to be in the air, earning their keep.
Having the distinction of being the first aircraft type designed and built by de Havilland Canada, the first Chipmunk took to the skies in May 1946 and almost immediately gained interest from the military. By April 1948, the Royal Canadian Air Force had taken delivery of their first Chipmunk, but they were not the only ones admiring the qualities of this extremely capable aeroplane. The vast majority of the 1,283 de Havilland Chipmunks built would be manufactured under licence in the UK, in factories at Hatfield and Chester, with around 735 of these going on to see service with the Royal Air Force, again as the direct replacement for the venerable old Tiger Moth. In RAF service, the British built machines were known as the de Havilland Chipmunk Mk.10 and they would go on to provide basic flight training support for many thousands of future military aviators, in addition to providing air experience opportunities for many more as part of the University Air Squadron organisation.
An appealing 3d rendered image produced from the CAD files during the design of the new de Havilland Chipmunk T.10, giving us all an idea of what we have to look forward to a little later in the year
Despite being a Canadian design, the Chipmunk has become one of the most recognisable Royal Air Force aircraft of the post war era and has enjoyed a military career which began in the early 1950s and continues to this day. The Battle of Britain Memorial Flight still operate two Chipmunks regularly, providing currency training for aircrew assigned to fly the unit’s historic ‘taildraggers’ and also to allow crews to reconnoitre new display venues in advance of their show appearance. In other situations, the aircraft can be used to deliver replacement aircrew or spare parts, whilst the Flight’s Spitfires and Hurricanes are out on display duties during the Airshow season. These two Chipmunks have ensured that the aircraft must now be regarded as one of the longest serving types in Royal Air Force History.
With such an impressive military pedigree as this, it is also interesting to note that the Chipmunk has gone on to become one of the most popular aircraft types on the civilian aviation scene and it is estimated that well over 300 aircraft are still in airworthy condition worldwide. Sometimes unfairly described as ‘The poor man’s Spitfire’, the Chipmunk surely now has to be regarded as a historic aircraft in its own right and one which continues to underline the effectiveness of its design. With aircraft formerly serving with the RAF, Army Air Corps, Royal Navy and the mount of several RAF display teams, there is no shortage of attractive schemes available for you to present your Chipmunk in if you are lucky enough to own one, not to mention the fact that the aircraft would also be operated by several overseas air forces all over the world.
As a training aeroplane, it is obvious that more people would have had personal experiences with the de Havilland Chipmunk as opposed to perhaps the more glamourous front line aircraft types which are so popular with enthusiasts. Indeed, the greatly increased possibility of actually flying in one of these equally historic aeroplanes has ensured that the Chipmunk is held in great affection by owners and enthusiasts alike and as we have already discussed, is an aircraft type which is not out of the reach of prospective pilot/owners. Significantly, the Chipmunk is still fulfilling the aviation role for which it was originally designed when making its first flight 74 years ago, training new pilots and allowing people to experience the thrill of flying for the first time.
Another 3d rendered image of the new 1/48th scale Chipmunk tooling, which clearly shows why this pretty little training aircraft is going to be a popular addition to the Airfix model range
With aviation credentials such as these, surely the task of producing a scale model kit representation of this magnificent aeroplane is enough to daunt even our most experienced product designer, knowing that many thousands of modellers are going to be scrutinizing his work in the years to come. In a strange scale model design sort of way, he would be doing in modelling terms what the de Havilland Company of Canada had done back in the 1940s, as his new Chipmunk tooling project would be the follow up to our successful 1/48th scale Tiger Moth tooling of 2019. Add to this the fact that this coming May will mark the 75th anniversary of the first flight of the de Havilland Chipmunk and it was clear that Senior Product Designer Matt W had a significant new model project on his hands.
Over the course of the past five and a half years producing the Workbench blog, we have been fortunate enough to feature Matt’s design talents on a number of review features in previous blogs and he is always really generous in giving up his time to discuss some of the finer points of his highly specialised work. Although we don’t intend to cover exactly the same areas Matt has already covered for us, in these rather unusual times, we asked a few questions we thought Workbench readers might ask if they were given the opportunity to quiz Matt directly, as well as asking one or two specific Chipmunk related questions. We are also delighted to say that Matt took time out from working on his current design project to supply us with an exclusive series of images to illustrate this feature. Let’s now spend a little time with Matt and his Chipmunk.
The obvious first question to ask one of our designers at the start of any newly announced tooling project is “When did you start work on the Chipmunk and how was the job allocated?”
You might think that this answer would be pretty similar in the majority of cases when discussing new tooling projects with one of our designers, however, that doesn’t necessarily appear to always be the case. Anyway, as far as the modelling enthusiasts is concerned, we are always interested to learn such facts. Matt told us how he took on the 1/48th scale Chipmunk in October 2019 and how sometimes, seniority and experience can influence the allocation of various projects within the team. As an extremely close knit team, younger designers are always encouraged to push themselves when it comes to learning new skills and taking on challenging projects, however, they can always count on the support of more senior designers at any stage of any project. Having said that, there are definitely some occasions when greater experience means certain projects have to be placed with more senior designers. This could be for reasons of design complexity, or for the simple fact that they are working to a tight deadline. When costing a new tooling project, many factors have to be taken into account before it can be deemed viable, which has to include a designers salary. Sometimes, the certainty that a project will be completed on time can make the difference between a project being signed off, or not. In such cases, a senior designer will usually take on the project.
Once Matt knew he would be tackling the de Havilland Chipmunk T.10 tooling project, he started to gather his research files and with the help of our lead researcher, arranged to scan a suitable aircraft.
Operation ‘Scan a Chipmunk’ about to begin at the Vintage Fabrics hangar at Audley End
A series of images which show various sections of the Chipmunk scan data, once it had been cleaned up and delivered to Matt. This information is an important component of any new tooling project, but is only the start of many months of work for the product designer leading the project
The result of our scan trip to Vintage Fabrics at Audley End, but just the start of our work in bringing the Chipmunk into the Airfix model kit range
Specifically talking Chipmunk, Matt started work on the project by building an information base, looking at what research the company already had in our extensive archives and scouring the internet for any additional books, plans and information he felt he was going to need. Completely immersing himself in the project, Matt also worked closely with the Lead Researcher to find where preserved examples of the aircraft were available for them inspect and potentially secure for scanning purposes. This is not as straight forward as it sounds, because the team will have already discussed what they wanted to achieve with the tooling and which variants of the aircraft they intended to model. All these specifics would have to be incorporated in the subject aircraft to be scanned, but they also had to be aware of any non-standard modifications a particular aircraft may exhibit, any damage which had been repaired and generally anything on the aircraft which would not have appeared on the aircraft for the time period the team were intending to model. Even if the aircraft to be scanned does exhibit some of these features, as long as the designer is aware of it, he can account for this during the design process.
For the new de Havilland Chipmunk T.10 project, Matt and the team were fortunate enough to have access to a machine which was more than suitable as a scan subject and we were once again incredibly grateful to Clive Denney and the support of his Vintage Fabrics business. Heading for their facility at Audley End, near Saffron Walden in Essex, de Havilland Chipmunk T.10 WB585 had been specially positioned within the hangar to allow a detailed LIDAR scan to be completed, something when once cleaned up and sent to Matt in a format he could use, would form the basis of this interesting new project. It would be used alongside all the other research materials Matt had amassed in preparation for taking on the famous Chipmunk.
“Have the pandemic restrictions had an impact on the way you work and indeed, on the timescales associated with new tooling projects?”
Most of us would assume that just like every other business around the world, Airfix and specifically the design of new model tooling projects, would have been adversely affected by the different way we have all been required to go about our lives over the past year or so, something which seems likely to continue into the coming year. Matt told us that they have clearly had to go about things in a slightly different way, but from a design and team dynamics perspective, there have not really been any issues and in some areas, have actually made them more effective. We all know that the Airfix design team possess a unique set of skills and abilities which are not shared by any other people outside of the business and whilst this close knit group meet regularly to discuss projects, seek advice and to share information, the actual design work itself is quite a solitary process and will see each designer spending many hours ‘in the zone’, just them and their computer. With that in mind, it didn’t really matter if their work computer was situated in the office, or at home and with the availability of accessible and easy to use on-line meeting tools, staying in contact with the rest of the team has been absolutely no problem. Holding design update meetings as regularly and effectively as required, everything has carried on more or less as normal.
A Chipmunk coming together. This image represents quite an advanced stage of the design process and would have been the result of many hours spent behind the computer
Another powerful software tool available to our product designers is the ability to produce these attractive computer rendered 3D images of the new model, images which often appear in the Airfix catalogue at the start of the year and on our stand at the annual Scale Modelworld show. They help to give an idea of what new models still in development might look like once they are released and certainly highlight the impressive levels of detail the designer has captured
Working remotely has actually brought about some beneficial changes to the way the team works, as it has probably resulted in a more formal structure to the meetings, giving each member of the team the opportunity to discuss and record the status of their individual projects and everyone able to see exactly where their colleagues are with regard to existing projects. As a senior designer, Matt has also found the changes really positive when it comes to supporting less experienced members of the team if they require advice, or just simply giving them a one-to-one opportunity to talk about anything that may be on their mind. Ultimately, from Matt’s perspective, he doesn’t think the changes have been detrimental to the design team at all.
“How different is it working on a famous training aircraft, as opposed to something like a Spitfire or Mustang?”
From the perspective of wanting to produce the most accurate representation of the subject aircraft you are working on and continuing to develop your skills, Matt told us that there is absolutely no difference whether your aircraft is a trainer or a famous WWII fighter, both are equally rewarding. Clearly, you could argue that more people will be familiar with the Spitfire than they would with a de Havilland Chipmunk, but it would be equally true to say that more people have been close to, or flown in a Chipmunk than they would have a Spitfire. This brings its own pressures for a designer taking on such a project, as he knows that more people will have a personal connection with the Chipmunk that they would a WWII fighter and he will have to prepare himself for plenty of modeller feedback once the kit is unleashed on the modelling world. Importantly, as more people will have experienced the delights of the de Havilland Chipmunk, this new kit could actually prove to be a more popular subject than many other kits in the range.
Even though Matt knew his Chipmunk design work would not require him to incorporate guns or bombs into the tooling, he also knew that there would be plenty of opportunities to add real character and detail into the new kit, details which would be familiar to a great many people. The cockpit was an area of the design where Matt knew he wanted to pay particular attention to, incorporating plenty of the fine detail into the new kit, so that anyone who had ever flown in a Chipmunk would find this detail reassuringly familiar. It could be argued that most people would probably be more familiar with the rear seat of the aircraft, as their time in the Chippie was spent undergoing flight training or enjoying an air experience flight, but as the Chipmunk also has the rather unfairly title as the ‘Poor man’s Spitfire’, this also suggests the aircraft is popular with private individuals looking to own a former military aircraft, so the ‘front office’ will need to be similarly detailed.
The result of many hours of painstaking work, this impressive image shows some of the detail which Matt has incorporated into his latest design, details which will be extremely familiar to anyone who has spent time in the company of a de Havilland Chipmunk
With the Chipmunk featuring a rather distinctive ‘fixed’ main undercarriage, Matt knew that this was one area of the design work where things would be a little less complicated than on other projects and therefore would save him a little time. He also knew that there were plenty of other areas where he intended devoting a little extra time, to ensure as much details as possible could be replicated. Of particular interest to him was the de Havilland Gipsy Major engine and the ability to allow the modeller to build their kit with the engine cowling panels displayed in the open position, revealing the engine detail in all its glory. Another significant area of the Chipmunk’s design where Matt was able to devote more time was the representation of the fabric covered wings and how they contrasted with the rivetted metal leading edge sections. Hopefully, this is another feature of the new model’s design he hopes will appeal to the modeller, once the Chipmunk is released.
“Did you encounter any particular challenges whilst designing the new Chipmunk?”
Although Matt would definitely not tell you so himself, he is our most experienced product designer and whilst he is always looking to further enhance his already impressive design CV, there will be few occasions when he his daunted by anything he is asked to work on. He told us that he was really looking forward to working on the Chipmunk, but one thing which became apparent to him quite early in the information gathering phase of the project is that there is not much technical literature available for the Chipmunk, which certainly made periods of the design work a little more challenging. Quite a number of modifications were incorporated into the design of the aircraft throughout its service life, with late model Chipmunks displaying quite a number of differences from earlier aircraft. The challenge for Matt was trying to work out when all these changes were applied to the aircraft and whether they would need to feature on the variants of the Chipmunk kit he was working on.
It is interesting for us modelling enthusiasts to learn that whilst the Chipmunk project is breaking news as far as we are concerned, Matt has spent over a year working on this new model and has already moved onto a new project, one which for the time being must remain in the Top Secret area of the Airfix office.
“Clearly you will be proud of every Airfix kit you were involved in designing, but is there anything in the new Chipmunk’s design which you are particularly pleased with?”
This seemed to be quite an easy question for Matt to answer, as he quickly responded with the word - “Engine!” He was really pleased with how much detail he was able to incorporate not only into the design of the de Havilland Gipsy Major engine parts themselves, but also how everything around the engine supported the inclusion of impressive detail. From the modellers perspective, the ability to construct the kit with engine access panels open to reveal all this detail will be a real benefit and an appealing option which will hopefully see many deciding to go down this route.
This next series of images show some of the design stages Matt went through in producing the engine detail which he is so pleased with. When the kit is released later in the year, we will have a big decision to make when it comes to whether we should display our model clean, or with the engine detail showing
With the Chipmunk seeing such widespread use over the past seventy years or so, it is clear that everyone from pilots and engineers to RAF cadets and air experience flyers will have an affiliation with this magnificent aircraft and Matt believes that whatever your connection with the aircraft, this kit will allow you to construct it in a way you remember it best, from the rear cockpit, or with your head inside the engine panels. The Chipmunk will undoubtedly mean many things to many people, particularly as the aircraft was used extensively by University Air Squadrons and perhaps more significantly, by the RAF Cadet force. Going back over 50 years, RAF Air Experience Flights allowed cadets the opportunity to experience the thrill of flying, with each cadet having access to at least one flight every year, in most cases. Many of these flights would have taken place in a Chipmunk and whether the cadet went on to secure a career in the military, or if they simply remember enjoying dancing amongst the clouds for a few minutes, they will never forget the thrill of their Chipmunk flights. Hopefully, Matt will have the opportunity to display his Chipmunk at this year’s Scale Modelworld show if we are lucky enough to have it take place and he is expecting to speak to plenty of people who have Chipmunk stories to share.
Amongst the fascinating selection of development images Matt sent us to illustrate this feature, there were one or two which we felt required some explanation, for the benefit of us mere modelling mortals. The image below was entitled ‘Scan Curves’ and shows the scanned data from the Audley End Chipmunk, with a series of lines and curves drawn on top of it. These show how the scan data, albeit extremely accurate, is only used as a guide for the designer and is just one part (if quite a major one) of a models development story.
Matt supplied this image entitled ‘Scan Curves’ and shows how the scan data is used by the product designer in plotting all the surfacing work which will need to be completed
The skeleton model clearly resembles a Chipmunk and represents an important stage in any new tooling project. Tracing over the scan data, this shows where the designer has built up the overall shape of the subject in sections, joining all surfaces together and providing the foundation for the design CAD. This is the base point from where all the new kits individual parts can be designed and checked against the master shapes - all highly specialised work
The geometric lines placed on top of the scan are basically a framework of faceted data sections, areas where the designer will be chopping his design into sections and using this as a framework for the production of his tooling design. Tracing over the scan data, this will allow him to smooth out all the shapes, curves and surfaces, cleaning up all the scan information and allow him to work on the production of his skeleton model. Basically, this is the way a designer will interpret the scan data, knowing that what he is really looking to do is to use this information to help him produce files for the production of model kit tooling blocks. Even though these screen grabs are absolutely fascinating for modelling enthusiasts to look at, for the designer, this highly skilled work is just a collection of complex geometric plots. The design team may well be more impressed with a table of coordinates, but Workbench readers definitely prefer these interesting pictures.
This ‘Scan Detail Positioning’ image allows us to see all the detail areas of the Chipmunk’s wing Matt has plotted for his future design attentions
The image which shows the Chipmunk wing with a series of purple blocked protrusions on it is described as ‘Scan Detail Positioning’ and is just another extension of the process described above. This time, as well as showing the frame section overlay lines on the scanned wing section, this image shows where the designer is looking to clarify the scanned data information, tracing over the scan to plot where all the surface detail should be positioned. The unusual raised areas you can see on the screen grab mark all the positions of wing surface detail which the designer will have to work on when accurately representing things like fuel filler caps, bolts, rivets and hatches. This important work reassures him of accurate positioning, with all this information imported into the cad design software, where he can begin working on individual components. Highlighting why the design of a new model tooling can take so long, it is interesting to note that each and every one of the purple boxes and tubes you can see on the image are individual items of detail which will require the design engineers attention at some point in the future.
Any excuse to show a larger version of the magnificent artwork which will be gracing the box top of the first release from this magnificent new 1/48th scale tooling
When we modellers take delivery of our latest kit and excitedly open the box to inspect the contents within, we are usually swept along by the simple pleasures our hobby provides and rarely spare a thought for the poor designer who has just spent a year of their life slaving over this model, trying to ensure that we have an enjoyable experience when building it. In truth, that is probably the way it should be and if the designer responsible remains out of your thoughts, then chances are they have done a good job and you enjoy building their creation. Nevertheless, every now and then, it is interesting to see just how much skill and effort goes in to producing the kits we all love to make.
This next series of images show how Matt took the raw scan data of a Chipmunk wing and turned this into an important component in a kit many of us will be building a little later in the year. The first image shows just how detailed and accurate the scan data actually is and how nothing escapes the attention of the laser beam. You can make out the outline of the RAF roundel, the No Step marks placed outboard of the non-slip panels, in addition to accurately mapping the iconic shape of the aircraft’s wing. In actual fact, the scan arguably shows too much detail, with every fine contour and undulation recorded on the scan and if this were simply replicated as a wing kit part, we might expect to receive one or two complaints. This is where the designer has to take the scan data and use this as a basis for the production of his skeleton model, always referencing the original data, but converting it into a useable format for its intended use. Whilst retaining as much accurate detail as possible, this will after all be used to produce a highly technical tooling block, from which plastic model kit components will be manufactured.
Starting with the scan detail, this series of images are a fascinating visual walk through of how Matt designed the new Chipmunk’s wing, from the basic surfacing detail on the accurate profile of the wing, right through to how the new kit’s wing part will look. We think it would be fair to call this an extremely accurate representation, even at this early stage
The images above show some of the various stages of the wing’s design and how Matt took the basic shape and gradually built up the surface detail in stages. If you refer back to the ‘Scan Detail Positioning’ image and all those purple boxes, you can begin to see how Matt used all those individual positioning plots to locate the areas which were going to require further attention and how they are going to look on the finished model. It is still important to stress that these are all development images, but this Chipmunk wing design walk-through shows how Matt expertly replicated the rib structure and fabric covering surface detail, right through to the final image, where all the wing detail has been added. Knowing that each detail had to be designed separately, it is easy to see why our product designers become so familiar with the subjects they have worked on and how they must become quite attached to them.
The de Havilland Chipmunk is a magnificent little aeroplane and one which is definitely worthy of being inducted into the Airfix model kit hall of fame. With this year marking the 75th anniversary of the first flight of the prototype and the fact that the aircraft was used by the RAF, Royal Navy and Army Air Corps and is still being used by the Battle of Britain Memorial Flight, the availability of attractive scheme options for the aircraft is almost endless, not to mention the people who have gone on to operate the aircraft in a civilian capacity. We really hope that modellers are looking forward to spending a little quality workbench time with our 1/48th scale Chipmunk T.10 once it is released and are especially looking forward to seeing all the colourful and imaginative ways in which you will be finishing your model builds.
From a Workbench perspective, you can rest assured that we will be bringing you regular project updates as soon as they are available, as we chart the progress of a model which is sure to become a range favourite. For the time being, we would like to thank Matt for allowing us all to have a little insight into his Chipmunk design work and for sending us this fascinating selection of development images to show. As he has now been relieved of his Chipmunk duties, we wonder what he is working on now? All will be revealed in just under 12 months’ time!
An exclusive first look at built sample models featuring both of the impending new 1/35th scale Cruiser Mk.VIII A27M Cromwell Tank kits, due to arrive in our warehouse over the next few days
For the millions of people who are fascinated by the various armoured fighting vehicles which have roamed the world’s battlefields over the past 104 years, we all manage to find a real aesthetic appeal in these massive ‘ships of the land’, which are basically not much more than mobile lumps of metal, with a plethora of offensive armament. With each machine possessing its own unique list of impressive qualities, along with an equally long list of manufacturing/operational deficiencies, these powerful machines transformed the way ground warfare has been conducted over the past century, with the machines which contested the Second World War possessing an enduring fascination which shows absolutely no sign of abating. With the inspirational stories of the brave men who took these machines to war only serving to strengthen our interest, the shape, markings and colour schemes used on the world’s tank legion are as fascinating as they are sometimes confusing, however, in scale form, these metal monsters are irresistible to the modelling hobbyist.
With an impressive new selection of 1/35th scale military vehicles joining the Airfix kit range back at the start of 2019, the following year’s range announcement included news of a completely new tooling addition to this popular range and one which certainly seemed to appeal to many Workbench readers, as well as the wider modelling community. In fact, just like the actual tank on which the project was based, the new model would allow a number of variations of the same basic tank design to be modelled, a tank which would see its combat introduction in the Normandy countryside, following the successful Allied D-Day landings in June 1944, the British Cromwell cruiser tank. Marking the latest in a long line of Workbench exclusives for our readers, thanks to the prestigious modelling talents of our Product Designer Paramjit Sembhi, we can now bring you the first built models from this impressive new Cromwell kit, showcasing what we all have to look forward to in just a few weeks’ time - this Cromwell pair are already in our modelling sights.
This dramatic box artwork will announce the arrival of these two new additions to our 1/35th scale Military Vehicles range
Tracing its origins back to the early armoured skirmishes between British and German units at the start of WWII, the Cromwell was a development of the famous line of cruiser tanks which served the British Army with distinction throughout the Second World War. At first glance, you could be forgiven for dismissing the Cromwell as not possessing the same visual impact of many of the tanks in service around the time of the D-Day landings, specifically the German heavy panzers, but also arguably the Allied Churchill and Sherman Firefly, but in its own way, the story of this relatively small British tank is more interesting than all of its contemporaries. The Cromwell suffered from such a painfully protracted development that it was almost obsolete by the time it made its combat debut during the Battle of Normandy in the summer of 1944, however, the new tank possessed two essential qualities which would ensure its success - speed and reliability. Operated by brave and well trained crews, these extremely effective new tanks were available in large numbers as the Allies broke out of their Normandy beachheads and once in open country, their stealth and speed allowed them to really show the impressive fighting qualities of the Cromwell.
Understanding the lineage of Cromwell production and variant details is definitely a headache inducing process, with so many differences in engines, components, hull and turret designs to negotiate, in some cases, what appears to be a Cromwell may not actually be so. The most heavily produced version of the new Cruiser Tank Mk.VIII A27M, the Cromwell Mk.IV matched the Centaur hull with the highly effective Rolls Royce Meteor engine (A27Meteor), a development of the Merlin engine which famously powered the Spitfires and Hurricanes of the Battle of Britain to victory. This powerful and extremely reliable engine allowed the tank to travel at impressively high speeds, which is just as well, as in operation, these relatively lightly armed tanks would be required to get rather close to their targets, using stealth and speed to outflank them.
The tank also featured a quick firing 75mm gun, which was a re-bored version of the ubiquitous British 6 pounder gun and allowed the commander to have the option of using American produced armour piercing or high explosive rounds. Further underlining the strategic effectiveness of the tank, its turret could traverse through 360 degrees in just 15 seconds, thanks to the impressive hydraulic system it employed.
A1373 Scheme B - Cruiser Tank Mk.VIII, Cromwell Mk.IV, Northamptonshire Yeomanry, 11th Armoured Division, British Army, Europe, 1944/45
This first selection of images feature a fully completed model of the soon to be released A1373 Cruiser Tank Mk.VIII, Cromwell Mk.IV
During the savage fighting in the narrow hedgerow lined lanes of the Normandy battlefield, the excellent mobility of the Cromwell was somewhat nullified, even though its low profile would allow it to pass relatively unnoticed by watching German armour. When a situation required a Cromwell commander to move from the protection of the narrow lanes and into the surrounding fields, the initial climb up the steeply banked hedgerows could prove fatal. Exposing the lightly armoured lower hull of the vehicle during the manoeuvre, they were at risk of being destroyed by either an enemy tank, or by Wehrmacht infantry troops equipped with one of the plentiful Panzerfaust hand-held anti-tank weapons they were equipped with. An ingenious and rather simple solution to this problem was to attach a steel ‘hedge cutter’ blade to the front of the tank, which allowed the commander to scythe through the foliage obstacle, keeping his tank level and still able to bring his guns to bear on any potential target. This addition even provided some welcome natural foliage camouflage for the tank as it passed through the hedgerows, just so long as the trees and bushes it collected didn’t obstruct his gun aiming sights - if this did happen, it would require a crew member to leave the safety of his armoured chariot to clear it.
The armoured units of the Northamptonshire Yeomanry would also see heavy action following the Allied landings in Normandy, but as their role was to provide armoured support for infantry units engaged in combat, they would usually be deployed in smaller numbers and spread across several locations at the same time. A gunner from the Northamptonshire Yeomanry was thought to have been responsible for firing the shot which ended the fearsome reign of German Tiger tank commander Michael Wittmann on 8th August 1944, although he was assigned to an up-gunned Sherman Firefly at the time.
The majority of the 11th Armoured Division landed on Juno Beach on 13th June 1944, but would be thrust straight into the action, where they would be involved heavily with most of the British Second Army operations in northern France. They would continue fighting as the push moved to Belgium, Holland and eventually into Germany itself. It is interesting to note that like many other British Army tanks of the period, other than the single Allied star on the rear of its turret, this Cromwell has very little decoration or markings on its hull, other than its relatively inconspicuous unit markings.
A1374 Scheme A - Cruiser Tank Mk.VIII, Cromwell Mk.VI, 2nd Tank Battalion, 1st Czechoslovak Independent Brigade Group, British Army, Europe 1944/45
Even though the new British A27M Cromwell Tank would not make its combat introduction until the Allied invasion of Normandy in June 1944, the speed and mobility of this excellent new tank would soon earn it an enviable reputation amongst Allied troops, who came to rely on the support they provided. The majority of Cromwell Tanks were armed with the standard 75mm ROQF gun, however, the less numerous Mk.VI variant would provide specialist infantry close support with its 95mm Howitzer and were consequently never too far away from the action. Firing a high explosive hollow charge shell, the tank was used to overcome fortified positions, such as concrete bunkers and pillboxes which stood in the way of the infantry’s advance and could even lay smoke-screens if required.
With its distinctively short barrel, the Mk.VI also featured a large counterweight on its main armament, which was necessary in helping to balance the gun. Approximately 340 of these specialist tanks were eventually produced, which would prove to be extremely effective as Allied ground units pushed German forces back towards their homeland. Despite their impressive speed, the Cromwells were no match for the firepower of the German heavy tanks and would have to rely on speed and stealth for their battlefield survival.
An army unit made up of expatriate Czechoslovak troops equipped and under the command of the British Army, the 1st Czechoslovak Armoured Brigade landed in Normandy during August 1944 and would be handed the essential task of containing and weakening the beleaguered German garrison occupying the port town of Dunkirk. Allowing the Allies to concentrate on operations across wider Normandy without fear of a German breakout, the Czech unit would actually be involved in heavy fighting, as both sides repelled enemy advances, before launching their own counter offensives. The brigade were equipped mainly with Sherman and Cromwell tanks, including a number of the specialist Cromwell Mk.VI variants with their 95mm Mk.I Howitzers, tanks which were ideally suited to dislodging particularly stubborn areas of enemy troop resistance. A real asset to troops fighting these aggressive skirmishes, often at close quarters, the support nature of these tanks dictated that they would never be found too far from the action, with their legendary speed allowing them to confuse and outflank the enemy.
A final, slightly larger image of A1374 Cruiser Tank Mk.VIII, Cromwell Mk.VI, which not only showcase just how appealing the new model is, but just how fortunate we are to have Paramjit on the team to build (and sometimes design) them
Without doubt, the most impressive attributes of the Cromwell were within its hull, all of which endowed the tank with excellent battlefield performance. The powerful Meteor engine combined with the tried and trusted Christie suspension allowed the Cromwell to travel at speeds in excess of 40mph on roads and not much slower than this when operating cross-country. It also had a much lower profile than the Sherman and possessed an impressive turret traverse rate which outclassed most of its opponents on the battlefield – adopting a shoot and scoot approach to armoured engagements, the Cromwell was an effective addition to the Allied inventory, especially when they eventually had Wehrmacht units on the run.
This magnificent pair of newly tooled and highly detailed 1/35th scale A27M Cromwell Tanks are now due for imminent release, so for those who have pre-orders in place, you should be receiving your models during the next few days. For everyone else, all the information you need can be found on the respective product pages on the new Airfix website, A1373 Cruiser Tank Mk.VIII A27M Cromwell Mk.IV and A1374 Cruiser Tank Mk.VIII A27M Cromwell Mk.VI. The Airfix team are all looking forward to seeing your completed models.
Regular Workbench contributor Andreas Fey has been letting his modelling imagination run riot again, this time creating his own scale tribute to the famous 1969 Guy Hamilton directed film ‘Battle of Britain’
Although our product designers work incredibly hard to create accurate, appealing and enjoyable model kits for us to build, we are always fascinated to see what you, the modeller, manages to do with them. Building a model kit is something which should be an enjoyable experience for modellers of all ages and abilities and the thrill of this hobby can often be quite a personal thing, but having said that, there are also many times where we are simply left in awe at what some people are capable of. In some cases, it really does seem like we are giving you the modelling canvas to work on, then you go and show us what a real artist can do with it!
Over the course of the past few years, modeller Andreas Fey has been a regular contributor to our Workbench blog, sending us details of his latest impressive diorama build project, using a fascinating mix of new and classic Airfix kits as his subjects. With his photographic skills matching his modelling talent, these features have always proved incredibly popular with our readers and have provided plenty of modelling inspiration for us along the way, whilst at the same time leaving us wondering what he is going to do next. Well, we are delighted to say that he has been at it again and has kindly sent us another fantastic selection of images to share with our readers.
A little look behind the scenes of the latest diorama project created by Andreas
Last year marked the 80th anniversary of the Battle of Britain and Andreas decided that he would make his own modelling tribute to the occasion, but with something of a twist. He certainly intended to build a model diorama which featured Spitfires, however, he wanted to try and replicate a scene from the famous 1969 Guy Hamilton directed movie ‘Battle of Britain’. At the outset of the project, he had a mental picture of the scene from the film when Robert Shaw shouted to fellow pilots “Don’t just stand there, get one up!” and this famous quote proved to be his inspiration for the build.
Andreas informed us that he really did put a lot of thought and effort into this build, but that he is really please with how it turned out and looking at the pictures he sent us, it’s not difficult to see why. With regard to the Spitfire builds, he decided right from the start that he wanted to detail one of the model’s cockpits, enabling him to display the model with the canopy in the open position. This meant that he had to cut the clear plastic part into three pieces, retaining the front windscreen and replacing the rear sections with scratch built parts. This Spitfire also benefitted from the addition of some etched brass extra market parts and some careful painting of the cockpit area. The diorama also featured an Austin Tilly from the Airfix WWII RAF Vehicle Set, an airfield hut and trolley acc from Flightpath Kits and various other items rescued from the Aladdin’s cave of his spares box.
A fitting modelling tribute to a historic feature film, Andreas has created his own diorama masterpiece
We feel sure you will agree that the finished diorama is superb and shown off to great effect by Andreas’ renowned photographic skills. If ever we were in need of some early year modelling inspiration, we can always rely on Andreas to provide it. We are also pleased to report that he has given us an insight into his current project, which has a 1/72nd scale Hawker Typhoon as its main subject and we very much look forward to showcasing this build in a future edition of Workbench. For now though, we would like to thank Andreas for his latest build submission and to let him know that we owe him a pint in the Jackdaw Inn (you will have to watch the Battle of Britain film to get that one!). Once again, we are astounded by your modelling talents sir!
We are afraid that’s all we have for you in this latest edition of Workbench, which we sincerely hope included something which was of interest to you. We are delighted to confirm that our next edition is only a week away, as we attempt to catch up with our usual schedule, following our recent blog hiatus - It will be same time, same place next Friday for our latest selection of Airfix modelling updates and exclusives for your enjoyment. As always, if you have any suggestions for subjects you would like to see covered in a future edition, please do drop us a quick line, using this workbench@airfix.com link to contact us.
In between new editions of our blog, the Airfix conversation continues over on our Airfix Forum Workbench thread, with further discussions taking place on both the official Airfix Facebook page and the Airfix Twitter channel – please do get involved in the discussions and let us know what you think about Workbench.
Whenever you decide to visit, the Airfix website is always the place to be for all the latest model availability information, previous editions of our blog, a selection of modelling tips and much more.
The next edition of Workbench is scheduled to be published on Friday 12th February, when we will have more interesting features from the world of modelling.
As always, we are incredibly grateful for the support you continue to give our Airfix Workbench blog.