
Welcome to this latest edition of our Workbench blog and all the news, updates and modelling exclusives from the fascinating world of Airfix.
The subject of this latest Workbench update is the next release of our scale tribute to one of the most important aircraft in the history of British aviation, the most heavily produced bomber type to see RAF service and the aircraft with which Britain was able to strike back at the start of the Second World War, the Vickers Wellington. In a year which has seen the nation commemorate the 80th anniversary of the Dambusters raid, it seems somehow fitting that we head into winter and traditional modelling season by looking at an aircraft which owed much to the ingenuity of celebrated engineer and inventor Barnes Wallis, the man who was also behind the Dambusters 'Upkeep' mine. Adapting his geodetic construction method used on airships for the Wellington, this would endow the aircraft with great strength and combat survivability, whilst at the same time saving weight during construction.
As we look forward to what will only be the fourth release from a tooling first announced back in 2017, we will not only be discovering why the Wellington has been such a popular subject with modellers over the past sixty years of so, but also why the aircraft occupies such a significant position within the annals of British aviation history. From a Workbench perspective, we're delighted to announce that for the third time in the past few weeks, we also have an image exclusive to share, as we bring you a first look at the stunning new box artwork produced in support of the Wellington's latest release and as usual, our look at the scheme options we will be tempted by following the release of this new kit. One represents an early war Wellington which convinced Bomber Command to change to night operations, whilst the other is truly fascinating from a presentation perspective and one which might just turn out to be the most unusual bomber in many a built model collection, should we decide to go with that option.
As we enter the darker nights of winter, we can all look forward to spending some time with an RAF Bomber Command aviation classic in this weekend's edition of Workbench.
In addition to inspiring modellers all over the world, Airfix box artwork serves to preserve aviation history, whilst also marking the heroic exploits of the men who served in Bomber Command through our hobby. This artwork graced the box top of the first release from our new 1/72nd scale Vickers Wellington tooling back in 2018.
When it comes to the subject of famous British aircraft of the Second World War, and in particular, those which played a significant role during the early months of the conflict, it's probably true to say that most people rarely look past the Supermarine Spitfire, partly because of the role it played during the Battle of Britain, but also partly due to the iconic, almost mythical status the fighter has attracted over the years. Accepting the fact that the Spitfire should rightly be a major consideration, there are other types which were equally important to the British war effort, even though history usually consigns them to a less conspicuous, less celebrated position within the aviation annals, aircraft which could almost be described as unsung heroes.
One particularly significant aircraft which unquestionably falls into this category and another product of the Vickers design offices, the Vickers Wellington was the most important British bomber during the early stages of WWII and would go on to see service in a variety of roles and in several different theatres of operation before the end of the conflict. The Wellington can trace its origins back to an Air Ministry requirement for an advanced new twin engined medium daylight bomber issued in late 1932, one which featured rather ambiguous specification requirements, other than a strict limit on the overall weight of the aircraft. As the new aircraft was being developed at a time of great innovation within the world of aviation, with monoplane designs and powerful new engines leading aircraft development in an exciting new direction, this weight restriction was going to be the major challenge facing Vickers designers.
Within the Vickers design team at that time, accomplished engineer Barnes Wallis proposed that his geodetic method of construction would be perfect for the new bomber, as it was relatively light in weight, but would provide the aircraft with great strength. A construction technique brought across from the great airships of the 1920s, 'W' shaped beams of Duralumin were used to form a metal lattice-work construction onto which wooden battens were screwed, which allowed a doped fabric outer skin to be attached. The resultant fuselage was relatively light in weight but possessed great inherent strength, something the Wellington would become renowned for.
Wallis' geodetic frames were exhaustively tested by the Royal Aircraft Establishment and whilst a strength factor of six was required for aircraft construction, his structures exceeded a factor of eleven, without showing any signs of failure. Although hugely impressive, this would prove crucial during the design phase of the new bomber, as this strength allowed much heavier and more powerful engines to be used, once the Air Ministry agreed to overlook the ridiculous weight restriction included with the original requirements.
Design CAD imagery created using the design software during work on the new 1/72nd scale Vickers Wellington model tooling project.
Making its first flight on 15th June 1936, the aircraft which took to the skies over the Weybridge factory airfield on that day was very different to the ones which entered service with RAF No.9 Squadron two years later, with its sleek and cultured fuselage looking nothing like a warplane at that stage. Once the design had been perfected and the necessities of military service added, the new Wellington would look much more aggressive and was obviously significantly heavier than the prototype aircraft.
At the start of the Second World War, Britain's bomber force was still relatively modest and definitely still in transition, consisting of around 300 aircraft, made up of both light and medium bomber squadrons. Within this number, however, were eight squadrons of Wellingtons, unquestionably the most capable bomber aircraft available to Bomber Command at that time and the aircraft Britain would be needing to lead the line when it came to offensive operations against enemy forces in occupied Europe.
On 4th September 1939, the day after Britain declared war against Germany, 14 Wellingtons from No's 9 and 149 Squadrons joined a force of Bristol Blenheims in conducting the first RAF bombing raid of the war, as they attacked German warships at the mouth of the river Elbe, near the town of Brunsbüttel. During the attack, two Wellingtons would be lost to enemy fire, becoming the first British aircraft to be lost on the Western Front during the Second World War.
The Wellingtons of Bomber Command would go on to lead Britain's bombing onslaught against Germany, initially flying operations during daylight hours, but after it was discovered the bombers were effectively unable to defend themselves against concerted Luftwaffe fighter attack, would later switch to bombing operations by night. During these early operations, it soon became apparent that the geodetic construction used on the Wellington was one of its greatest attributes, light yet strong and able to withstand immense amounts of punishment. If bullets or shrapnel didn't pass right through the structure of the aircraft, more significant damage didn't cause structural failure and even if there were gaping holes in an aircraft, it managed to keep flying, bringing many a crew back home to safety. Many Wellington crews would owe their lives to the work of Barnes Wallis and his geodetic bomber design.
More Wellington CAD and computer rendered imagery which helps us to see how the Wellington may have been one of the RAF's most potent strike bombers at the start of the Second World War, but how it utilised many traditional aviation processes during its design and production.
Reading the recollections recorded by wartime Wellington crews, it does appear that the first flight in the bomber often proved to be a little disconcerting for many, but was again down to the geodetic construction method the aircraft utilised. Although light, incredibly tough and something they would soon come to rely on, the fuselage of a Wellington did possess the ability to flex slightly, something crews became aware of as the aircraft was taxiing toward the runway for their first flight. As the aircraft turn to following the perimeter track prior to take-off, it appeared as if the fuselage was snaking slightly as it followed the nose of the aircraft, however, this only proved worrisome on that first occasion.
In other instances, when a Wellington was being used in a glider towing capacity, this flexing was perhaps a little more noticeable, as the weight of the glider tended to cause some longitudinal flexing of the aircraft's geodetic structure.
The Wellington and its distinctive method of construction would go on to become the most heavily produced British bomber aircraft in history, serving from the first minute of the Second World War, right through to the last. Of the 11,461 Wellingtons produced, the final one to leave the factory would do so on 13th October 1945, with the last training variant of the aircraft only being withdrawn from RAF service in 1953.
As an attempt to satisfy a demanding, if rather ambiguous RAF requirement for a modern medium bomber back in 1932, the Vickers Wellington would go on to make quite a name for itself in aviation history terms.
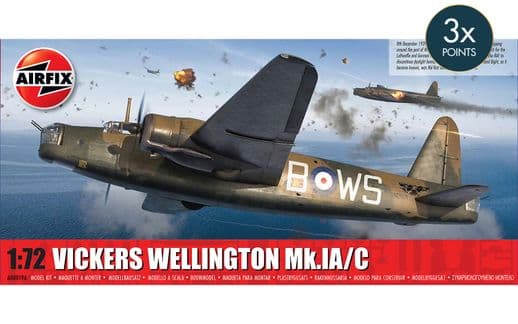
Our latest Workbench exclusive, this stunning new box artwork depicts one of the RAF Wellingtons which took part in the disastrous Battle of Heligoland Bight in December 1939 and the lead scheme option of two included with this latest Wellington kit release.
As one of the most famous British aircraft types of the Second World War and one of the larger aircraft types replicated in 1/72nd scale, the Vickers Wellington has long been a favourite subject across the modelling world and one which surely must qualify for classic kit status when it comes to the Airfix range. First appearing back in 1959, the original Airfix Wellington tooling was a real triumph for the Airfix design team, who could hardly have imagined just how iconic this model would become when they signed the tooling off prior to its first production run.
Since that date, tens of thousands of modellers have lavished many happy hours of time and attention on building Airfix Wellingtons, having no doubt being inspired by the magnificent artwork of Roy Cross from the 1970s onwards. The adoption of his captivating depiction of a Wellington bomber limping home low over the sea with a feathered propeller and smoking port engine, still suffering the attentions of a pair of attacking Messerschmitts as box artwork will be familiar to so many Workbench readers and was probably responsible for setting many of us off on our own modelling journeys, or at least reaffirming our commitment to the hobby.
Without question, that original Wellington kit has to be considered amongst the most significant in the entire legacy Airfix range and certainly built into an interesting and eye catching model for our built kit collections. Having served the range faithfully for well over half a century, the enduring popularity of the Wellington almost demanded it should be the subject of a new model tooling project, particularly as it always appeared prominently on any modeller poll of subjects people would like to see added to a future Airfix kit range.
Although the Wellington was always on the radar of respective Airfix development teams over the years, the decision to finally give the project the green light was only taken in 2016, with Workbench readers learning about the new Wellington project the following year, however, since its initial release, the new kit has continued the success story of Britain's famous WWII bomber in Airfix scale model kit form.
The inclusion of the Vickers Wellington in the current Airfix range marks just the fourth appearance of this newly tooled example of the aircraft, but is definitely something worth celebrating. With two really interesting scheme options to look forward to a little later in the year, let's take a closer look at why this next release from the Wellington tooling is destined to be just as popular, if not more so, than the three which preceded it.
During the early stages of the Second World War, a restructuring Bomber Command could call on the services of 23 operational squadrons, but just 280 aircraft with which to demonstrate British fighting resolve in the face of German aggression across Europe, even though they still had to develop effective tactics on how to achieve this. Early raids had proved relatively ineffective and crews were under strict instructions at that time not to launch attacks against any targets where civilian casualties may be inflicted, no matter how tempting the target.
It was under these conditions that a significant raid was attempted on 18th December 1939, an armed reconnaissance mission against German naval targets in the Heligoland Bight/Wilhelmshaven area, attacking and sinking any enemy warships they encountered. The raid would consist of 24 Vickers Wellington bombers from three squadrons, nine aircraft from No.9 Squadron, six from No.37 Squadron and nine from No.149 Squadron, with all aircraft taking off from their respective bases at around 09.00hrs to form up over the North Sea. Two aircraft developed technical problems and returned to their bases quite soon after take-off, leaving 22 Wellingtons to carry out the mission.
Whist the Wellingtons were forming up over the North Sea, German ground controllers were watching their every move on the latest variant of their Freya early warning radar equipment and immediately passed details on to Luftwaffe fighter units in the area. Although the British bombers didn't manage to spot any German vessels in the open ocean, they could clearly see several large warships in the vicinity of Wilhelmshaven itself, however, the strict rules of engagement by which they were bound and the risk of civilian casualties prevented them from launching an attack.
This didn't prevent the aircraft from coming under fire from both Wilhelmshaven's impressive anti-aircraft defences and indeed the guns of the warships in harbour and by the time the aircraft turned for home, many had already suffered damage, with the onslaught resulting in the formation becoming separated.
Full scheme details of this lead scheme option, the Wellington which sustained heavy combat damage during the Battle of Heligoland Bight and was forced to make an emergency landing at RAF North Cotes.
Unfortunately for the Wellington crews, things were about to get much worse for them. A significant Luftwaffe fighter force of around 45 aircraft, a mixture of Messerschmitt Bf 109 and Bf 110 fighters soon pounced on the British bombers, subjecting them to repeated attacks over the next few minutes and by the time they disengaged, they had left a scene of utter devastation behind them. Ten of the Wellingtons had been shot down and two more would be forced to ditch into the sea within minutes, their fuel tanks ruptured by machine gun and cannon fire. Of the ten aircraft which did manage to make it back to Britain, many were so badly damaged that they had to put down at the first airfield they came across and would not be available for operations for weeks to come.
The raid itself was a complete disaster for Bomber Command and particularly costly in terms of both crew casualties and the number of aircraft lost. Of the 22 Wellingtons which headed out over the North Sea, ten were shot down, two ditched in the sea and a further three crash landed once back over British soil, with 57 airmen losing their lives and a further five becoming POWs. German causalities were two Messerschmitt Bf 109s lost, but no damage of any significance to any of the warships sighted during these actions.
As a result of this sobering 68% loss rate, Bomber Command initiated a complete change in their attack tactics, accepting that their bombers were clearly unable to defend themselves against enemy fighter attack by daylight, therefore switching their bombing raids to night-time operations. In addition to this, their Wellington bombers were given improved armour protection, more defensive firepower and self-sealing fuel tanks, all increasing the survivability of the aircraft, but further increasing their overall weight in the process.
The new Wellington kit includes lots of internal detail and the ability to see the aircraft's geodetic method of construction represented extensively throughout the kit.
Vickers Wellington N2871 was one of the nine RAF No.9 Squadron bombers which took part in this heroic, yet ultimately disastrous raid against surface vessels at Wilhelmshaven. Already damaged by anti-aircraft fire over the target area, the bomber's crew fought valiantly against the incessant Luftwaffe fighter attacks they were subjected to over a frantic period of around 20 minutes and unable to make it back to their home base at RAF Honington, would make a successful landing at RAF North Cotes.
Once the aircraft was on the ground, personnel at the airfield must have been amazed at the level of damage this aircraft had suffered, yet continued to fly on, bringing its airmen home to fight another day. Several photographs exist which show this aircraft having landed at North Cotes, with significant damage evident to both wings and the fuselage, with large sections of the aircraft's structure exposed. Although serving as sobering evidence of the onslaught those Wellington crews were forced to endure during the Battle of Heligoland Bight, they also underline the effectiveness of the Wellington's geodetic construction and specifically, just how much punishment this ingenious structure was able to withstand.
If you have been looking to add a Bomber Command model to your collection that will stand out from all others, we think this latest Wellington release might just have the scheme for you.
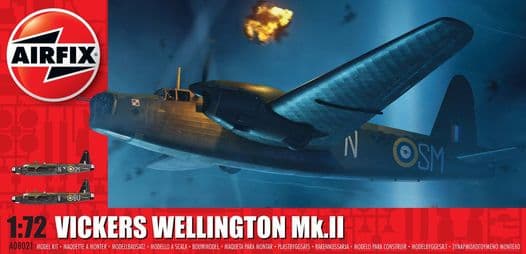
At around 18.06 hrs on 6th February 1941, Vickers Wellington Mk.IC L7842 took off from RAF East Wretham along with five other bombers, all destined to take their place amongst a larger force of 25 Wellingtons sent to attack harbour infrastructure around the French port of Boulogne-sur-Mer. The aircraft was from No.311 Squadron, a Royal Air Force unit manned by Czech nationals and in fact, the only Czech manner medium/heavy bomber unit within the RAF during the Second World War.
Many of the men making up this unit had been trained in their homeland, but fled following the German occupation of Czechoslovakia, making their way through Europe, to continue fighting with either the French Army of Air Force. Following the defeat of France, they were again on the move, this time arriving in Britain, but still determined to fight on. Czech crews would subsequently fight valiantly as part of the Royal Air Force for the remainder of the war, with official figures showing that 511 men would pay the ultimate price for their devotion to duty, with a sobering 53 percent of this figure lost whilst serving with No.311 Squadron.
The bombers sent to attack Boulogne would do so successfully, with the loss of just a single Wellington on the way to the target, however for L7842 and her crew, the return flight would prove to be rather eventful for them. It was reported that the bomber's navigator on that raid was making his first combat sortie and suffered with terrible altitude sickness, so much so that he was unable to perform his duties. Unable to plot their position and therefore chart a course home, the radio operator attempted to provide the pilot with a fix, but discovered that his equipment was malfunctioning.
It was left to the pilot to find out where they were, but with fuel now running low and the weather deteriorating, the situation was becoming desperate. The navigator did recover enough to tell his crewmates that they were heading in the wrong direction, but by that time, there was little hope of making it all the way back to Britain.
In what must have been a frantic situation for all concerned, what followed next is the subject of some conjecture, but ended with the same outcome. Some reports claim that the aircraft had been hit during the raid and as a result, made a forced landing near Flers in Normandy, with the crew all being taken prisoner. Other reports state that having been completely disorientated and thinking he was now over Britain, the pilot landed at the first airfield he saw, which unfortunately happened to be the German occupied airfield at Flers.
Such a fascinating scheme - To some, it might seem wrong to put German markings in an RAF bomber, but the story behind this scheme is just so engaging. If you’re looking for a Wellington scheme which will invite further questioning when it takes its place in your model displays, this is unquestionably it!
On landing, the crew noticed German aircraft parts and spares around the dispersal areas, and once this was brought to the attention of the pilot, he attempted to manoeuvre the aircraft for take-off. Unfortunately, the heavy bomber became stuck in the waterlogged ground and it wasn't long before armed German troops arrived on the scene to take control of the situation. The crew were taken prisoner and the Wellington impounded, but not before they had managed to destroy navigational equipment and sensitive documents.
For the Germans, the capture of a serviceable British bomber was quite a coup and news of their good fortune was immediately relayed to their high command. As you might well imagine, this proved to be quite the development and was relatively well documented at the time, allowing us to chart the transformation of this Wellington from Bomber Command aircraft, to one pressed into Luftwaffe service.
Initially, the aircraft's change of ownership had to be clearly displayed, so all RAF markings were removed and replaced by oversized German insignia, even though the bomber's original squadron codes were retained. As the aircraft was deemed to be in a condition to allow it to be made airworthy and therefore available to be evaluated by the specialist Erprobungsstelle at Rechlin-Lärz airfield, it was later given the distinctive yellow undersides applied to all Allied aircraft flown by this unit. As an aircraft type not usually flown by German pilots, locally based flak units around the test centre had been instructed not to fire on any aircraft painted in this way, even if it was clearly an enemy aircraft.
Once captured enemy aircraft had been evaluated by the specialists at Rechlin-Lärz, they were often transferred to the care of Theodore Rosarius and his famous enemy aircraft flight, a unit which became unofficially known as ‘Zirkus Rosarius’ or ‘Wanderzirkus Rosarius’. This special test unit not only evaluated the strengths and weaknesses of captured Allied aircraft, but also toured Luftwaffe fighter stations around occupied Europe, allowing pilots the opportunity to closely inspect their enemy’s latest aircraft and to discuss tactics on how best to defeat them in combat.
Such a stunning kit, it's no wonder our new 1/72nd Vickers Wellington tooling is widely regarded as one of the finest models in the entire Airfix range.
The airfield touring nature of the unit is clearly reflected in the unofficial title it gained amongst Luftwaffe personnel and for any airfield expecting the arrival of the ‘Wanderzirkus’ it must have been a time of great excitement for both pilots and their ground crews alike.
From the photographic evidence available, it does seem as if the second account of how the Wellington fell into German hands is the most plausible one, because if the bomber had suffered a heavy forced landing, how would the Germans have managed to dismantle it and take it to a suitable airfield? In addition to this, would they have had access to the replacement engines, propellers and panelling they would surely have needed to make the Wellington airworthy? Pictures of the aircraft with German personnel inspecting it show it complete with its RAF markings and with no visible signs of damage and significantly, with the distinctive propellers intact and undamaged. Crucially, these images were taken prior to any German markings having been applied to the aircraft.
Subsequent images show the aircraft at various stages of its presentation conversion from RAF bomber to the aircraft evaluated by the Luftwaffe at Rechlin-Lärz, with the final images showing it wearing the distinctive yellow undersides which were intended to protect it from friendly fire incidents. In none of these images does the aircraft exhibit any noticeable damage or missing panels, again further pointing to the second account of how it fell into German hands being the most likely.
Unfortunately, its flight evaluation use by the Luftwaffe does not appear to have been documented quite so well, so it's not known how many times, or for how long the Wellington was flown in these distinctive markings. As the war became more desperate for the Germans and with spare parts to allow an enemy Wellington bomber to be maintained in an airworthy condition clearly being a sizeable problem, the aircraft was most likely scrapped, as there will have been little to gain by holding it as a war prize.
Nevertheless, doesn't this make for a most interesting representation of a wartime Wellington bomber, one which was forced to wear the wolf's clothing.
Down for Double! A final look at the box presentation of the soon to be fourth release from the still relatively new 1/72nd scale Vickers Wellington tooling, first in current Airfix branding form, then in full box artwork layout.
This fantastic new Vickers Wellington kit release is currently scheduled to be available towards the end of the year, but with both scheme options having such engaging stories behind them, we can't think of a better way in which to embark on a new year of modelling enjoyment.
We are afraid that's all we have for you in this latest edition, but we will be back next Friday with more project development updates and the very latest Airfix kit exclusives. In the meantime, we are always keen to hear your views on all things Airfix and in particular, any thoughts and opinions you may have regarding our Workbench blog. If you would like to drop us a quick line, could we please ask that you use our workbench@airfix.com email for all correspondence.
To re-visit any of the Airfix blogs we have produced over the past seven years or so, please head to our main Workbench hub, where you will find our entire blog back catalogue and all the Airfix design projects we have already covered.
All our dedicated official social media sites can be accessed by clicking the respective link icons at the foot of this page, or by heading to the Airfix homepage. Other useful Airfix links are:
Facebook, YouTube, Twitter and Instagram official sites
Please join us for more Airfix updates next week and thank you for your continued support.