
We are pleased to be bringing you this latest edition of our Workbench blog and all the news, updates and modelling exclusives from the fascinating world of Airfix.
Yesterday marked the 103rd anniversary of the establishment of the Royal Air Force and whilst the current national situation dictates that we are all unable to celebrate this momentous occasion gathered together on some airfield, we can, however, mark it from an Airfix perspective in the best way we know how - by bringing you details from several new model tooling projects. We will be starting this latest edition by featuring details from the last remaining new aircraft tooling announced from the 2021 model range, speaking with the model’s designer and thanks to him, also including a spectacular selection of exclusive imagery for your delectation. We will be following this up with another exclusive, this time featuring a modified tooling addition to the 2021 kit range and one which will allow modellers to produce the Rolls Royce Merlin engined version of the famous Vickers Wellington bomber.
Staying with the Wellington for our next feature, we have been fortunate enough to be sent a spectacular selection of images by one of our ultra-talented readers, who decided to do something a little different with our Wellington kit, resulting in a build presentation the like of which you have probably never seen before. Finally, we end with a final pre-release update from the latest kit to join our popular Quickbuild range, a beautifully produced representation of the RAF’s most capable strike jet aircraft, one which has been making procurement headlines over the past week or so.
As we will be featuring one of the RAF’s most potent piston engined fighters to ever enter service, one of their most important bombers from the Second World War and their very latest Fifth Generation jet fighter within this edition, we are certainly doing our best to commemorate the force’s 103rd birthday, even if it is just in a scale modelling sense. Clear props, let’s get going!
The unmistakable profile of one of the RAF’s most potent piston engined fighters, the superlative Hawker Tempest V
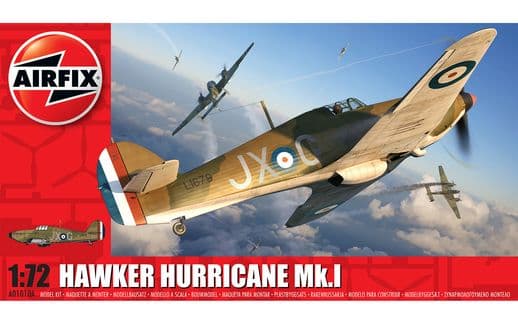
In the period which encompassed the late 1920s right through to the early 1950s, it is difficult to think of a more influential British aircraft company than Hawker Aircraft Limited, a company which was responsible for such aviation classics as the Fury, the Hunter and of course, the magnificent Hurricane. Although history has judged that the Hurricane must always be kept in the shadow of its more famous (and some might say more glamorous) fighting hangar-mate from the Battle of Britain, this does not truly reflect the historic importance of the Hurricane and how this aircraft not only pointed towards the future of British aviation, but in the nations darkest hour of need, proved to be our airborne saviour.
The Hawker Hurricane began life as a proposed development of the cultured Fury biplane fighter, originally referred to as the Fury Monoplane, then later when redesigned to utilise the powerful new Rolls Royce Merlin engine, the Interceptor Monoplane. Effectively developed as an extremely costly private venture, at a time when the Air Ministry were in a period of consolidation and were in no mood to pursue ground-breaking new aviation projects, the new fighter was intended to be a marriage of existing construction techniques, but utilising the very latest technology. In essence, what Hawker’s were attempting to produce was the worlds best ‘all round’ fighter, an aircraft which would succeed on many levels, from performance and ease of maintenance, to adaptability and problem free pilot conversion. What they managed to create was an aviation classic, the Hawker Hurricane - an aircraft which would prove to be the right aircraft at the right time.
Once the Air Ministry saw what Hawker’s had managed to produce and with war clouds gathering ominously on the continent, they immediately placed a large order for the Hurricane fighter, which would go on to have many ‘firsts’ to its name. Incorporating such innovative design features as retractable undercarriage, the Hurricane was the RAF’s first modern monoplane fighter, was the first RAF aircraft capable of exceeding 300 mph and was the first fighter to be equipped with eight machine guns. With more Hurricanes in squadron service at the time of the Battle of Britain, Hurricane pilots serving during that time described their aircraft as the one which actually won the battle, ably assisted by the Spitfire and not the other way around. Indeed, the Hurricane accounted for over 60% of all victories over enemy aircraft during the Battle of Britain.
For an aircraft which possessed such impressive credentials as these, it was obvious that the design team at Hawkers almost immediately began giving thought to the Hurricane’s replacement, an aircraft which their Chief Designer Sydney Camm colloquially dubbed his ‘Super Hurricane’. The road to developing the ‘Super Hurricane’ would eventually bear aviation fruit, however, this would actually prove to be a relatively long and arduous journey and would not finally be realised until the introduction of the Hawker Tempest in early 1944, an aircraft which owed much to lessons learned during the development of its immediate predecessor.
The original intended fighter replacement for the Hawker Hurricane was the Typhoon, an aircraft which attempted to combine the most powerful piston engine available at that time with a small, yet robust and heavily armed airframe. Although intended as an interceptor fighter, it quickly became apparent during development that the new aircraft would not be able to fulfil this role effectively, as the thickness of the wing was not conducive to high performance at higher altitudes. In fact, the Typhoon would have to endure quite a troubled development and service introduction, to the point where cancellation of the entire programme was seriously considered at one time. Nevertheless, the Typhoon would eventually go on to find its aviation niche as a hard-hitting ground attack aircraft and one which would come into its own during preparations for the Allied invasion of Normandy.
A computer rendered image produced using the new 1/72nd scale Hawker Tempest V CAD design files. By the time the Tempest entered RAF service, the Luftwaffe were simply not deploying their aircraft in anything like the strength of earlier years and this potential mount of aces simply had less targets
Aware that their Typhoon had huge potential but was in need of significant improvement, the Hawker design team started work on a new fighter project, one which incorporated many of the same ideas used on the Typhoon, but also, several significant modifications and improvements. Indeed, the new aircraft was initially referred to as the Typhoon Mark II, but this was later changed to Tempest as the prototype aircraft neared the date of its first flight. Although this was still an impressively large aeroplane for a single engined fighter, its airframe was light and it would be partnered with the massively powerful 24 cylinder Napier Sabre engine, a powerplant which would give the new fighter spectacular performance. Making its first flight on 2nd September 1942, the new Hawker Tempest featured a newly designed laminar flow wing, which was much thinner than the wing used on its predecessor and allowed the new fighter to slip through the air at incredible speed - Hawker finally had their super interceptor.
At first glance, the Typhoon and Tempest do share many similarities, however, if you know where to look, it is not that difficult to tell them apart. Without doubt, the wing is the most obvious distinguishing feature between the two, as not only is the Tempest’s wing much thinner than the one employed on the Typhoon, but it is also a completely different shape. With a straighter leading edge and more elliptical trailing edge, the Tempest’s wing was designed for speed, even though the aircraft could still be used effectively in a ground attack role, something which would become increasingly important as the Luftwaffe’s ability to fight began to decline steadily from around the time of D-Day. Other Tempest design differences included a slightly longer nose and a tail section which appears to be significantly larger than on the Typhoon and a more generous vertical stabiliser which features a pronounced dorsal fillet. During the prototype aircraft’s maiden flight, the Tempest posted an impressive top speed of 477 mph in level flight, to the delight of both the design team and the watching Air Ministry officials.
After recently working on two classic early jet kits, Tom was very much looking forward to getting stuck into this potent WWII piston engined fighter
One of the real pleasures in producing almost six years of Workbench blogs is to have the honour of bringing all the very latest Airfix exclusives to our ever-growing readership and to further the enjoyment of this fantastic hobby of ours. The undoubted stars of our blog are the small, yet incredibly talented team of Product Designers we are lucky to have with us here at Airfix, people who not only spend long hours producing the latest model kits which continue to enhance the Airfix range, but who also regularly give up their time to talk us through the development of their latest modelling masterpiece, something our readers are always interested to hear about.
In this latest feature, our designer Tom is once again taking centre stage and from a blog perspective, it has been quite humbling to see how he and our other young designers have quickly grown into this rather unique role and now have impressive lists of Airfix projects to their names. It is also interesting to see how despite the fact that the team are basically doing the same kind of work and are generous in sharing the knowledge they gain with fellow members of the team, they are also very different characters and during these fascinating design review features, we are allowed a little insight into their world. As Tom has already helped us with several previous articles of this kind, readers have become accustomed to learning one or two little Tomisms, little entertaining quotes and sayings which just seem to come out of nowhere, but are guaranteed to raise a smile. We are pleased to say that when we spoke to him earlier this week, he was very much on form and whilst we will be hearing about details of his latest Airfix design project, we will also benefit from a couple of his pearls of wisdom into the bargain. Without any further ado, its over to Tom and his new Hawker Tempest.
Our first question to Tom centred around the subject matter he has recently been working on. ‘As your previous two projects have been classic early jets in the larger 1/48th scale, was it a bit of a culture shock coming back to a prop design in 1/72nd scale?’
Tom told us that when he heard that his next project was going to be designing a new kit of the Hawker Tempest in 1/72nd scale, he was actually quite excited. Of course, he does have some prop design experience already behind him, as his very first full project at Airfix was to design the hugely successful de Havilland Tiger Moth in 1/48th scale, but since then, he has gone on to design the MiG 17F, a Sherman Firefly, the Canadair Sabre and the Vampire. It really didn’t take too long for the first Tomism to come out, as he described how he didn’t want to get ‘stuck in jet land’, so working on the Tempest would be an enjoyable subject brake for him. In any case, he was keen to get started on the Tempest because it was such a cool looking aircraft and he knew the project would once again give him the opportunity to challenge himself.
With this latest project taking him back to 1/72nd scale for only the third time in his Airfix career, we were interested to find out if at the outset of the project, he thought it would be a little easier than some of the more recent kit designs he had been working on. As quick as a flash, Tom replied by saying that whilst he thought the Tempest may not take him quite as long to complete as either of the 1/48th scale jets he had just done, how this was a blank sheet of paper in terms of a design challenge and another opportunity to stretch himself professionally and to further hone his skills. Significantly, with his existing knowledge of the aircraft, he already knew that there would be some real areas of design complexity which would have to be negotiated, particularly around the rather distinctive air filter at the front of the aircraft, the different gun configurations the aircraft flew with and the usual research issues which are common to this type of work. Nevertheless, in Tom’s words, ‘The Tempest just looks wicked’ and he wanted to see just how much detail he could include in his new design.
From a timing perspective, it was interesting to learn that the Canadair Sabre took Tom around six months to complete, with the Vampire taking slightly less time at just under five months. With it being in the smaller 1/72nd scale and with Tom gaining in experience with each new project completed, work on the Tempest took him around four months of hard graft!
From a research perspective, was the Tempest project a case of scan or no scan?
Tom told us that as far as his design career is concerned, he will never forget the Hawker Tempest for one specific reason - this was the first project he started during lockdown. With all the previous projects he has undertaken, he had the opportunity to inspect a preserved example of the subject aircraft/vehicle, where he could look for any areas which might cause him problems when scaling it down and designing a model kit representation of it and crucially, to take his own selection of detailed photographs to help him during the design phase. The national lockdown dictated that in the case of the Tempest, he would not be allowed this opportunity and at the outset of the project, Tom did admit to having some trepidation about the fact.
Thankfully, as with all the new tooling projects scheduled to be undertaken by Airfix, much of the research preparation work is completed well in advance of the designer receiving his brief and in the case of the Hawker Tempest, Tom not only had the benefit of accurate scan data to call upon, but also an incredible amount of additional research material he could access, including a selection of detailed images taken by our Lead Researcher on the day the scanning operation took place. Using a preserved aircraft currently on display in a UK Museum (or it will be once the museum is open to the public once more), the only deviation Tom reported from that of a project started under normal conditions was the fact that he spent a little more time in preparation, before actually starting the design phase of the Hawker Tempest project.
At the outset of the project, Tom had the benefit of accurate scan data to work with, even though he didn’t have the opportunity to inspect a preserved example of the aircraft in person
A rather unusual ‘Rendered’ version of the Tempest scan data
With you working on some quite complex designs of late, would you describe the Tempest project as being a little less demanding?
In Tom’s opinion, one of the most important things he tries to avoid as a designer is to unnecessarily overcomplicate things, something which he is particularly aware of when working in smaller scales. As a designer gains more experience in this type of work and the tools and processes at his disposal continue to advance, you could find yourself falling into the trap of making your design extremely accurate, with lots of fine detail and small, separate parts, but inadvertently creating construction headaches for the people who the product is intended for. The constant trade off is to make everything look as realistic as possible, incorporating lots of fine detail, whilst at the same time ensuring that the build experience is an enjoyable one. It is always something of a trade off, however, putting yourself in the position of the modeller building the kit will always reap huge dividends in the long run.
To illustrate this point, Tom described how current technology will allow him to incorporate lots of fine detail, even at this smaller scale and in areas of the design such as the undercarriage bays, he could go to town on creating lots of individual parts to beautifully recreate to aircraft on which his design is based. This can actually be achieved in one of two ways, either by creating a series of separate, smaller parts, which will all have to be constructed in sequence and by closely following the instruction booklet, or alternatively, to design these details as part of a detailed, single moulded piece covering the same section of the aircraft. By following the first mindset, you will have lots of individual parts which will definitely make things more challenging for our illustrator, whilst at the same time making the kit more difficult to build and quite possibly a less enjoyable experience for the modeller. By adopting the alternative approach, it still gives the designer the opportunity to excel and innovate, however, it will definitely translate into a more pleasurable build experience for the modeller.
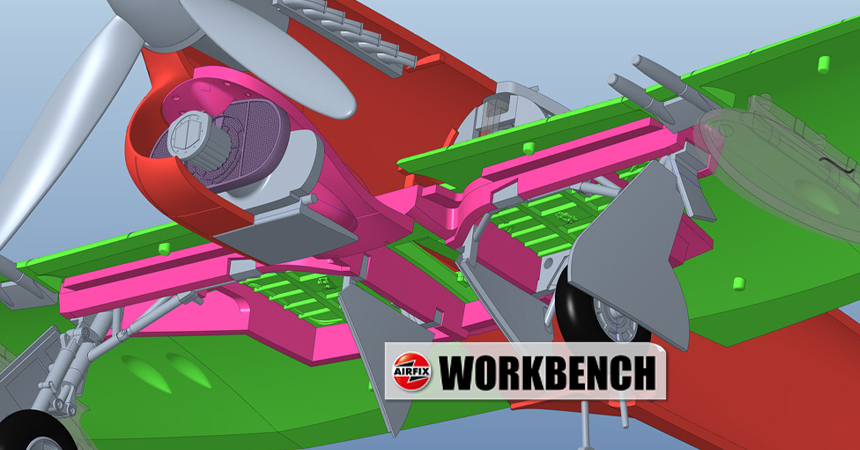
A CAD screengrab from the Tempest project, showing the cockpit design and how it fits to the centre of the upper wing structure, something Tom was rather pleased with
Crucially, even though this clever design solution will reduce the overall part count of the kit, the larger component will still feature all the detail the designer wants to include, but will definitely make it a more enjoyable build experience once it arrives on modeller’s workstations. By nature, it will also help to provide the new kit with greater rigidity, something which once again is of real importance to the modeller and is therefore a significant design consideration. Elements of the Tempest’s design which Tom was particularly pleased with include the undercarriage and the wings, which were designed in such away to endow the model with strength and rigidity, whilst at the same time removing the need to build a cockpit section in the traditional manner - the centre of the single piece top wing actually serves as the base for the cockpit construction. It’s time for another Tomism here, as he came out with a cracker at this point! He said, in his own inimitable manner and with more than a hint of sarcasm, “Looking back at this part of the Tempest’s design, I was bloody clever!” Is it any wonder we love doing stuff like this with him?
Our next question was linked to the fact that our blog has been running longer than Tom has actually been with the company. As you continue to develop your skills as a designer, is there anything you did differently on this project as a result of your previous experience?
The delivery of this question was followed by a moments silence, as Tom was clearly contemplating his response. He said that with each new project he embarks on, it is important that you try to learn from all the experiences you now have under your belt and to bring this knowledge to bear for the benefit of the modeller. There is no secret formula to this, just to try and incorporate all the skills you have learned so far at every available opportunity and from his perspective, there is never an occasion where you can allow yourself to slip into auto-pilot. As far as he is concerned, the most tangible benefit of ever greater experience is that projects start taking just that little bit less time to complete, as you become much more aware of potential problems before you actually encounter them. This is definitely the case when it comes to the production of your skeleton model - at first, you put such a lot of effort into producing this, as it is the bedrock of every new design project. Unfortunately, when it comes to this, not everything that looks right will end up being right and previous pitfalls can prove to be quite a steep learning curve, but ones which usually only catch you out the once. Any design area which has fought you during a previous project will not catch you out again, but it has to be said that you are always learning and there are usually several different ways to achieve the same end goal - greater experience just teaches you the most appropriate path to take.
An extremely aggressive looking aeroplane, the Tempest must have been what designer Sydney Camm had envisaged when he started working on his ‘Super Hurricane’
It was also interesting to note that Tom told us how all the designers spend quite a lot of their spare time reading modeller’s comments and kit reviews relating not only to the kits they individually designed, but from a more generic Airfix point of view. Each member of the team knows that their efforts are always aimed at producing a faithfully accurate scale representation of the aircraft, tank or vehicle they are assigned, but in plastic kit form, with the modeller dictating whether they have been successful or not. No matter how pleased with their overall design they might be, hearing what modellers of all abilities think about their kit is of huge importance to them and even though it is always nice to receive complimentary comments, constructive criticism can be incredibly valuable to a designer and may well benefit the entire hobby from that point forwards. When it comes to the market place, all designers will take notice of such comments and where appropriate, look to make little improvements in each new design they embark upon.
With the Tempest appearing to be a relatively simple design, did this project allow you any opportunity to innovate?
Tom told us that the Tempest gave him plenty of opportunity to innovate and not just with regard to the detail he was able to incorporate into his design. In addition to work he wanted to do around the previously mentioned undercarriage design and wing rigidity, one aspect of every model’s design which frustrates him a little is how clear parts can often cause the modeller some frustrations. In his words, “Clear parts and glue can often get messy!” This was definitely one aera of the design where Tom wanted to try and innovate, taking what can traditionally be a modelling frustration and turning it into a real design positive. With these parts being such an integral and highly visible aspect of every model build, he used all his previous experience to design these parts in such a way as to negate the possibility of construction resulting in glue marks blighting the build and modellers becoming frustrated.
A very clean design, the Tempest was designed with two things in mind, to be fast and to dominate the skies - it excelled in both regards
For the main cockpit canopy, Tom designed the kit in such a way that it can be fitted as to hide any possible glue marks, by splitting the parts in a slightly different way. This was also how he approached the gunsight and compass construction, making this a single piece component and hiding the joint within the instrument cluster, thus greatly reducing the possibility of glue mess. In summary, there were plenty of opportunities to innovate on the design of the Tempest, just as you might expect, but with the inclusion of appealing levels of detail now coming as standard with new Airfix kit designs, it was how Tom managed to split the individual components within the design which pleased him the most.
Did any part of the Tempest’s design create any particular challenges for you and what do you think modellers will be most impressed with when they can build the kit later in the year?
On the subject of challenges, as he now has quite a number of completed projects to his name, Tom described how in his opinion, you challenge yourself, rather than the project challenging you. Perhaps with greater experience comes the confidence to envisage what the modeller might hope for when building the kit in the months ahead, therefore influencing some of the design decisions you make along the way. Of course, as is the case with every new project, having a clear understanding of the research files and the design brief is critical, knowing which parts were used on the version of aircraft you will be designing and any future development the kit will have to incorporate. Of particular note on the Tempest project was the fact that early machines utilised many components from its predecessor, the Typhoon, whilst he also had to get his head around things like air intakes, props, spinners and machine gun positions. You have to be clear on all these details before you can even begin designing the kit, which as we have seen many times previously, possesses its own set of very specific challenges.
This CAD screenshot shows how Tom designed the undercarriage components with the modeller in mind, retaining lots of fine detail, but getting rid of fiddly, individual parts. This design also gives the model great strength
On the subject of things he hopes modellers will appreciate when building the Tempest, in addition to the undercarriage and wing design innovation already mentioned and the way Tom tried to do something a little different with the clear parts, he thinks people are going to be impressed with how he has designed the underwing drop tanks. Unusually, the fairings which attached the tanks to the wing of the Tempest were made of a clear acetate material, to allow ground crews to be able to clearly see that the securing latches had engaged onto the wing stations. As a consequence, the latches and fuel pipework can be seen through this clear section, something which can be modelled on this new kit. Also, there are many areas of the new Tempest’s design where simplification has been the order of the day, this has been achieved without compromising on the inclusion of impressive levels of detail. This goes back to how Tom was describing how he intentionally did away with lots of small individual parts, in favour of incorporating all this detail into larger, more robust components, which would benefit the build process as a whole. The Tempest is a spectacular looking aeroplane and modellers can look forward to lot’s of impressive detail with this new kit.
We wanted to bring the interview to a close by asking a couple of questions which had not been asked of our designers during similar features in the past, just to catch Tom off guard a little and to gain a further insight into his work. Firstly, we asked, ‘With regard to product design and your time here at Airfix, what is the newest thing you have learned and how has it improved your design work?’
Again after a short period of contemplation, Tom told us that he thought the most recent thing he has learned is probably a new and different way of using the powerful design software all the team use. During one of their regular design chats, if one of the team members has managed to uncover a specific aspect of the design software’s capabilities which might help their work in the future, this is shared amongst the group and its benefits discussed. As with most industrial software packages, it is unlikely that any particular process will utilise all of the program’s many features - in the main, you will only tend to use the sections which are needed for your own work and there is little time to embark on software voyages of discovery. When something does reveal itself, it is usually an offshoot of something you are already using, as was the case when one of the team found a way of using a pattern feature which could be used when producing rivet detail on a new kit design. As this laborious process could take several weeks to complete on a large scale 1/24th scale kit, this discovery could save team members many hours slaving away at the computer, with the cumulative saving being quite significant to the team as a whole on an annual basis.
A thoroughbred fighting aeroplane, Tom was desperate to ensure that this new kit did justice to what has to be considered as one of the most capable fighter aircraft of the Second World War
A simple, yet stunning design, Tom had plenty of opportunity to bring all his design skills to bear when working on his new Hawker Tempest kit
Tom was also keen to point out that the Airfix team is a really selfless group and if anyone has information which could benefit a fellow team member, this is always shared amongst other members of the team. The sharing of knowledge has been one of the things which has impressed Tom most during his time at Airfix, particularly as his previous design experiences couldn’t have been more different. In the world of product design, any information or acquired skills a person may have are jealously guarded, as this could give them an edge in a cutthroat world, but that is definitely not the case at Airfix. In addition to helping their colleagues, they know that shared information will help them all to be more effective at what they do, help to increase modeller satisfaction and benefit the Airfix brand across the board. So in answer to this question, Tom would say better understanding of the power of the design software he uses almost every day and how newly discovered processes can really help during the design phase.
Our final question to Tom was, ‘When designing a new kit, which stage of the process do you get most excited about?’
Tom described how every design project will have its ups and downs, something all of the designers just have to embrace. For example, when you have been designing rivets constantly for two weeks on the trot he would definitely describe this as a down, however in contrast, finally entering the full design phase is something he really looks forward to. He said, “finally being able to add some detail to the Tempest shaped grey blob I have been looking at for days was a real treat, knowing that I can now actually start to make this look like a scale representation of this beautiful aircraft - that was something to really look forward to”.
Tom’s drop-tank design will allow the connecting pipework to be replicated and viewed through this clear section of the faring, just as it was on the real aircraft
If we needed any confirmation that the new Tempest is definitely something to look forward to, this screengrab will have us all making space in our build schedules a little later in the year. In any case, our Typhoon kit could do with a bit of company!
In addition to this, there are some obvious project landmark stages which would have anyone getting a little excited, such as the receipt of the new model’s prototype SLA components and indeed the arrival of the first test frames produced from the new tooling blocks, but Tom described these as being a little too obvious.
As far as Tom is concerned, when you invest so much of your time and expertise into these projects, arguably the most exciting stage is when it finally hits the model stores and comes into the hands of modellers all over the world. ‘As a design artist, you would obviously like to think that everything you do will be well received by one and all, however, this could never be the case all the time and as a professional, you need to be aware of any issues there may be with a new kit. Hypothetically, this could be a quality control issue that needs bringing to the attention of the Brand Manager, or part of the build process which is causing unexpected issues and could have been designed differently, or explained more clearly in the instruction guidance. In all cases, these issues are linked to the modeller’s overall build experience of the kit you designed and if they are impressed with what you have done, then that can be quite an exciting thing’.
Like a modern day, scale version of Sydney Camm, we would like to thank Tom for this fascinating insight into his Hawker Tempest project and a kit many of us will be looking forward to building a little later in the year. We would also like to thank him for supplying the selection of design screenshot images used to illustrate this feature, each one of which have come straight from his computer and are being published for the first time. Without doubt, the Tempest will be a popular addition to the Airfix range and we look forward to bringing you further details from the project as it advances towards production.
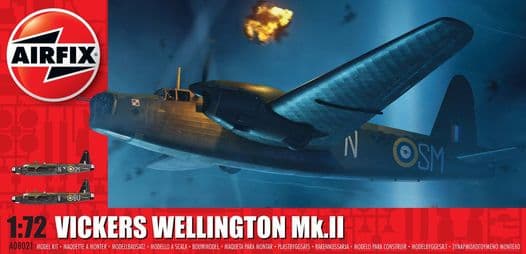
This computer rendered image of the Vickers Wellington II was used to announce the existence of this Merlin engined variant of this impressive kit at the start of the year
As Britain prepared for war in the late summer of 1939, it was already clear that the RAF’s Vickers Wellington bomber squadrons would have a significant role to play in the months of conflict to come. Despite the fact that the Wellington was originally designed to specifications issued in 1932 and was widely regarded as bordering on obsolescence even before it entered RAF service, as Europe descended into war, it was by some margin Britain’s most capable medium bomber. The Wellington proved to be something of an aviation dichotomy as it approached RAF squadron service, on the one hand incorporating some of the very latest equipment and design ideas, whilst also continuing to use many of the tried and trusted manufacturing techniques associated with a previous era of aircraft production. Conforming to the strict weight criteria imposed during the design stage and intending to incorporate the latest and most powerful engine designs on their new aircraft, the Vickers design adopted a method of construction which would give the Wellington one of its most distinctive features and endow the aircraft with a significant benefit in the struggles to come. The geodetic method of construction was developed by famous British engineer and inventor Barnes Wallis, who had perfected this design for use in the construction of airships and the earlier Vickers Wellesley light bomber and utilised hundreds of Duralumin W-beams used to form an intricate metal lattice-work construction on to which wooden battens would be screwed. This would then allow a doped fabric outer skin to be attached to the aircraft, which whilst representing a more traditional type of aircraft manufacturing, made the Wellington much less susceptible to battle damage than more modern stressed skin designs. The resultant fuselage was relatively light in weight but possessed great strength and whilst this method of construction undoubtedly posed challenges for companies engaged in manufacturing the Wellington, the inherent strength of the design would prove crucial when the aircraft was thrust into combat. Capable of withstanding significant battle damage, numerous RAF Wellingtons managed to bring their crews back home, when other bombers may have failed to do so, often sporting gaping holes in their wings and fuselage.
With the Wellington occupying such a prominent position in the history of British aviation, it was obvious that the bomber would also be a favourite subject for the world’s modellers, with the Airfix range able to boast the inclusion of a Wellington since 1959, a kit which many Workbench readers will no doubt have enjoyed building. The Airfix Wellington kit received a new tooling boost in 2018, when this most famous British bomber was the subject of a new design project, incorporating all the latest design and production techniques which were available to the Airfix development team. The new kit proved to be an instant hit with modellers and many will have been delighted to see its inclusion in the current 2021 range, particularly as it featured additional parts to allow a relatively unusual version of the aircraft to be modelled. We are delighted to now be in a position to give our readers and exclusive first look at the new parts which will feature in the release of A08021 Vickers Wellington Mk.II.
An exclusive first look at the additional part frame which will allow modellers to produce the Rolls Royce Merlin X powered version of the famous Vickers Wellington bomber
As Britain’s most capable bomber, the Mk.II variant of the Wellington was initially proposed in early 1938 and was an attempt to endow the aircraft with more powerful engines. The main powerplant adopted by this variant was to be the Rolls Royce Merlin X, an inline V12 engine which utilised a two-speed supercharger, giving the Wellington Mk.II a very different profile to aircraft adopting the more usual radial engine powerplants. As the new Merlin X was not available to designers until early 1939, the first flight of the Mk.II variant did not take place until 3rd March 1939 and from a performance perspective, it was not all good news. Although the engines did produce more power than the original Bristol Pegasus, they were also quite significantly heavier and resulted in the Mk.II giving with one hand, but taking away with the other. It was capable of achieving greater speeds and operating at higher altitudes, but it also had a reduced bomb carrying capability and could not match the range of its predecessor.
Finally entering service at the end of 1940, the Wellington Mk.II would be produced in much smaller quantities than variants which came before and after it and from a total wartime production of 11,462 Wellington’s, only 401 were of the Merlin powered variant. With the exception of the different powerplants, the Mk.II was basically identical to the Mk.IC, which was the first major production variant of the bomber, although some 2,685 of this type would eventually be built.
One of the many fascinating facts relating to the wartime service of the Wellington was not about the exploits of a heroic crew, although there were undoubtedly plenty of these, but the speed at which one could be produced. As a nation galvanizing propaganda exercise, workers at the Vickers Armstrong factory at Broughton were invited to show just what Britain could do and build a new Wellington in a record breaking time during their ‘Workers Weekend’. As you may well imagine, everyone was keen to do their bit for the war effort, particularly as a government film unit was in place to document the attempt. Following a super human effort, the workers easily broke the existing record which was at that time held by an American factory and as Wellington LN514 rolled out of the factory in October 1943, they had produced their bomber in the impressive time of 23 hours and 50 minutes. It is reported that the test pilot was taken completely by surprise at the speed of the construction and had to be roused from his bed in order to undertake the test flight. With the entire factory staff looking on, the new bomber took to the air for the first time only 24 hours and 48 minutes after the first parts of the airframe had started construction.
Making a fascinating addition to any Bomber Command model collection, this Rolls Royce Merlin powered variant of the famous Vickers Wellington is scheduled for a summer release.
There are many things which go towards making a varied and enjoyable edition of Workbench and they don’t all emanate from within the Airfix office - a large part of this is the ability to feature the magnificent modelling talents of our readership. From an editorial perspective, the opportunity to see what modellers do with the kits our designers produce can sometimes be quite breath-taking and even though we strive to make our kits as accurate and detail rich as possible, it seems as if the love of modelling is only limited by a person’s imagination and in many cases, that appears to be boundless. Maintaining this edition’s Wellington theme, we were fascinated to see pictures of an unusual build uploaded to a modelling site recently and we simply had to find out more, particularly as the project had such an evocative title. When our new Wellington kit was released in 2018, we thought that our designers had produced a faithful and hugely appealing scale representation of this famous British bomber, however, Michael Carvill took this kit as his modelling canvas and used it as the basis for something very special indeed.
The inspiration for this project was simply the amount of detail our designer managed to incorporate into this new kit, with Michael feeling that it was such a shame to leave all that impressive internal detail hidden away - he was determined to unlock some of the Wellington’s secrets. A former soldier and now marine propulsion engineer, Michael started modelling when he was young, but had a long break from the hobby during his military service and re-entry back into a civilian career, only returning to the hobby in earnest quite recently. Although he certainly enjoys modelling, he told us that he has only recently ‘upped his game’ when it comes to detailing his builds, with a recent period spent in furlough allowing him to devote a little more time to his hobby. In truth, Michael would usually go for brands other than Airfix, in the main because he was remembering what the kits were like he used to build, but that opinion changed dramatically when he built one of our more recent kits not so long ago. Since that time, he has gone on to build a great many Airfix kits, with our 1/24th scale models being particular favourites of his. He describes himself as a modeller who loves a challenge and when he has quite a radical idea for his latest build, he likes nothing more than to hear people telling him that it can’t be done, or that it will be too difficult. His reaction to that is always to think ‘I’ll show you!’
This first series of images show how Michael initially attacked his imaginative Wellington build and how he had to be aware of parts which would later need to be added to the interior of the model, meaning these sections could not simply have all the fuselage plastic cut away. The third image clearly shows how he had to scratch build parts from plasticard to complete the inner wing, tail and horizontal stabilizer skeletons
With regard to this Wellington build, we asked Michael if he had any particular affiliation to the aircraft and a reason why he put so much effort into it, but he said not. He did remember building the Matchbox kit of the Wellington some years ago and always thought it was an interesting looking aeroplane, but the inspiration was purely and simply down to the amount of detail the new Airfix kit had inside it. He thought that this detail deserved to be ‘exposed’ and he started thinking about how best he could achieve this. Searching the internet for detailed images, he came across a group dedicated to the aircraft and through them, was sent a series of detailed photographs featuring the RAF Museum example, an aircraft which is currently undergoing restoration at Cosford. As his research was coming together, he also sent off for a selection of etched detail parts for the Wellington to further enhance the build, which he needed to inspect before deciding what overall effect he intended to go for. Clearly attracted by the distinctive geodetic construction of the Wellington, Michael set about planning the build and effectively started taking a knife to his kit.
The first stage was to mark out all the areas where he intended to cut away the plastic from the fuselage sides, basically the areas in-between the geodetic lattice structure, whilst at the same time taking care not to open up sections which would need to have other internal parts fitted there a little later in the build. This fuselage work turned out to be relatively trouble free, with the model retaining much of its inherent strength, however, the wing, horizontal and vertical stabilizers would be a different story entirely. Initially, he had intended to do exactly the same on the wings as he was planning on the fuselage, but as he began to attempt this, he quickly encountered a problem. Firstly, the wing did not offer the same construction detail guidance that the fuselage interior did and where he was able to cut the surface skinning away, it looked too thick and was out of scale. His solution was to scratch build the internal wing detail from plasticard and whilst this did look much more effective, it was very labour intensive and had nowhere near the strength retained by the fuselage - this would lead to him having to scale back his ambitions somewhat.
It is difficult to imagine just how much work has gone into this build, but it was definitely well worth the effort - the end result is truly magnificent!
With interior sections of the model now exposed, quite a bit of pre-painting of the exterior of the Wellington had to be done, because if he had left this until the end like he would usually do, paint spray would ruin the effect of the interior detail. We think you will agree that Michael’s vision for his ‘Skelly Welly’ was definitely realised and what he has achieved is a hugely imaginative and beautifully executed build. When asking Michael which sections caused him the most issues, he said that this would most definitely be the wings. The entire project required a gentle, steady hand and lots of patience, but if the fuselage alterations were a little more straightforward than he had envisaged, the wings and stabilisers most certainly were not. Without a pattern to follow, he had to use his research images and information passed to him by his Cosford contact as his template and as this detail had to be scratch-built using plasticard, it made these part of the model quite fragile. As a consequence of this, the original idea of opening up the entire wing had to be scrapped, for reasons of structural integrity and for his modelling sanity. In review, Michael described the entire project as being a steep learning curve in terms of modelling techniques, with careful handling being required throughout.
When looking at the finished build, it is amazing to think that this was the first time Michael had attempted to do anything like this with his modelling and from opening the kit box to photographing the completed model only took him eight weeks. The finished model is now displayed next to his old Matchbox Wellington and he told us that the contrast between the two kits is quite striking - it shows just how far the hobby has come in a relatively short period of time. Michael’s return to modelling has seen him becoming a member of the Merseyside Scale Model Club, although lockdown has dictated that all their meetings for the past year have been virtual and not in person, but this is just a sign of the times. He is very much looking forward to attending a few model shows once things get back to normal and spending some time with fellow modelling enthusiasts.
This final selection of images all show various angles of the ‘Skelly Welly’ and it was a real challenge to trim this feature’s image selection down to just nine, as they were all so good. Will anybody else dare to take on the Skelly Welly?
We couldn’t let Michael go without asking him what he was currently working on and it turned out to be quite a production line. Having now returned to work, he is not able to spend quite so much time modelling at the moment, but he currently has a classic Airfix Short Stirling on his workbench which is just awaiting painting. His next two projects will be a larger scale Swordfish (clear edition) and an Airfix Shackleton, which he once again intends to do something a little different with - we can’t wait to see what he comes up with.
We would like to thank Michael for allowing us to share pictures of his ‘Skelly Welly’ with fellow Workbench readers and for spending the time to give us a little insight into the project. Hopefully, we will be able to thank him in person once the model show circuit is up and running once more and maybe to even see this impressive Wellington in the plastic (so to speak), on the Merseyside Scale Model Club display table - here’s hoping!
In our preview at the beginning of this blog, we said that our modelling tribute to the 103rd anniversary of the Royal Air Force would end with the latest update from a new kit which is a representation of the RAF’s latest strike fighter, the awesomely capable Lockheed Martin F-35 Lightning II. Things do rather appear to have run away with us somewhat in this edition, as we have gone to town on both the Tempest and Wellington, but that is not the only issue at play here. The Quickbuild F-35 sample model we were hoping to photograph and include in this update did not become available as expected, so this review feature will have to carry across to the next edition of the blog, but rather than bump the F-35’s slot entirely, we wanted to give you this exclusive preview of the new box artwork which will accompany the release of a kit which is surely destined to be one of our most popular models for many a year. With the F-35 occupying a position as one of the worlds most capable combat aircraft and the RAF taking at least 48 of them to operate from our new Queen Elizabeth class carriers, we are delighted to report that this new kit is an absolute stunner, but as already explained, you are going to have to take our word for that until the next edition of Workbench. Until then, please enjoy this first look at the new box artwork, something which is about to become a familiar sight in model shops right across the world.
That’s another whopping edition of Workbench done and dusted, and we hope we managed to include at least one feature which was of interest to you. As always, if you have any suggestions for particular subjects you would like to see covered in a future edition, please do drop us a quick line, using this workbench@airfix.com link to contact us.
In between new editions of our blog, the Airfix conversation continues over on our Airfix Forum Workbench thread, with further discussions taking place on both the official Airfix Facebook page and the Airfix Twitter channel – please do get involved in the discussions and let us know what you think about Workbench.
Whenever you decide to visit, the Airfix website is always the place where you will find all the latest model availability information, previous editions of our blog, a selection of modelling tips and much more.
The next edition of Workbench is scheduled to be published on Friday 16th April, when we will have more interesting features from the world of modelling.
As always, we are incredibly grateful for the support you continue to give our Airfix Workbench blog.
The Airfix Workbench Team
