
Welcome to our latest Workbench blog and all the news, updates, and modelling exclusives from the fascinating world of Airfix.
Although we didn’t plan to leave our readers without new blogs to enjoy at the start of this year, we've worked hard to get back to normality and are now on our usual fortnightly schedule. Importantly, we've managed to bring you most of the initial design and development details from the new model tooling announcements made with the launch of the 2021 kit range. This includes our enigmatic de Havilland trio of Chipmunk, Mosquito, and Vampire kits. We've decided as well to give you a new tooling break for this edition, whilst still staying with the subject of Airfix exclusives.
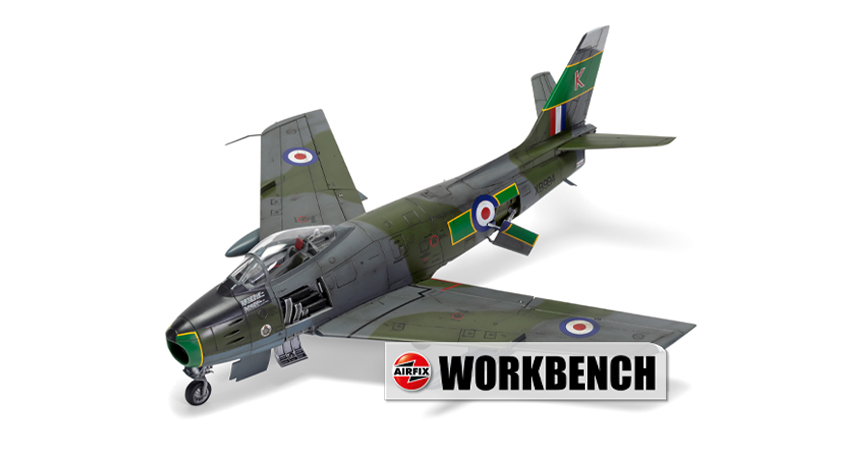
For this 146th edition of Workbench, we'll be looking forward to the impending arrival of a new tooling announcement from 2020, with exclusive images of our 1/48th scale Canadair Sabre F.4, a sight sure to have countless modellers rushing to add this early jet-powered aviation classic to their build schedules. We also head back to our popular Dogfight Doubles range, with an upcoming release focusing on the Pacific Air War warriors in their struggle for aerial supremacy over the island atoll of Midway. Supporting this, we have our latest box artwork exclusive, with a look at the scheme options for both aircraft too. We end by taking a last look at three new model toolings, which have just been released and are now finally available after being blog-development stars for the past year or so. Another feature-packed edition awaits you!
One of the most rewarding parts of Workbench is the opportunity to follow new model tooling projects from announcement to release, covering all the exciting design and development stages along the way. Usually, seeing a fully finished, advanced sample kit build on the blog is a good sign it's now finally either in production, or very close to it. We can then look forward to it vying for space on our work stations in the near future. The stunning 1/48th scale Canadair Sabre F.4 tooling is just such a kit, and thanks to our modelling product designer Paramjit and his latest masterpiece, we have a selection of beautiful Sabre images to share with you.
Although RAF Sabres during the 1950s were all manufactured by Canadair, they could trace their lineage to one of the most important jet-powered aircraft of the early post-war years, the magnificent F-86 Sabre from North American Aviation. With their expertise in producing arguably the finest single-engined, piston-powered fighter of WWII, it's no surprise the team behind the F-86 Sabre would be keen to bring their talent to the development of a new jet-powered fighter after the war.
Like most early US jet designs, their initial design incorporated a straight wing. However, having been given access to captured German research data from their more advanced jet programme, they changed the design to feature a wing with a 35% sweep back. Their design also sported a streamlined fuselage, with them convinced that the new aircraft could attain great speeds. This wasn't at a cost of all-round pilot visibility however, which was a key feature of the ‘D’ variant of the successful Mustang.
The first flight of the XP-86 prototype took place on 1st October 1947. On what must have been a significant day for North American Aviation, they were fortunate to call upon the skills of one of America’s greatest aviators for this auspicious occasion. The chief test pilot was none other than George Welsh, WWII fighter ace and national hero; a man who had famously piloted his Curtiss P-40B Warhawk fighter against the attacking Japanese aircraft during the Pearl Harbor raid. In doing so, he became one of the first US aviators to score aerial victories in WWII, (despite the fact that war against Japan was not officially declared until the following day).
Later in the aircraft’s development programme, an F-86A Sabre would go on to set a new world airspeed record of 670.84 mph, underlining the credentials of this exciting new fighter and bringing it to the attention of the aviation world. On entering service with the U.S Air Force in 1949, the North American F-86 Sabre would have the distinction of not only being America’s first swept-wing fighter, but also the fastest fighter aircraft in the world. It would be regarded as one of the most important aircraft in the post-war jet era and arguably the most capable of the world’s early jet-fighter designs — beautiful to look at, but still a deadly fighting aeroplane at heart.
Showing what we all have to look forward to in just a few short weeks’ time, Paramjit’s expert Canadair Sabre F.4 build highlights why this new tooling release will be an extremely popular addition to our 1/48th scale kit range and why its short RAF service is definitely worthy of greater recognition, if only to pay homage to its stunning looks
With its established reputation as one of the world’s finest early-generation jet fighters, it seems inappropriate to describe the North American Sabre, or to be more precise, its Canadian deriviative, as being nothing more than just a ‘stop-gap’ aircraft type for the RAF. That is, unfortunately, how aviation history judged it.
Because the RAF had to fulfil their obligation to NATO to adequately defend Europe against Warsaw Pact forces, the late service introductions of indigenous designs such as the Hawker Hunter, Supermarine Swift and Gloster Javelin placed them in a difficult situation. Particularly as the perceived opposition were introducing their latest generation of jets at that time. Unable to delay taking action any longer, they had to upgrade their existing Meteor and Vampire first-generation jets with a more capable aircraft type, in the full knowledge that this new aircraft would itself be almost immediately replaced once the new British jets became available.
An acceptable international solution to this pressing problem came with the procurement of hundreds of Canadian-built F-86 Sabre jet fighters. Even though these aircraft would only remain in service for around three years, they would go on to equip twelve RAF squadrons (ten of which operated from bases in Germany) and would form the backbone of the RAF’s NATO fighter commitment during a volatile period in world history. Of even more historical importance, during the early 1950s, Canadian-built Sabres were the only swept-wing jet fighters available for the defence of Western Europe.
With this uncomfortable situation revealing itself early in the development of new British designs such as the Swift, Hunter, and Javelin, movements at the top military levels began to take place. Officials were sent to Canada to determine whether the Canadair company had the capacity to fulfil potential orders from the UK, particularly as delivery delays would only exacerbate an already pressing problem. Additionally, RAF pilots were sent to North America to test fly the Sabre jet and two evaluation examples were also loaned to Britain. These two fighters were operated by the Central Fighter Establishment at West Raynham, in advance of what was looking increasingly like a ‘done deal’.
These aircraft were extensively evaluated against existing Meteor and Vampire fighters, as well as Boeing B-29 Superfortress bombers, to see just how effective the Sabre would be in a squadron service environment. When compared with the Meteor it would effectively be replacing, the Sabre was found to be superior in almost every aspect and more significantly, better than any British fighter currently in service.
A proud moment for our designer Tom, his magnificent new Canadair Sabre will soon be taking its place amongst the Airfix kit range and in this larger scale, all the fine detail he managed to incorporate in its design will surely delight anyone taking on this beautiful kit
Because the Canadair Sabres only operated in RAF colours for a short time and at a point when the day's Government definitely did not want to draw much attention to this short(ish) arrangement, history guaranteed that it passed relatively unnoticed in RAF history. In fact, all but the most hardened aircraft enthusiasts are probably unaware that this classic fighting aeroplane actually saw RAF service at all. In fact, we'd wager this new Airfix tooling release in RAF colours comes as a surprise to many!
Of the RAF pilots who flew the Canadair Sabre, most said they loved the aircraft, describing it as a delight to fly and possessing very few flaws. When the time came to give them up in favour of Supermarine Swifts and the first-generation Hunters, many were dismayed, feeling they were taking a backward step. All this, just so they could be seen to be flying an aircraft built and designed by Britain. Of course, hindsight is 20/20 and the Hunter would mature into an excellent aircraft well deserving of the 'classic' tag.
With grateful thanks to our Product Designer Paramjit once more, the build images used to illustrate this feature clearly show just how attractive an aeroplane the Sabre actually was and how in this slightly larger scale, it will make for a stunning display piece. Add to this the fact that it will sit perfectly within a display of other Airfix 1/48th scale classic jets, such as the Gloster Meteor, Hawker Hunter, Gloster Javelin and new 2021 project, the de Havilland Vampire, it is clear to see that the subject of early RAF jet power is about to get a significant boost in exposure, if only from a modelling perspective. Let’s now take a closer look at the details behind the scheme Paramjit decided to finish his recent RAF Sabre build in.
Scheme A - Canadair Sabre F.4 XB984, No.3 Squadron, Royal Air Force Germany, Geilenkirchen Air base, 1954.
Wildenrath based No.3 Squadron traded their de Havilland Vampire FB.Mk.5 jets for new Canadair Sabres in May 1953, with the first pair of aircraft arriving at the station on 11th of that month. Although No.67 Squadron may have been the first to receive the Sabre, No.3 Squadron had the distinction of flying the RAF’s first Sabre formation sortie, when on 19th May 1953, the Squadron Commander led a flight of 4 Sabres on a flight over the German countryside. At this time, the squadron was still a mixture of Sabre and Vampire jets, but by the 27th May, it had its full complement of Sabres and the full type conversion could begin in earnest. The unit’s last Vampire sortie took place on 12th June and from that date, these first-generation jets would be flown back to the UK to something of an uncertain future.
Although these aircraft had a vital role to play in European skies, one of their first official duties was to train for the impending Coronation Review, which was due to take place at RAF Odiham. This temporary UK deployment so soon after taking delivery of their new Sabres was an inconvenience, but would bring the new jet to the attention of a much wider UK audience. On 20th June, famous WWII fighter ace Group Captain Johnnie Johnson led sixteen Sabres across the English Channel to RAF Duxford, where they would spend the next few weeks based whilst practicing for the review flypast. They also flew mock dogfights against the Duxford based Meteors above the Cambridgeshire countryside.
On 16th July, the squadron returned to Wildenrath only to be informed that they would be permanently relocating to a new base at Geilenkirchen over the next few days, with the first 16 aircraft arriving at their new home by 20th. The move coincided with the squadron having to play a full role in ‘Exercise Coronet’, which was to be the largest Allied military exercise since the end of the Second World War and a real show of strength for the watching Warsaw Pact nations. Their new base came under simulated attack by other NATO aircraft and a maximum squadron effort was required to meet this challenge - this was the culmination of an extremely busy period for everyone involved with No. 3 Squadron. Thankfully, the beginning of August brought a welcome respite for squadron personnel, as runway resurfacing works at Geilenkirchen brought about a nine day period of no flying for the pilots and hangar tlc for their new aircraft.
By May 1956, No.3 Squadron was preparing to enter another significant period in its history, as they awaited the arrival of their new Hawker Hunter jets. During June, all remaining Sabres were serviced in preparation for ferry flights back to the UK, leaving the squadron to commence its Hunter association. Their time with the Canadair Sabre F.4 may have been short and sweet, but these attractive aircraft were used extensively during this three-year period.
A final look at our new 1/48th scale Canadair Sabre underlines why this early jet fighter must qualify as one of the most attractive aircraft to ever wear the RAF roundel and despite its relatively short service life, is about to receive some long overdue modelling attention
Canadair Sabre F.4 XB984 was delivered to the RAF on 10th November 1953 and later sent to join No.3 Squadron at RAF Geilenkirchen in Germany. During its time with the squadron, the aircraft was fitted with the modified 6-3 wing and became the personal aircraft of Squadron Leader Hutchinson. The markings it displays are the later ‘bar’ markings, which were adopted by all 2nd TAF Sabre squadrons towards the end of their service lives. The squadron’s motto Tertius primus erit roughly translates to ‘The third will be first’.
Once again, we would like to thank Paramjit for undertaking such a magnificent model build, one which perfectly highlights why the new Canadair Sabre will be a popular addition to our 1/48th scale kit range. Destined for a late spring/early summer release, it will not be long now before we can produce our own modelling tribute to the short, but fascinating career of the RAF’s Canadian built Sabres.
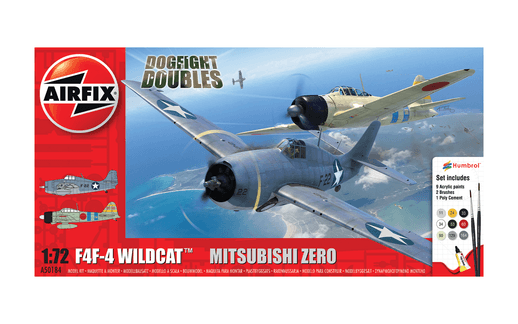
Box artwork reveals have always been one of the most popular features of our Workbench blogs and looking at this stunning Dogfight Doubles artwork for the Battle of Midway Wildcat and Zero, it isn’t difficult to see why. As far as aerial duels of the Second World War are concerned, this one is an evenly matched classic
As far as military engagements of the Second World War are concerned, there can be few which hold the significance of the Battle of Midway, particularly with regard to conflict in the Pacific Theatre. The six months which followed the devastating surprise attack against American forces at Pearl Harbor were a succession of victories and territorial gains for the Japanese Empire, with America still licking her wounds and reorganising her forces for the campaign to come against the Japanese.
From a Japanese perspective, could they class the Pearl Harbor attack a success, or was it a massive military blunder? The aim of the attack was to neutralise the threat posed by the mighty US Pacific Fleet and specifically, their aircraft carriers (none of which were present during the attack). Even the Japanese knew that once American industrial might was brought to bear, they would not be able to compete militarily, so their plan was to destroy the American carrier force and buy their own forces time to raid and plunder unchallenged throughout the Pacific. Once their position was threatened, they could fight the Americans and inflict a heavy defeat, gambling that this would bring them to the negotiating table and a territorially advantageous armistice for the Japanese. That was the theory in any case and with the most effective naval strike force in the world at their disposal, it was not a theory without merit.
The one thing which could possibly derail this plan was the unscathed US Pacific carrier fleet and Japan’s outstanding need to destroy it. Japanese military planners knew that the Americans were fully aware of what their intentions were and would never commit their ‘flat tops’ to a devastating surface engagement, where the carriers would be extremely vulnerable to both air and surface attack. What the Japanese needed was a diversion, something which would draw the American carriers out into open ocean, so they could be attacked by the Japanese Navy’s highly proficient air strike forces. Once again relying on stealth and deception to keep the American’s very much on the back foot, an attack against the US military facilities on the strategically vital Midway Atoll was planned, with a strong attack fleet making it seem as if an impending invasion of the islands was about to take place, something which the American’s could surely not allow. Once the carriers were committed to battle, these would be the main targets for the Japanese airmen, achieving their most pressing military objective in one mighty blow.
The rather clear looking deck of Japanese carrier Akagi just weeks prior to the attack against Midway Atoll. On the morning of 4th June 1942, this deck would launch the strike aircraft heading for the island, the start of 24 hours of frenetic fighting. By 6am the following day, she would be lying at the bottom of the Pacific ocean
The Japanese Midway attack force was impressive and included the four heavy aircraft carriers Akagi, Kaga, Hiryu, and Soryu, all of which were protected by a strong supporting force of battleships, heavy cruisers, and destroyers. Their complement of around 260 aircraft was probably the most effective naval strike force in the world, with excellent aeroplanes flown by experienced and extremely proficient airmen and should things go their way, they could hardly be better prepared. Unfortunately for them, there remained one factor which placed the force at a huge tactical disadvantage - they had no idea of the whereabouts of the Pacific Fleet and their all-important carriers. Supporting reconnaissance flights over Pearl Harbor had been driven off and the task force spotter aircraft had failed to locate a single American ship. To make matters worse, the Japanese force had been spotted by land-based aircraft from Midway, whose crews immediately radioed back the information, before launching attacks on the carriers. The scene was set for a pivotal Pacific showdown and potentially, an aerial engagement which would determine the outcome of the entire Pacific war.
The evocative box artwork featured at the head of this section has been produced in support of the latest kit addition to our popular Dogfight Doubles range, one which includes the two most proficient fighting aeroplanes which took part in the savage aerial duels during the Battle of Midway, the Japanese Mitsubishi A6M2 Zero and the American Grumman F4F-4 Wildcat. With Midway being just a tiny island speck in the middle of the vast Pacific Ocean and the Japanese aircraft operating from the even smaller decks of ships in the same ocean, much of this combat would take place over open water. This required the utmost skill and bravery of aircrews on both sides. The image shows fighter combat above what is presumably Midway’s sand island as the airfield is not visible, but shows how the Wildcats were forced to deal with the capable Zero fighters, whilst Japanese strike aircraft pressed home their attacks against military facilities on the islands. The scheme options included for both of the aircraft in this kit are as follows:
Grumman F4F-4 Wildcat ‘F-22’ VF-8 ‘Fighting 8’, USS Hornet (CV-8), Battle of Midway, June 4th 1942.
Recently upgrading their aircraft, the US Navy’s VF-8 re-equipped with the F4F-4, the latest variant of Grumman’s diminutive Wildcat fighter. The new Wildcats featured a number of design modification which were a direct result of British requests following their combat use of the aircraft in Europe. The new variant featured an increase in armament from 4 to 6 machine guns (although ammunition carrying capability was not increased), the addition of extra armour protection for the pilot, and self-sealing fuel tanks, all of which improved the aircraft’s combat survivability. The adoption of Grumman’s ingenious wing folding mechanism would allow twice as many new Wildcats to be stored on the decks of aircraft carriers, compared with previous variants. Unfortunately, all these modifications added significant weight to the fighter and as the engine was not updated to compensate, this resulted in an unwelcome loss of performance. Knowing that the Wildcats would be coming up against the fast and extremely agile Mitsubishi Zero, famous naval aviator Jimmy Thach is reported to have said of these modifications, ‘If you can’t hit an enemy fighter with four guns, you won’t hit him with six!’
Nevertheless, the Wildcat was an extremely rugged fighter which was capable of absorbing lots of punishment and still bring its well protected pilot home, something a Zero pilot could not count on. US Wildcat pilots knew not to tangle with the nimble Zero in a tight, turning dogfight, instead electing to make successive slash and run attacks against their enemy, negating the manoeuvrability advantage of the Zero and hoping to exploit its vulnerabilities, which were an almost total lack of protection for its pilots and the absence of self-sealing fuel tanks. Fighter tactician John ‘Jimmy’ Thach developed a method to give Wildcat pilots a better chance of claiming victories against the highly manoeuvrable Zero, which became known as the ‘Thach Weave’. If a Wildcat in your flight had a Zero on their tail, other fighters in the flight would turn in to make a head on pass towards their squadron mate, either shooting down the Zero in the process, or forcing them to disengage - a risky, but extremely effective tactic. A flight leader and his wingman would fly regularly intersecting weaving flight patterns for mutual defence, hoping to catch an unsuspecting enemy fighter pilot in a hail of American bullets.
The first time the ‘Thach Weave’ tactic was used in combat came during the Battle of Midway, when Jimmy Thatch was leading a flight of six Wildcats on a mission to provide fighter cover for strike aircraft from USS Yorktown attacking the Japanese carrier fleet. The Wildcats were engaged by between 15 and 20 Zero fighters and in the ensuing dogfight, the ‘Thatch Weave’ tactic allowed Jimmy Thach to shoot down three Zeros, with his wingman claiming a fourth. Only one Wildcat was lost during this engagement.
Based on the US Navy Carrier Hornet for the duration of the Battle of Midway, the Wildcat fighters of VF-8 were not only tasked with flying combat air patrols to protect the American ships from enemy attack, but also to protect strike aircraft which were hoping to score a decisive victory against the Japanese aircraft carriers. In one heroic, yet ultimately futile action, ten Wildcats from the Squadron were lost on a single mission, as they were so desperate to provide effective fighter cover for the Douglas SBD Dauntless dive bombers which were looking for the Japanese strike force. With the SBDs possessing a significantly greater range, the Wildcats simply ran out of fuel and were forced to ditch in the Pacific.
During the Battle of Midway, USS Hornet was awarded a Presidential Unit Citation for actions which saw the carrier’s aircraft involved in the sinking of the Japanese heavy cruiser Mogami and the crippling of the cruiser Mikuma. In addition to this, they also inflicted damage on the destroyers Asashio and Arashio.
Mitsubishi A6M2B-21 Zero (Zeke) DII-I8I, Japanese Carrier ‘Soryu’, Battle of Midway, June 4th, 1942.
The air combat credentials of the magnificent Mitsubishi Zero fighter were without equal, particularly during the early years of WWII, where this aircraft reigned supreme in the skies above the Pacific. The Zero was designed as a long-range carrier based fighter and by the time of its introduction during the summer of 1941, it was the most capable naval fighter in the world and the envy of every carrier air group. Its impressive combination of speed, manoeuvrability, range and firepower meant the Zero proved to be a fearsome adversary. In the hands of the well-trained Japanese pilots, the Zero would go on to post an impressive combat success ratio of 12:1 when engaged in early skirmishes with US airmen.
The Zero was, however, not without its flaws. A lack of protection for its pilot and no self-sealing fuel tanks were amongst the most significant omissions, which would ultimately claim the lives of many Japanese pilots. In addition to this, the slender design of the fighter did not lend itself to significant future development, particularly the adoption of more powerful engines, which meant that once the Americans caught up, the Zero would never again regain its fighting superiority.
The A6M2B Type 0 Model 21 introduced some significant modifications to the first Zero fighters to enter service and would become the most heavily produced early variant of the fighter. With modifications applied to aircraft No.66 onwards off the production line, this variant incorporated folding wing tips to facilitate more effective carrier operation and significantly increased range capabilities, with both greater internal fuel tanks and the ability to carry an additional under fuselage external drop tank. Around 740 of this variant were built by Mitsubishi, with a further 800 produced by Nakajima, with these improvements earning the Zero the reputation of being the finest naval fighter in the world.
For the Midway attack, the Zeros based aboard the Imperial Japanese Navy carrier Soryu were held in reserve of the first attack wave, both to protect the task force from American air attack and to prepare for an anticipated subsequent strike against US Aircraft carriers, once these had been detected. The Zero was an excellent fighter and more than a match for any American fighter, let alone any attack aircraft sent against it. As a consequence, the Zeros at Midway would take an extremely heavy toll of US strike aircraft and would have provided the protection the Japanese force needed, had fate not intervened.
In preparation for the Midway operation, Soryu had a total complement of 57 aircraft, consisting of 21 A6M2 Zero fighters (3 of which were intended to be flown and operated from Midway once the airfield had been taken), 16 D3A1 ‘Val’ dive bombers, 18 B5N2 ‘Kate’ attack bombers and two experimental reconnaissance aircraft. Although some of the ship’s strike aircraft were launched in support of the initial raid against Midway Atoll, Soryu’s Zeros were held back to perform Combat Air Patrol duties.
Not knowing the exact whereabouts of the American carriers was a significant tactical disadvantage for the Japanese task force, but it was by no means the only difficulty they faced on that fateful day. Having been detected by an American Catalina flying boat, the task force would come under incessant attack from Midway based aircraft, which almost definitely impacted on their tactical thinking. In addition, the strike against Midway was not decisive and a second raid would be required, but should the commander give the order to immediately undertake this second strike, or hold for the appearance of the US carriers, which were after all, their ultimate objective? Both options would require the strike aircraft to be armed with different ordnance and in any case, the aircraft could not be prepared whilst the first strike aircraft were being recovered. This military quandary would prove to be the perfect storm of a predicament, with the delay swinging the initiative in America's favour.
With strike aircraft from the American carrier force now aware of the location of the Japanese carriers, their dive bombers would ruthlessly press home their attacks. Akagi, Kaga, and Soryu all sustained significant damage, with Soryu being the first to sink. Although Hiryu did manage to launch strikes which would eventually result in the destruction of USS Yorktown, Midway would be a significant defeat for the Japanese Navy, with all four of the carriers they committed lying on the bottom of the Pacific by the 5th June. Although Japanese forces were far from defeated, the war in the Pacific had taken a significant step in favour of the Americans at that point.
A model commemoration of this pivotal Pacific battle, this latest Dogfight Double Gift Set release features examples of both the American Wildcat and Japanese Zero, as a model recreation of the first time these variants of the respective aircraft were committed to combat against each other in large numbers. Occupying such a significant position in the history of the Second World War, this set serves as a modelling tribute to the bravery of the airmen who took part in the Battle of Midway. The A50184 Grumman F4F-4 Wildcat and Mitsubishi Zero Dogfight Double set is in production as we write and should be available at the very beginning of May - if we get our skates on, we could all have our Midway modelling tributes finished in time for the 79th anniversary of the battle.
Workbench reader Dean Cameron Reynolds loves building our 1/72nd scale Mitsubishi Zero and often likes to try something a little different. This image is a Photoshopped representation of a ‘clean’ Zero build
As regular readers of our blog will know, we are always keen to feature the modelling talents of our readers and Airfix modelling enthusiasts everywhere, especially when they show real imagination to go along with their undoubted build talents. Both these attributes were clearly evident when we discovered a stunning build featured on a modelling website over the past few days and as we knew the subject of this latest blog would be featuring the Mitsubishi Zero, we simply had to contact its creator. Thankfully, New Zealander Dean Cameron Reynolds was not frightened off by our rather direct approach and was more than happy to discuss his latest Zero build project with us.
A real fan of the Zero fighter and consequently of the 1/72nd scale Airfix kit of the aircraft which was retooled back in 2011, Dean told us that he has completed several examples of the kit which he said was a joy to build. He described the detail featured on the kit to be crisp and accurate, with the model itself going together without any trouble whatsoever - he went on to say that the cockpit build is particularly impressive and that he is a big fan of the pilot figure, which he feels poses extremely well. In fact, Dean is so taken with our little Zero that every time he sees one for sale in his local model store, he buys it just in case he has another Zero inspiration moment! Most, if not all of his previous Zero builds have presented this classic WWII fighter in pristine fighting configuration and indeed, the image displayed at the head of this article features one of his previous builds, pictures of which were imported into Photoshop to produce this rather dramatic scene.
With so many Zero builds already behind him, he wanted to do something a little different for his latest project and headed to the internet in the hope of finding some scheme inspiration. He found much more than that. Although he was expecting to be wooed by some unusual unit markings, it was actually the sight of wrecked and abandoned aircraft slowly decaying on various Pacific islands which caught his attention, so he took a selection of these images to serve as build inspiration. Taking the Zero kit he was so familiar with as his modelling canvas, he looked to see how he could use it as the basis for what would be a rather unusual build project and if he could achieve the effect he was looking for.
As you can see from the images Dean kindly sent us, we think it’s safe to say that it was mission accomplished for the project, with the finished model resembling one of the wrecked Zero images he used as inspiration. We are extremely impressed with Dean's stunning display of modelling skill. Indeed, it could be argued that this model looks even more appealing than a standard Zero build would! Whatever your modelling taste, there is no doubting that this would look spectacular as part of any model display.
Quite magnificent, Dean decided to use images of wrecked Zeros as inspiration for his latest build project and what he managed to produce is something really special. Having the idea and actually managing to pull it off are two completely different things, but we think you will agree, Dean has managed to do it in some style!
Dean told us that the build took around two weeks to complete and we were surprised to learn that this was actually the first time he had attempted a project of this kind - very impressive. Surely, his wrecked Zero must take pride of place within his model display and must certainly be the topic of some interesting discussions when anybody sees it for the first time. Looking at just how effective the build is and how keen we were to feature it in this Battle of Midway Dogfight Double edition, you can see why we wanted to get in touch with Dean and find out more about his fantastic build. Having made contact, it also became pretty clear that Dean had his own agenda with regard to the contact, as he asked whether we had any access to the Product Designers, because he wanted to get a message back to them. He wanted us to tell them that he loves the models and to keep up the good work, a message we were more than happy to relay. It's a great feeling to know that their efforts are appreciated by modellers the world over, and that something which is designed in our Margate offices will be enjoyed by people on the other side of the world.
We couldn’t let Dean go without asking him which were his favourite Airfix kits! He presented us with a list headed by his beloved Zero (obviously), but one which also included the Fokker Eindecker, the MiG-17F, the Sabre, Messerschmitt Me 262 and the Nakajima Kate to name just a few. If the builds are anything like this Zero, Dean must have one stunning model display. We would like to thank Dean for sending us these images and for allowing us to include the feature in this latest edition of Workbench. If you have more modelling ideas like this Dean, please don’t be shy about sending us details, as we will always have a space for you within a forthcoming edition of the blog.
With the new 1/48th scale Canadair Sabre and Wildcat/Zero Dogfight Doubles kits still currently residing in the future releases category, we thought we would end this latest blog by looking at a trio of models which have featured in several previous editions, but have now just been, or are just about to be released. Fans of our popular 1/35th scale Military Vehicle series will no doubt already have an example of our magnificent new Cromwell Tank in their stash and awaiting their attention, as this stunning new tank kit has now been available for a couple of weeks and has proved to be an incredibly popular addition to the range. One of a series of fast and relatively well armed cruiser tanks developed by the British during the Second World War, the Cromwell can trace its history back to late 1940 and the decision to find a replacement for the widely used Crusader tank.
Unfortunately, a relatively protracted development has dictated that there is generally some confusion with different variants of these tanks, as similar looking machines could both be named Centaur or various marks of Cromwell. They were all derived from the A24 Cruiser Mark VII Cavalier, the name given to the original intended Crusader replacement programme. The main reason for the different names revolves around three different engine types used to power the vehicles, different manufacturers and several different hull types.
The A27M Cromwell Mk.IV was the most heavily produced version of the new Cruiser Tank Mk.VIII and matched the Centaur hull with the highly effective Rolls Royce Meteor engine (A27Meteor), a development of the Merlin engine which famously powered the Spitfires and Hurricanes of the Battle of Britain to victory. This powerful and extremely reliable engine allowed the tank to travel at impressively high speeds, which is just as well, as in operation, these relatively lightly armed tanks would be required to get rather close to their targets, using stealth and speed to outflank them.
The tank also featured a quick-firing 75mm gun, which was a re-bored version of the ubiquitous British 6-pounder gun and allowed the commander to have the option of using American produced armour piercing or high-explosive rounds. Further underlining the strategic effectiveness of the tank, its turret could traverse through 360 degrees in just 15 seconds, thanks to the impressive hydraulic system it employed.
This newly tooled kit is actually available in two variants of this speedy tank - A1373 is the Cruiser Mk.VIII Cromwell Mk.IV and A1374 is the Cruiser Mk.VIII A27M Cromwell Mk.VI and both of these beautifully detailed new models are available now.
By the time this latest blog has been published, one of the most eagerly anticipated new 1/72nd scale aircraft kits of recent years will be flying out of our warehouse at a rate of knots. The Bristol Beaufort heralded from the same design stable as the famous Blenheim and Beaufighter twin-engined aircraft. It was significant for the fact that it was the only monoplane produced for the Royal Air Force that was designed from the outset as a torpedo bomber and reconnaissance platform. As an island nation, one of the most crucial battles to be won if Britain were to remain in the war, would be the protection of her sea lanes and the maintenance of the merchant convoys which would be crucial to the nation’s survival. At that time, the current land-based torpedo bomber available to the RAF was the obsolete and rather ungainly Vickers Vildebeest biplane, an aircraft which would not be suitable for the battles to come and one which needed replacing urgently.
Highlighting the desperate need for their new torpedo bomber, the Beaufort was one of only a handful of new aircraft types to be ordered by the British Air Ministry whilst the project was still ‘on the drawing board’, a move which underlined the urgency of the situation, whilst at the same time illustrating the level of faith they had in the Bristol Company. As it later transpired, the demanding specifications the Beaufort design had to satisfy, in addition to Bristol’s existing Blenheim manufacturing commitments, would dictate that an aircraft which had received signed production contracts in August 1936 would not actually see its RAF squadron introduction until almost three and a half years later, when Britain was already at war. Once in squadron service however, the Beaufort quickly proved to be an extremely rugged and highly manoeuvrable aircraft, one which would be tasked with performing some of the most demanding and hazardous strike-attack missions of the war.
The Beaufort is a really interesting looking aeroplane and whilst it was initially intended that it would be an evolutionary development of the existing Blenheim design, it soon became clear that this could not be achieved whilst satisfying all the design criteria required by the new torpedo bomber and it would actually look quite different to its predecessor. With a much deeper forward fuselage section required to accommodate the aircraft’s crew of four and the requirement to carry a torpedo in a semi-recessed position under the fuselage, the new torpedo bomber would require a gross weight increase of around 25 percent over that of the Blenheim, ensuring that whilst both aircraft may have been related, they could certainly not be described as identical twins. This weight gain would also require more powerful engines to be developed for the Beaufort, with this constant search for engines capable of reliably developing the power the aircraft needed being one of the main reasons for its protracted production delays.
A new kit which will look magnificent displayed either by itself, or as part of an enigmatic trio, flanked by a Blenheim and Beaufighter, the initial release of this stunning new kit is available now and will surely be high on many a modeller's list for an early season build project - we can’t wait to see all your completed builds.
That’s it for yet another edition of Workbench - we hope we managed to include something which was of interest to you. As always, if you have any suggestions for particular subjects you would like to see covered in a future edition, please do drop us a quick line, using this workbench@airfix.com link to contact us.
In between new editions of our blog, the Airfix conversation continues over on our Airfix Forum Workbench thread, with further discussions taking place on both the official Airfix Facebook page and the Airfix Twitter channel – please do get involved in the discussions and let us know what you think about Workbench.
Whenever you decide to visit, the Airfix website is always the place where you will find all the latest model availability information, previous editions of our blog, a selection of modelling tips and much more.
The next edition of Workbench is scheduled to be published on Friday 19th March, when we will have more interesting features from the world of modelling.
As always, we are incredibly grateful for the support you continue to give our Airfix Workbench blog.
