Welcome to this latest edition of our Workbench blog and all the news, updates, and modelling exclusives from the fascinating world of Airfix.
One of the main offensive assets the Allied air forces could call upon during the Second World War was the availability of large numbers of capable four engined heavy bombers. Both Britain and America introduced aircraft capable of carrying the fight to enemy occupied Europe, with the Luftwaffe’s inability to match them thought by many to be one of the most significant factors in them ultimately losing the war. Both Britain and America could call upon the destructive services of three different four engined heavy bombers during WWII, with the Avro Lancaster joining the Short Stirling and Handley Page Halifax in Bomber Command service, pounding countless German targets by night.
The Americans also had three such aircraft, the impressive late war Boeing B-29 Superfortress joining the B-17 Flying Fortress and Consolidated B-24 Liberator which were already in service, although as far as many people are concerned, this particular story started and ended with the Flying Fortress. For whatever the reason maybe, the B-17 seemed to capture the imagination of the world, and as such, is often regarded by many as the most famous and most important four engined heavy bomber of the war, even though the B-24 Liberator was produced in greater numbers and was arguably the better aircraft.
As we welcome what is just the second release from our new 1/72nd scale Consolidated B-24 Liberator tooling to the 2025 range, this latest update will help us attempt to redress this historic imbalance by discovering why the B-24 was much more than just an aircraft which served as a support act for the Flying Fortress throughout the USAAF daylight bombing campaign against Germany in WWII, and is deserving of much greater recognition than it usually receives.
A true WWII aviation heavyweight is under the Airfix modelling spotlight in this latest edition of Workbench.
Airfix have a proud reputation for recreating the world’s most significant aircraft as scale model kits stemming back to the very first Spitfire model in 1955.
For those of us who have enjoyed being part of the modelling community over the years, we will all have our own reasons behind the decision to devote so much of our free time to making scale model kits. It could be that we are interested in the variety of aircraft types which took part in the air battles of the Second World War, or gained a fascination for the classic wooden galleons which ruled the oceans during the 16th and 17th centuries, ships which featured so regularly in our school history books.
Whatever our own personal reasons may be, scale model kits helped to bring the stories that captivated us so much during our formative years to life, tactile three dimensional scale representations of some of the most significant craft in the history of humanity, each fascinating in their own right. Model kits help to tell and preserve human stories from the most fascinating periods in history, the stories of ace pilots, intrepid explorers, and talented designers, who all helped to shape the modern world, and whether they preserve the stories of those who designed, built, maintained or operated them, these stories are all worthy of being preserved and celebrated.
When talking about the relative merits and overall performance of two of the most important four-engined US heavy bombers of the Second World War, such discussions can become highly subjective and open to interpretation, with the only people truly able to comment being those who served operationally on BOTH aircraft types, and those special people are now few and far between. Having said that, having built scale examples of both aircraft types displayed in front of us can provide us with a focal point to such discussions, helping us to come to our own conclusions, having studied all the related pros and cons.
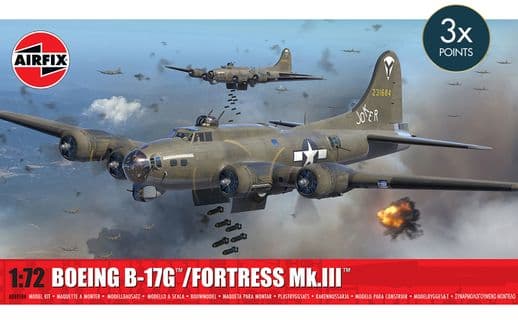
Over the years, both the Boeing B-17 Flying Fortress and the Consolidated B-24 Liberator have been stable model kit subjects within the Airfix range, with the Flying Fortress appearing first back in 1962, and the Liberator joining the range the following year, but with both going on to become popular and iconic additions to our beloved hobby. With the designers at the time cleverly introducing some impressive elements into the production of these kits, such as operating turrets and undercarriage position options, both would become staples for modellers all over the world, and would do much in attracting new people to the hobby.
This popularity has been underlined in recent years as both aircraft have been the subject of new Airfix tooling projects, with the popularity of these iconic aircraft showing absolutely no sign of abating. Whether the Flying Fortress or the B-24 Liberator get your vote in the best US heavy bomber of WWII stakes, we now have impressive recently tooled kit examples of both to help us make up our minds, with just the second release from the Liberator having arrived in model stores everywhere.
Let’s spend a moment or two looking at the Consolidated B-24 Liberator in a little more detail, and to hopefully explain why this has to be regarded as one of the most significant aircraft in US aviation history.
The second release from our B-24 Liberator tooling features two scheme options which have fascinating stories to tell.
It's interesting to discover that when looking at the history behind the development of the Consolidated B-24 Liberator, the story of this exceptional aircraft actually begins with a US Army Air Force request for Consolidated to produce B-17 Flying Fortress bomber for them under licence back in 1938. With the clouds of war gathering ominously in Europe, US officials were convinced that advanced heavy bombers would be playing a significant role in any conflict to come and in the Flying Fortress, they had an aircraft which was just about as good as it gets.
Following a visit to the Boeing production facilities in Seattle, Consolidated officials went back to the USAAF with an audacious counter proposal to their licence manufacturing request. They informed them that they were happy to build their bombers, but wanted to produce one of their own design, a new aircraft which would be better than the current Flying Fortress. Intrigued by their confidence, the USAAF invited Consolidated to submit a design study in January 1939, however, as the proposed new aircraft promised to be faster, was able to carry a greater bomb load over greater distances than the existing B-17, it was virtually assured of gaining a future production contract.
Taking design inspiration from the existing PBY Catalina flying boat Consolidated were already producing, the new bomber featured a deep fuselage and innovative bomb-bay doors, doors which resembled metal roller shutters and moved up the side of the fuselage when opened. This feature had the dual advantage of allowing the aircraft to be 'bombed up' more efficiently when the aircraft was on the ground, but was also much more aerodynamically efficient when opened in flight.
The Liberator also featured an advanced shoulder mounted 'Davis Wing' which was highly efficient and endowed the Liberator with greater speed and range than the B-17 Flying Fortress. Relatively thick in profile, the wing was much narrower and longer than the one used on the B-17 and was set high on the fuselage of the new aircraft, similar to the configuration of the PBY Catalina, with the high positioning of the engines helping to protect them from foreign object damage whilst on the ground, even though servicing would be more difficult for mechanics at bomber stations around the world.
The Liberator used four supercharged Pratt & Whitney R-1830-35 Twin Wasp engines housed in similar nacelles to those employed on the Catalina, even though the requirement to install oil coolers on either side of each engine gave the Liberator's nacelles a distinctly oval appearance.
During the B-24's flight testing programme, the aircraft posted performance figures which eclipsed those of the Flying Fortress, and highlighted the fact that it was indeed able to fly faster, carry greater bomb loads and over greater distances than its famous Boeing predecessor. Officials must have been excited at the prospect of introducing their advanced new bomber, particularly as the cavernous fuselage of the aircraft arguably made it a significantly more versatile aircraft than the Flying Fortress - the future certainly looked bright for America's new B-24 Liberator.
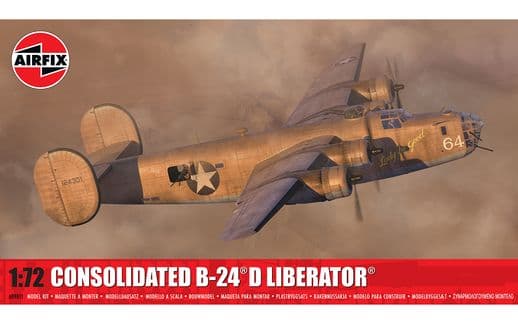
Airfix box artwork hols a special place in our hobby, and this example was created to announce the release of the first kit produced from this new mould set.
Impressive as the new bomber undoubtedly was, it wasn't all good news for the new Liberator, as its advanced design presented several significant challenges for the service pilot flying it following its introduction. Certainly, during the early years of B-24 operation, even the most ardent of B-24 supporters would have to concede that it was quite a challenging aeroplane to fly, heavy on the controls and with the high, narrow wing making it difficult to maintain position in the air at times. The aircraft had a tendency to wallow in flight and required almost constant corrective flight control inputs to be made by the pilot, which could be exhausting on a long mission. It has been reported many times that B-24 pilots and co-pilots would share flying responsibilities in twenty minute shifts between the two of them on long missions, just to keep themselves fresh and to avoid the potential of either of them becoming overly fatigued.
This difficulty keeping the aircraft straight and level was claimed to have prevented B-24 groups from holding tight formation during raids deep into enemy occupied Europe, where the integrity of the formations was vital in ensuring the most effective mutual defence against attacking enemy fighters. Loose formations presented many more attack opportunities than one where many hundreds of defensive machine guns could be brought to bear in any direction.
Once America's heavy bomber duo was committed to combat in large numbers, a great rivalry commenced between crews operating the aircraft, with each claiming theirs to be the more effective combat aircraft. B-24 Liberator crews claimed that whilst their aircraft was more challenging to fly, it was a real pilots aircraft and could reach targets the B-17 simply didn't have the range to attack. Flying Fortress pilots described the B-24 Liberator as being nothing more than the box in which a B-17 was delivered and whilst the Flying Fortress was undoubtedly the more famous of the two aircraft, the Liberator was crucial to the Allied war effort and went on to become an aviation record setter.
A situation which really does highlight how the B-24 Liberator is positioned historically in the minds of many people occurred in February 1943, when B-24 41-23728 'Hot Stuff' of the 330th BS completed twenty five operational missions over Europe, the first USAAF heavy bomber to do so and a full three and a half months before the much more famous B-17 'Memphis Belle', the story of which we all know only too well.
After 'Hot Stuff' had completed 31 missions, it was decided that she and her crew should fly back to the US to undertake a war bond tour, however, during the subsequent flight home, the aircraft was lost during bad weather over Iceland, tragically claiming the lives of all but one on board. Due to the tragic nature of the incident, the USAAF decided to change their original plan and instead focus on the impending 25th mission achievement of the 'Memphis Belle', and the rest, as they say, is aviation history.
Perhaps the most significant operational difference between the B-17 and the Liberator was how the design of the B-24 dictated that the aircraft was forced to operate at markedly lower altitudes than its Boeing comrade in arms, where they were vulnerable to more enemy aircraft and where flak defences were significantly more effective. As a consequence, B-24 Liberator crews suffered terribly at the hands of Germany's air raid defences, even though they did deliver more bombs on target than any other Allied bomber type during WWII.
A CAD screengrab produced by our designer during the latter stages of his work with the new Consolidated B-24 Liberator project.
Made available to the British via the Lend-Lease Act, the impressive range and versatility of the Liberator saw these first aircraft to see combat during WWII pressed into service initially as trans-Atlantic ferry aircraft, taking delivery pilots to the US to pick up new aircraft to fly back to Britain. Others performed the vital role of airborne anti U-Boat protectors for naval convoys during the Battle of the Atlantic, a battle which for Britain at least, was the most critical of the entire war.
Following its subsequent USAAF introduction in 1941, the B-24 Liberator would go on be produced in vast quantities, serving in every theatre of war during WWII, and making a vital contribution to the Allied War effort. Indeed, it could be argued that no other aircraft came to represent the incredible industrial might of the American war machine than the B-24 Liberator, an aircraft which during its production life, was manufactured at five different plants across the country. It was claimed that at its peak, the Ford production plant at Willow Run Michigan could construct Liberators faster that the USAAF could process them into service, with some sources claiming around one bomber per hour could be produced by teams at this impressive facility.
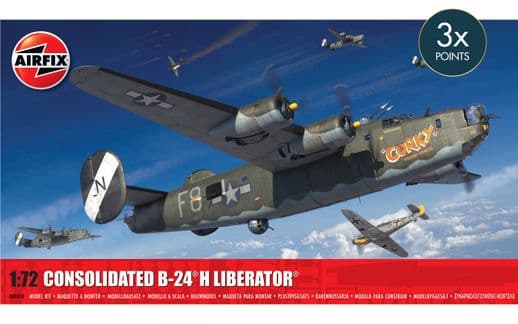
The introduction of the 'H' model addressed the aircraft's vulnerability to frontal attack once and for all, something enemy fighter pilots had been exploiting since the B-24's combat introduction. This variant was the first to be manufactured from the outset complete with an electrically operated Emerson A-15 nose turret, in addition to introducing around fifty other design modifications to make the Liberator a more combat effective aircraft. Although earlier versions of the Liberator did feature nose turrets, they were introduced later in the production run of those variants and even in some cases, installed as in-service modifications.
With just under 18,500 machines produced, the Consolidated B-24 Liberator would go on to become the most heavily produced four engined bomber in the history of warfare, in addition to becoming America's most produced aircraft of the Second World War. Quite simply, the B-24 was flown by more men, carried more bombs over greater distances and destroyed more targets than any other bomber in the history of aviation - quite impressive numbers for an aircraft which is probably still in the shadow of the Flying Fortress.
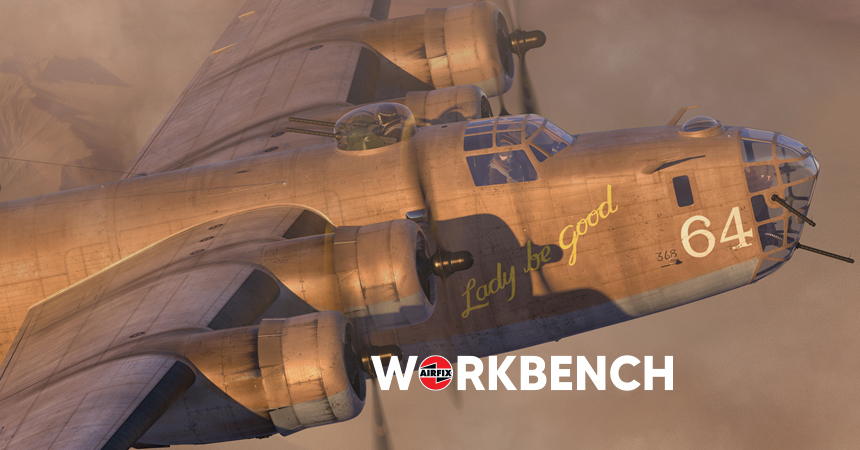
For the crew of new B-24 Liberator “Lady be good” their first combat mission on 4th April 1943 would tragically be their last, creating an aviation mystery that wouldn’t be solved until long after the war had ended.
We mentioned earlier about how the machines which have inspired replication in scale kit form throughout the history of Airfix also serve to tell the stories of the people who maintained and operated them, well, this is something which is illustrated perfectly by the first scheme option included with this second B-24 Liberator release.
The bomber crews who wrote a particularly heroic chapter in the air war annals of the Second World War were not only brave and extremely professional, they were also forced to put their lives in the hands of technology every time their aircraft climbed away from their home stations, each man working as part of a cohesive team, but each one hoping that luck and fate would be on their side this time around. Anyone who has ever been fortunate enough to inspect a WWII era engine at close quarters will no doubt have marvelled at the sheer complexity of the technology employed and how it's made up of thousands of beautifully engineered individual components.
In order for the engine to work as intended, each one of these components would have to work as intended for potentially many hours, if that engine was to get its crew home, not to mention the fact that the average bomber was made up of literally hundreds of different components, which all needed to perform as intended. These crews were literally putting their lives in the hands of technology, but would also have any number of other perils thrown at them during the average mission, such as weather conditions, the ability to navigate under extreme pressure and of course, enemy action. How these young men climbed aboard their aircraft time and time again to face the enemy is quite astonishing and continues to leave us all with huge admiration for their courage and mental fortitude.
One mission which highlighted all the many perils faced by an inexperienced USAAF bomber crew fighting in Europe and North Africa during the Second World War is marked by the first scheme of the two included with the second release from our new B-24 Liberator tooling, one which involved the mysterious disappearance of a new bomber, and the tragic loss of another brave crew.
When a highly trained, but combat inexperienced crew were assigned their newly delivered Consolidated B-24D Liberator at Soluch airfield near Benghazi in early 1943, they must have been excited about playing their part in the defeat of Germany, if understandably being a little trepidatious about what the future held for them. Wearing its factory applied desert scheme of sand over neutral grey, the bomber had been named “Lady be good” by her crew, as they clearly hoped she was going to be a lucky ship for them, bringing them back safely from many a future mission over enemy territory.
Their unit had only arrived in North Africa on 18th March 1943, but would soon be taking part in operations to prepare the soft underbelly of Europe (as described by British Prime Minister Winston Churchill) for an invasion push towards the heart of Germany itself, operations which started with the Allied invasion of North Africa in November 1942. That first combat mission would come on 4th April 1943, when the crew of “Lady be good” were assigned to take part in a bombing raid against the port of Naples, a raid which comprised of 25 B-24 Liberators from the 376th Bomb Group, but split into two elements.
“Lady be good” was one of the last bombers to take off from Soluch Field at around 2.30 in the afternoon, with the main force already heading for the target, but things started to go wrong right from the outset. The aircraft headed into strong winds and a sandstorm, which made the ability to formate on other aircraft and basic navigation difficult, with eight aircraft from this second group of thirteen bombers all turning back to Soluch as a consequence. The crew of “Lady be good” decided to press on to the target regardless, but alone, as they had become separated from other aircraft in the attack group.
Successfully reaching the target area, the crew were unable to release their payload due to the weather conditions over the target completely obscuring their view, so they, along with another Liberator, proceeded on to their secondary target, where they eventually dropped their bombs. The remaining aircraft on the raid ditched their bombs into the Mediterranean to reduce weight and save fuel, with all aircraft now setting a course for home. Flying alone and in fading light, the crew of “Lady be good” were struggling to find any bearings from which to plot a course home, and it was later discovered that the aircraft’s navigator didn’t make any entries in his navigational log during the entire flight home, which was highly irregular.
This downed bomber was found in the Sahara Desert fifteen years after coming to rest there.
With the aircraft’s direction finder now not working, the pilot sent a radio message to his home base requesting a bearing for them to follow, but as the equipment available could only provide a straight line bearing from the target back to Benghazi, it was unable to ascertain whether the aircraft was positioned out over the Mediterranean, or inland over the Libyan desert. With the crew now disorientated with the expanse of black beneath them, and not knowing if they were over ocean or land, it appears their flightpath actually took them close to their home airfield, but how inexplicably, they failed to notice the flares being fired off to alert them of their position. This was their first mission after all, and things were going very badly for them, so the bomber flew on, deep into the desert.
By morning, as there had been no sign of the aircraft, and no further communications from them, officials at Soluch Field assumed the bomber had ditched in the Mediterranean and sent search teams out to look for them. Those teams came back reporting no sightings of anything they might associate with an aircraft ditching, and eventually, the search was called off, with the bomber and its crew posted as missing in action, presumed ditched in the sea. The fate of the aircraft and its novice crew was something of a mystery, however the 376th Bomb Group were committed to their war effort.
This story would be lost in the Libyan Desert for fifteen years, until a British oil exploration team surveying the area from the air spotted the crashed bomber on 9th November 1958. The aircraft appeared to be remarkably well preserved, with the US markings being clearly visible to them. It’s location was marked, and on landing, company officials contacted the US base at Wheelus to report their findings, however, with no aircraft reported as being lost in the area during the war, they didn’t investigate further.
The following year, a follow up ground expedition by the oil exploration company found the wreckage and noted that despite being broken in two from the crash landing, how the aircraft was in remarkably good condition. The radio was still in working order, as were the aircraft’s machine guns, and both food and drinkable water was found inside the aircraft’s fuselage. What they didn’t find were any signs of the aircraft’s crew, and whilst further details were sent to Wheelus Air Base, the mystery continued.
With this new evidence, a team was subsequently dispatched from the American air base, and they eventually managed to find the bodies of five of the crew, and significantly, a journal which had been kept by the co-pilot, which documented the events of 1943. Over the course of the next few months, armed with this new journal information, the bodies of most of the crew were located and repatriated, however two men are thought to remain under the shifting sands of the Libyan Desert.
So, what did happen to the crew of B-24 Liberator ‘Lady be good’?
Solving the mystery
The discovery of the wreckage of “Lady be good” would eventually lead to this aviation mystery being solved, and the tragic repatriation of most of the aircraft’s crew.
The details behind the discovery of this bomber 400 miles inland from its base are incredibly tragic, and it’s difficult to imagine what this crew were forced to endure on what was their first combat mission. With the mission being affected by poor weather on both the outbound and homeward legs, and with something clearly going on with their ability to navigate accurately, the crew didn’t know where they were, or whether they were on course to arrive back at their home airfield. The bearing request they made did put the aircraft on the correct track, but they didn’t know that they’d already passed over the airfield and were heading further inland.
That being the case, when the base fired off flares for the crew to see, only the rear and potentially the ball gunner would have had a chance of seeing them, but with things now getting a little frantic onboard, were either of the gunners still in their positions, or were they with the rest of the crew in the belly of the mighty bomber discussing their best course of action? Whatever the case may have been, they didn’t react to the base flares, and flew on deeper into the desert.
At 02.00 and with fuel now at a critical level, the crew decided that they would have a better chance of survival if they took to their parachutes. At that time, they thought they were still over the ocean, but felt that they must be near to the coast, so swimming to the shore was definitely their best option. Unfortunately, as we now know, they were actually 400 miles inland and over the vast expanses of the Libyan desert, lost and a long way from safety.
With the aircraft on autopilot, each crew member took their turn to exit the aircraft, with the B-24 Liberator flying on until the fuel ran out, forcing it to settle onto its final sandy resting place. Clearly, the crew would have been surprised to have landed on solid ground, but managed to locate each other by firing their sidearms and flares, eventually all coming together. Eight of the nine crew members came together, but unbeknown to them, their bombardier had perished, as his parachute failed to open fully.
Thinking they were near the coast, the group decided to walk north to find salvation, but tragically for them, there was more than 400 miles of desert between them and their home base. With little in the way of food and water, and with the days being swelteringly hot and the nights perishingly cold, the main group managed to walk 80 miles from the crash site before stopping, with the strongest three electing to carry on for a further 20 miles, in an attempt to raise the alarm for their exhausted comrades. As we now know, their valiant efforts were to no avail, and the desert would ultimately claim the entire crew of “Lady be good”.
These scheme details commemorate an aircraft which highlighted the perils faced by all bomber crews during the Second World War, but the tragic story of one novice crew and their new bomber, both of which were making their first operational mission.
When the ground expedition discovered the downed bomber in 1959, personal items of the crew, and some aircraft components were collected and returned to the US Air Force, with some of those items subsequently used on other aircraft – most of these aircraft suffered their own difficulties, which helped to fuel stories that “Lady be good” was something of a cursed aircraft. Tragically, as we now know, had the crew parachuted closer to the crash site, or remained with their aircraft in a controlled crash landing, the fact that they had a working radio and supplies, suggests that they would have stood a good chance of being rescued.
Such a tragic story, this does highlight the perils all bomber crews faced during the Second World War every time they left their home airfield, even without factoring in the fact that enemy defences existed specifically to shoot Allied aircraft down.
Designated the 400th Bombardment Squadron (Heavy) on 22nd April 1942, the 400th were nicknamed the ‘Black Pirates’ and operated the Consolidated B-24D Liberator bomber. Crews first started training on at the Willow Run manufacturing facility at Michigan, before moving on to Hickam Field in Hawaii during September that same year, where the bombers were prepared for the onward flight across the Pacific to Australia. They were destined to be joining the USAAF 5th Air Force in the Southwest Pacific Theatre of operations.
By 4th November 1943, all four squadrons which constituted the 90th Bombardment Group, including the 400th Bomb Squadron, arrived at Iron Range Airfield in Queensland, a location selected as it was far enough out of the range of Japanese air units, but ideally placed to allow the bombers to raid across New Guinea, the Bismark Sea and the wider Pacific Theatre.
The site had been identified as a potential bomber base for US aircraft in early 1942 and later that same year, specialists from the 46th Engineer General Service Regiment built two 7,000ft runways and over 13 miles of sealed taxiways within 3 months, an impressive engineering achievement by any standard.
In early November, the B-24 Liberators of the 90th Bombardment Group arrived at the airfield, even though building work was still continuing, and the runways were yet to be completed. Crews described conditions there as ‘primitive’ to say the least, with some even going so far as to describe them as being the worst they had ever experienced – this may have had something to do with the fact that they were sharing the airfield with snakes, scorpions and a cornucopia of creepy-crawlies.
This aircraft would help to bring about a change in Allied fortunes across the Pacific and would later be assigned to the Royal Australian Air Force.
Full scheme details for the 90th Bomb Group’s 'Hell’s Belle'.
The aircraft of the 90th Bombardment Group were adorned with a large skull and crossed bombs on their tail units, an impressive insignia which was created by talented artist Sgt Leonard Baer. He created a stencil template made out of aluminium to assist with the job of application, with each of the unit’s four squadrons having their own coloured background – the 400th BS had a black background.
The unit’s first year of Pacific operations proved to be challenging to say the least, as they came to terms with the long range nature of operations in the Pacific, and how the need to stem Japanese advances in the region saw them having to embrace an extremely heavy mission load. Suffering horrendous losses, morale began to suffer, however under the inspirational leadership of Col Arthur H Rogers, they effectively managed to turn the tide, and become the scourge of the Japanese. With their Jolly Roger emblem helping to mark the fact that they were raiding Japanese shipping in the area like the pirates of old, members of the 90th BG thought themselves to be part of the finest damn Bomb Group in the USAAF.
The performance of the USAAF 90th Bomb Group was exceptional, and across the vast expanses of the Pacific Ocean, their raids would have a significant impact on Japanese military operations, helping to turn the tide of war in this theatre in favour of the Allies. This particular Liberator ‘Hell’s Belle’ was one of the hard working B-24s involved in this work, carrying impressive nose artwork on both sides of the aircraft’s fuselage, to complement the distinctive skull and crossed bombs of the 90th Bombardment Group.
It's not known how many bombing missions this aircraft actually completed during her operational career, but what we do know was that she was one of twelve war weary Liberators transferred to the Royal Australian Air Force later in the war. Australian crews had been flying Liberators with the RAF since early in the war, and as USAAF crews started flying missions from Australian bases against the Japanese, Australian crews were allowed to fly missions with the Americans to gain vital combat experience.
Another built sample model finished in this unusual, but incredibly appealing Pacific Theatre scheme.
Prior to the delivery of newly produced Liberators for the RAAF, these crews would form the nucleus of a new training unit at Tocumwal Air Base in New South Wales, which was Australia’s largest airfield complex. This is the base where the American’s sent twelve war weary Liberators to help assist in this program, with 41-24290 'Hell’s Belle' being one of those aircraft, allocated the RAAF serial A72-8 and assigned to No.7 Operational Training Unit on 22nd February 1944.
This aircraft crashed during take off on 11th January 1945, when the nose wheel collapsed at high speed, with the subsequent damage being severe enough to result in the aircraft being scrapped.
This scheme marks the Pacific service of this prolific US heavy bomber from the Second World War, a type which was also the only four-engined heavy bomber to be used by the Royal Australian Air Force in operations against the Japanese in this theatre.
The details recounted above show us that rather than being a Flying Fortress support act, the Consolidated B-24 Liberator was a vital component in the Allied war effort during the Second World War, the most heavily produced four-engined heavy bomber in history, and an aircraft which highlighted America’s proficiency in the mass-production of effective military equipment throughout the conflict.
Taking much design inspiration from the flying boat aircraft Consolidated were famous for producing, the Liberator was intended to be a more effective aircraft than the B-17 Flying Fortress already in service, which in many ways it was. Although often overshadowed by its predecessor, the success of the Allied bombing campaign unquestionably relied on the contribution of both aircraft, and from a modelling perspective, both types really should be displayed next to each other, examples of these famous aviation brothers in arms. Tragically, so many young men flying both aircraft types would pay the ultimate price in making their selfless contribution to the Allied war effort.
This new kit adds weight to any discussion as to whether you feel the Flying Fortress, or the Liberator was the more effective American heavy bomber of the Second World War.
Already available, the new Liberator kit is a build project of real distinction, with both scheme options offering the modeller something that little bit different.
We are afraid that's all we have for you in this latest edition, but we will be back next Friday with more project development updates and the very latest Airfix kit exclusives. In the meantime, we are always keen to hear your views on all things Airfix and in particular, any thoughts and opinions you may have regarding our Workbench blog. If you would like to drop us a quick line, could we please ask that you use our workbench@airfix.com email for all correspondence.
To re-visit any of the Airfix blogs we have produced over the past seven years or so, please head to our main Workbench hub, where you will find our entire blog back catalogue and all the Airfix design projects we have already covered.
All our dedicated official social media sites can be accessed by clicking the respective link icons at the foot of this page, or by heading to the Airfix homepage. Other useful Airfix links are:
Facebook, YouTube, Twitter and Instagram official sites
Please join us for more Airfix updates next week and thank you for your continued support.