Welcome to this latest edition of our Workbench blog and all the news, updates, and modelling exclusives from the fascinating world of Airfix.
Well, that’s it – the clocks have moved backwards and we now find ourselves well and truly on modelling saving time! With that being the case, we must also be about to enjoy the latest instalment of the modelling extravaganza we know as Scale ModelWorld, and our preparations for attendance at this year’s show have certainly had an impact on planning for this latest edition of Workbench. You can look forward to another dual posting weekend for the blog, however, in both cases, we will be re-visiting relatively recently released kits, but allowing us to share built model images which have only become available over the past few weeks. In addition to this, we implore Workbench regulars to keep an eye on the Airfix website over the coming few days, as there may or may not be a couple of additional blog posts, which may or may not have links to our attendance at this year’s Scale ModelWorld show – how very cryptic!
In this first blog, we will be revisiting a kit which is making just its second range appearance since the tooling was first announced back in 2020, an aircraft which was so important to Britain’s war effort during the Second World War, that it was ordered straight from the drawing board, the Bristol Beaufort. This will be joined by a separately posted blog where our beautiful 1/48th scale Gloster Meteor will be in the blog spotlight. This kit first appeared in Workbench late last year, but as it is now in the limited availability category, and we again have a selection of built model imagery to share, we don’t think many readers will be against us taking this opportunity to feature our scale tribute to this classic jet once again.
As usual, both blogs will be posted separately and can be accessed by visiting the main Workbench blog homepage, where almost ten years of Airfix blogs can now be accessed.
We’re on Scale ModelWorld countdown this weekend and you know that always means lots of lovely Airfix models to see!
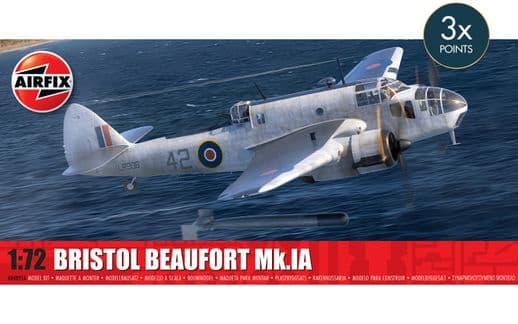
The appealing new box artwork produced in support of this second Bristol Beaufort release took inspiration from the details behind the second scheme option included with this kit and features a No.2 Torpedo Training Unit going about its business off the coast of Dumfries and Galloway.
As an island nation with an empire to maintain and a war to fight, the most important battle Britain had to win during the dark days of the Second World War was unquestionably the war at sea. The ability to maintain the integrity of her merchant shipping lanes, whilst at the same time denying her enemies the ability to obtain supplies by sea, was crucial and would ultimately determine if the nation would prevail. In addition to still possessing one of the most powerful navies in the world, Britain’s military had to have access to effective maritime strike aircraft which could destroy enemy shipping and submarines either close to shore, or in the middle of the Atlantic Ocean and it would be fair to say that at the start of the conflict, they were ill-prepared to meet that challenge.
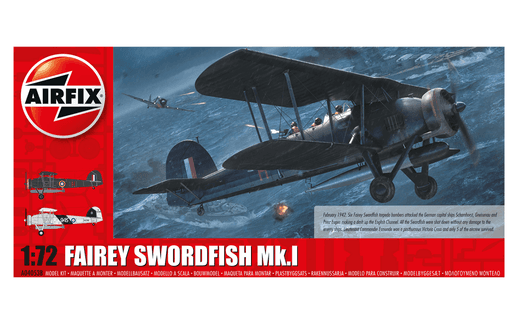
In the months which preceded the start of the Second World War, the most effective anti-shipping torpedo equipped aircraft available to the British was the Fairey Swordfish biplane and whilst this proved to be an exceptional aircraft during the war, the RAF were in desperate need of a powerful, modern torpedo bomber, capable of mounting long range strike missions. Indeed, the RAF were still operating the Vickers Vildebeest at that time, a large and ungainly coastal defence/torpedo bomber which was only capable of 143 mph under optimum conditions and without any weapons attached, an aircraft which was completely obsolete by that time.
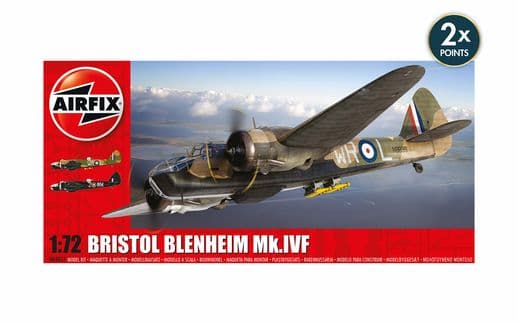
During the 1930s, the Bristol Aeroplane Company were without doubt one of the most proficient aircraft manufacturers not only in Britain, but across the world. Responsible for producing the RAF’s most important fighter of the decade, the fast and agile Bulldog, the company would also play a significant role in supporting the expansion of a modernising Royal Air Force, as their Blenheim light bomber would ultimately point towards the future of military aircraft design. An aircraft which was initially envisaged as an evolutionary development of the Blenheim, the Bristol Beaufort went on to earn the distinction of being the only monoplane aircraft type produced for the Royal Air Force which was designed from the outset to fulfil the dual roles of torpedo bomber and reconnaissance aircraft.
Taking design elements from the Blenheim which preceded it, the Beaufort turned out to be a very different aeroplane, but one which held enough promise to be ordered in quantity straight from the drawing board. This image features-built sample models finished in both scheme options included with this second release.
Highlighting the pressing need for an aircraft possessing these crucial maritime capabilities, the Beaufort was one of only a handful of aircraft to be ordered by the British Air Ministry whilst the project was still ‘on the drawing board’ and before a prototype aircraft had flown, a move which clearly reflected the faith they had in the Bristol Company, and the urgency of the situation. The Beaufort may well have started life as a Blenheim development, but it quickly became apparent that the new aircraft would look quite different to its predecessor. With a much deeper front fuselage section needed to accommodate its crew of four and the requirement to carry a torpedo in a semi-recessed position under the fuselage, a gross weight increase of around 25 percent over the Blenheim ensured that whilst the two aircraft may have been related in aviation terms, they most certainly could not be described as twins, in a visual sense.
Historically, the demanding specifications the Beaufort was required to satisfy, in conjunction with Bristol’s existing Blenheim manufacturing commitments, dictated that an aircraft which had production contracts initially signed in August 1936 would not actually see its squadron introduction until almost three and a half years later, when Britain was already at war. Once in squadron service, the Beaufort quickly proved to be an extremely rugged and highly manoeuvrable aircraft, one which would be tasked with performing some of the most demanding strike attack missions of the war.
Eventually entering Royal Air Force service with No.22 Squadron Coastal Command in January 1940, the Bristol Beaufort proved to be a rugged and highly manoeuvrable attack aircraft, even though the development of the new engines continued to be something of a problem throughout its introduction. Initially employed on missions laying mines in enemy controlled waters, Beauforts would later mount attacks against the German battleships Scharnhorst and Gneisenau and the heavy cruiser Prinz Eugen, however, in the European theatre of operations, the aircraft would mainly go on to operate as a medium bomber.
In the Mediterranean, Beauforts operating from Egypt and Malta would take a terrible toll of Axis shipping and during a concerted maritime onslaught from the middle of 1942, would make a significant contribution in denying Rommel’s Afrika Korps the vital supplies they needed to continue fighting the desert war.
Due to the relatively heavy weight of the Beaufort, a steep diving approach when engaged in a torpedo attack was both ineffective and could prove fatal for the aircraft’s crew. The attack run had to be performed at a relatively low, flat attitude and quite some way from the target, if the torpedo release was to be successful and not enter the water at too steep an angle.
This obviously made the aircraft vulnerable to accurate defensive fire from the vessels being attacked, however, Beaufort pilots were brave and aggressive in their flying, making full use of the aircraft’s excellent manoeuvrability at low altitude to evade the attentions of enemy gunners. With its thick wings and large fuselage, this was a rugged aeroplane, and one built to thrive in these low altitude combat situations.
Another built model image featuring both scheme options included with this second release. As both are very different from those included with the first release, which one gets your vote?
Even though large numbers of Beaufort’s were desperately needed by the Royal Air Force, the aircraft wasn’t without its teething troubles and for the men who bravely took the aircraft into combat, they were quick to report back to their superiors how the operational performance of the aircraft could be improved. The performance and supply of the Bristol Taurus 14 cylinder, two-row sleeve valve engines was the main issue affecting the early introduction of the Beaufort and despite a protracted introduction which was delayed because of these engines, power output improvements were proving to be almost comically slow during this time.
From the early days of operational flying, the Taurus engines were rather politely described as being ‘notoriously troublesome’ within official channels and were probably responsible for holding back the initial operational impact of the Beaufort. An aircraft which was generally excellent in the environment for which it was intended to operate, the Taurus engines appeared to be doing their level best to derail the introduction of the aircraft. Despite several years of constant development, the power output gain achieved on the latest version of the engine was a modest 1,130 hp compared to the 1,015 hp of the original units, something which barely kept pace with the ever-increasing weight of the latest equipment being added to the aircraft. Indeed, at one stage, a withdrawal of Beaufort aircraft from operational flying was considered until the engine problems could be overcome, however, this was thankfully never actioned.
From the resumption of Beaufort Mk.I production in early 1942, the aircraft benefitted from several significant improvements which resulted in a designation alteration to Mk.IA aircraft. With plenty of operational flying now behind them, Bristol had incorporated several of the crew requested changes into the production of new aircraft, including significant strengthening to both the fuselage and wings, the adoption of the latest, more powerful variants of the Bristol Taurus engines and an increase in the aircraft’s defensive armament, as it now adopted a twin Browning machine gun arrangement for the dorsal position, which was now housed in a Bristol B1 MK.V turret, a unit similar to the one used on the Blenheim Mk.V.
Although these changes undoubtedly improved the performance of the Beaufort, the Taurus engines continued to be troublesome, and the situation wouldn’t really change until a decision to re-engine future aircraft with the American built Pratt & Whitney Twin Wasp engine was taken. By this time, the more aggressive and much faster Beaufighter was in service, an aircraft which was also capable of delivering air launched torpedos against shipping targets.
The new Airfix 1/72nd scale Bristol Beaufort tooling was announced at the beginning of 2020 and Workbench regulars were able to chart the development progress of this highly anticipated model at several stages throughout the year. Once the initial release had been introduced, the model enjoyed rave reviews from modellers who were glad to be able to finally add this important WWII British aircraft type to their schedules and subsequently to their collections of built models.
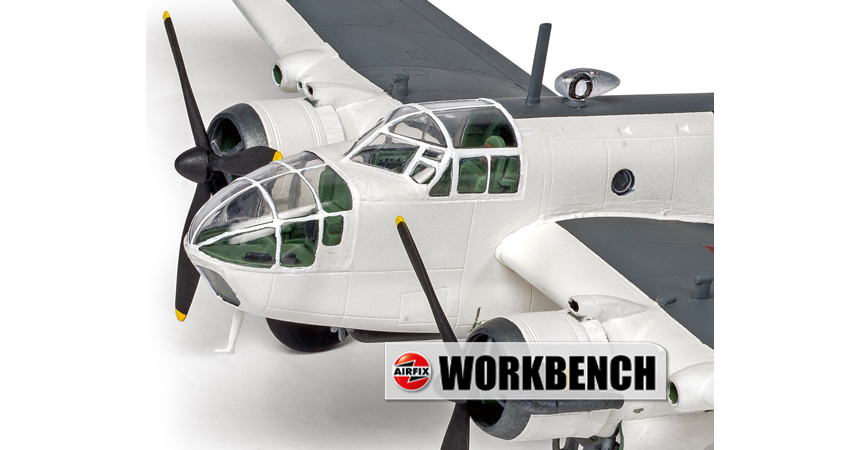
Already gracing model shops everywhere, this box top illustration shows just how different the Beaufort was to the Blenheim which preceded it.
That initial release was supported by the production of a stunning piece of box artwork, one which was a representation of Bristol Beaufort Mk.I N1016, an aircraft which was operated by pilot Flying Officer Kenneth Campbell and his crew on 6th April 1941. On that fateful day, this was the only aircraft of a force of Beaufort’s sent to attack the mighty German battleship Gneisenau at Brest to make it through mirky weather conditions off the French coast, with the crew facing the decision as to whether they should press home their attack alone, or return to base to fight another day.
As it was, the aircraft and its crew made a heroic solo attack against the Gneisenau, facing the full fury of the ship’s defensive armament and that of shore defences at Brest. Their attack was successful in damaging the mighty ship, however, their aircraft also suffered terrible damage during the run in and crashed into the sea not far from shore, claiming the lives of all souls on board. For his actions, but surely a reflection on the heroism of the entire crew, Flying Officer Kenneth Campbell was posthumously awarded the Victoria Cross, Britain’s highest award for valour in the presence of the enemy.
The two new scheme options included with this second release from the Beaufort tooling are very different from either scheme offered with that initial release and for the first time, allow the additional parts included for the Mk.IA variant of the aircraft to be used. The beautiful new box artwork features a training aircraft which was based at Castle Kennedy in Dumfries and Galloway during the late summer of 1943, but before we look at the details behind this particular scheme, let’s focus our attention on the first scheme offering included with this new kit.
We mentioned earlier how the Beaufort had been initially ordered in a desperate attempt to provide the Royal Air Force with a more capable torpedo bomber than the aircraft currently in service, namely the Vickers Vildebeest - Well, this first scheme option actually has a link, if somewhat tenuous, to Vildebeest operations during the Second World War. Although not common knowledge to most people, the Vickers Vildebeest was used operationally by the Royal Air Force during the Second World War and in heroic circumstances by brave crews.
Although they had been expecting to receive new Bristol Beaufort torpedo bombers for some time, two squadrons of Vildebeest biplanes were still based in Singapore and Malaya in December 1941, when a powerful Japanese naval force attacked. Despite being seriously outnumbered and operating these outdated aeroplanes, crews bravely went on the offensive, mounting numerous attacks against the enemy, even though they had little chance of success. Indeed, with each attack mounted, several of the aircraft were lost, or sustained significant damage during their attacks.
Nos.36 and 100 Squadrons had been expecting new Beaufort’s for several months prior to the Japanese attack, yet took their Vildebeest aircraft valiantly to war without question, facing withering enemy opposition and arguably the most capable naval attack force in the world at that time. The vast majority of their aircraft were shot down during these actions, but even as they withdrew and the Japanese advance continued, Vildebeest crews continued their attacks with whatever aircraft they could muster at the time.
In the end, these attempts proved futile and just two remaining airworthy aircraft attempted to make the flight to Ceylon and a respite from the fighting, but even this attempt ended in tragedy. Having run out of fuel, both aircraft ditched into the sea off the Sumatran coast.
Despite only being in theatre since the mid 1930s, the sheer pace of aviation development during that period meant that some aircraft entering service were almost obsolete as soon as they were received by their new squadrons and would ultimately be forced to fight against much more capable enemy opposition. Thankfully, the RAF would start sending more capable aircraft to Asia from this point forward, with the Japanese having shown themselves to be formidable opposition.
Reformed as a maritime reconnaissance unit in March 1937, No.217 Squadron Royal Air Force began receiving their new Bristol Beauforts in May 1940, however, due to the ongoing problematic introduction of the aircraft, it would be several months before they were cleared to begin offensive operations. Those early missions were mainly either striking against Axis shipping operating off the coast of France, or mine laying in contested waters, hoping to claim as many enemy shipping casualties as they could.
The unit would be heavily involved in operations trying to prevent the German battleships Scharnhorst and Gneisenau from passing through the English Channel as they made for their home ports in February 1942, even though the unprepared Royal Air Force failed to make any significant impact on the ‘Dash’.
After seeing plenty of operational flying from bases in southern England, No.217 Squadron moved north to Scotland in advance of a major relocation to Ceylon and the prospect of combat operations against the Japanese, but whilst the ground elements of the unit were sent direct to South Asia, crews and their aircraft were routed via the Island of Malta. Rather than simply using this as a staging point, they would spend the next two months operating from Malta during some of the most savage fighting of the war, as Beaufort crews helped to stem Axis operations in the Mediterranean, at what would prove to be a crucial stage of the war.
Even though No.217 had been heavily involved in coastal operations for two years whilst based in Cornwall, their time flying from Malta was unquestionably their most active period of the entire war, and they would help in taking a heavy toll of Axis shipping.
After their unexpectedly active stay in Malta, crews finally departed for Ceylon, leaving their battered Beauforts behind to continue the fight. When they arrived in Asia, they would initially inherit Lockheed Hudson aircraft, which they would be quickly required to operate in an anti-submarine role, as another major Japanese offensive was expected at any time. Thankfully for them, that onslaught didn’t materialise, as the Japanese were preoccupied fighting the Americans in the Pacific and indeed, No.217 Squadron crews would have a relatively quiet rest of the war, mainly engaged in flying long, defensive patrols and reconnaissance flights.
In April 1943, the squadron took delivery of new Bristol Beauforts and as these aircraft were so familiar to them, had no difficulty in making a quick transition back to their old mounts. Although they wouldn’t know it at that time, they would only be using these aircraft for a relatively short time, as the RAF were now providing much stronger support for Southeast Asia Command, and they would soon be converting to the faster and more capable Beaufighter.
A really attractive and incredibly interesting scheme for a Bristol Beaufort to wear, this option presents one of the aircraft operated by No.217 Squadron from Vavuniya Airfield during the relatively short period between Lockheed Hudsons and Bristol Beaufighters, but a scheme which really does look great on a Beaufort.
Although they rarely receive the recognition they undoubtedly deserve, the RAF training units engaged in producing a constant stream of capable crews for front line squadrons throughout the Second World War were absolutely vital, and usually operated the aircraft types they would hope to be flying once posted to an operational unit. Crucially, when operational crews were presented with an opportunity to strike a blow at the heart of the enemy, their ability to do so was a direct result of the many hours of work they had put in at their training units, stations which were usually well behind the front lines, work which have them the skill and confidence to press home their attacks and make an offensive difference.
Tracing its lineage back to ‘A’ Torpedo Training Flight at Gosport in early 1936, No.2 Torpedo Training Unit was established at RAF Castle Kennedy in late 1942, offering crews training there the vast coastline of western Scotland over which to perfect their dangerous work. Bases right across Scotland allowed training crews to obtain the knowledge and experience they needed prior to being posted to an operational squadron, free from the threat of attack from marauding Luftwaffe aircraft. This supply of capable replacement crews was vital to the Allied war effort and was something which allowed the Allies to continue on their inexorable march towards eventual victory.
Particularly in relation to the execution of a successful aerial torpedo attack, the correct attack profile was not an easy thing to achieve for pilots, but was vital if the torpedo was to have any chance of hitting its intended target. The correct delivery flightpath was difficult enough for a pilot to achieve in the idyllic surroundings of Loch Ryan or the Firth of Clyde, however, every member of these trainee crews knew that when they would be doing this for real, it would likely be into a hail of defensive fire from their target, or with enemy fighters attempting to prevent their attack. If they were to be successful in the future, their work whilst in Scotland would have to become second nature for them, meaning that each and every training sortie had to be conducted with skill and professionalism.
No.2 Torpedo Training Unit were equipped with an eclectic collection of aircraft, underlining the importance of the work they were engaged in. They had access to Tiger Moths, Airspeed Oxfords, Lysanders, Beauforts and Beaufighters, however, the unit would only exist as an autonomous entity for around nine months, prior to being absorbed into the main No.1 Torpedo Training Unit of the Royal Air Force.
With its location on the Dumfries and Galloway coastline, the airfield at Castle Kennedy was established as a major gunnery school for the British military following the start of the Second World War. In advance of this, construction works to establish service roads, hangars, accommodation and administration facilities underlined the importance of this work and soon saw the arrival of the Blenheim, Hampden and Wellington aircraft of No.3 Air Gunnery School. The school also used Lysanders and Defiants as drone tugs, which allowed air gunners to have the opportunity to live fire on targets whilst in the air.
Once operations at the airfield were in full swing, it was quickly discovered that the grass runways were prone to becoming waterlogged after rainy periods, so during the following winter, aircraft were temporarily relocated to a neighbouring airfield whilst the work to lay two new concrete runways was carried out. At the same time, contractors also took the opportunity to construct additional hangars and other support buildings. These works took four months to complete, but once finished, all the unit’s aircraft returned once again.
In December 1942, the Air Gunnery School re-located to North Wales and Castle Kennedy subsequently welcomed the arrival of No.2 Torpedo Training Unit, a unit which intended to use the relatively remote location of the airfield to allow their trainee crews to perfect the delivery of air launched munitions. Although the airfield remained relatively untroubled by visits from Luftwaffe aircraft, flight operations at the airfield where not without some challenges. It has to be remembered that this was extremely difficult flying, and these were still relatively inexperienced crews, so incidents and accidents were commonplace. Several aircraft based at Castle Kennedy would be lost to accidents, underlining the perils facing all wartime aircrews, whether operational or engaged in training flying.
This scheme option really is an attractive one and is the story which inspired the beautiful new box artwork produced in support of this latest release. It shows a rather handsome Beaufort engaged in the practice release of an air launched torpedo off the coast of Dumfries and Galloway, work which not only underlined the rugged capabilities of the Beaufort in these low altitude situations, but also the exhaustive work carried out by No.2 Tornado Training Unit in preparing its crews for posting to operational squadrons.
As we always like to do with these new model reviews, please enjoy this exclusive look at the full box presentation artwork produced in support of this second Bristol Beaufort kit release.
Just the second release from this highly regarded new model tooling, this new 1/72nd scale Bristol Beaufort Mk.IA kit is already available and just awaiting a position on your Workbench this winter. Which of the two very different scheme options you elect to go with is a quandary which may tame some time to resolve.
We are afraid that's all we have for you in this latest edition, but we will be back next Friday with more project development updates and the very latest Airfix kit exclusives. In the meantime, we are always keen to hear your views on all things Airfix and in particular, any thoughts and opinions you may have regarding our Workbench blog. If you would like to drop us a quick line, could we please ask that you use our workbench@airfix.com email for all correspondence.
To re-visit any of the Airfix blogs we have produced over the past seven years or so, please head to our main Workbench hub, where you will find our entire blog back catalogue and all the Airfix design projects we have already covered.
All our dedicated official social media sites can be accessed by clicking the respective link icons at the foot of this page, or by heading to the Airfix homepage. Other useful Airfix links are:
Facebook, YouTube, Twitter and Instagram official sites
Please join us for more Airfix updates next week and thank you for your continued support.