Welcome to this latest edition of Workbench and all the news, updates and exclusive announcements from the fascinating world of Airfix modelling. We are pleased to report that normal service has been resumed and in this latest blog, we will be including plenty of exclusive imagery from some of the most eagerly anticipated new models from the 2019 Airfix range, with aircraft and military vehicles being the main focus of our attentions for this edition. We begin by featuring new component frame and scheme details from the latest kit to be released from our popular new 1/72nd scale North American B-25 Mitchell tooling, a variant which can genuinely claim to be one of the most significant aircraft of the entire Second World War. We follow this with a stunning selection of built model images, scheme details and box artwork reveals from the second round of releases in our new 1/35th scale Military Vehicle range, which includes two classic WWII Panzers and one Allied Panzer hunter and end by announcing the results of a recent Airfix competition, launched to coincide with the anniversary of the first flight of the US Navy’s F6F Hellcat fighter. We have much to tell you about, so let’s make a start straight away.
The aircraft which took part in the aerial struggles of the Second World War continue to hold an enduring fascination for a great many people and even though most of these aircraft types will clearly be familiar to millions of modellers all over the world, some can also claim to be household names amongst the general population, even though their first flights took place more than eighty years ago. Names such as Spitfire, Messerschmitt and Mustang immediately conjure up images of classic fighting aeroplanes and in many cases, can even be more familiar to people than the aircraft which are currently patrolling our skies, however, the vast majority of WWII aircraft types still remain relatively anonymous to the majority of the world’s population. If you were to ask most people if they could name America’s most advanced twin engined bomber at the time of the Pearl Harbor raid, few would be able to name the North American B-25 Mitchell, yet this magnificent aircraft is without doubt one of the most important aircraft of the Second World War and one which has more historical significance than almost any other US aircraft of the period. As the strike aircraft which mounted one of the most audacious bombing raids of the war, the B-25 came to represent not only the awesome industrial capability of the American nation, but also the determination of its people to strive for nothing less than total victory – when 16 B-25B Mitchell bombers took off from the deck of USS Hornet on 18th April 1942, it could be argued that the outcome of the Second World War was already just about be decided.
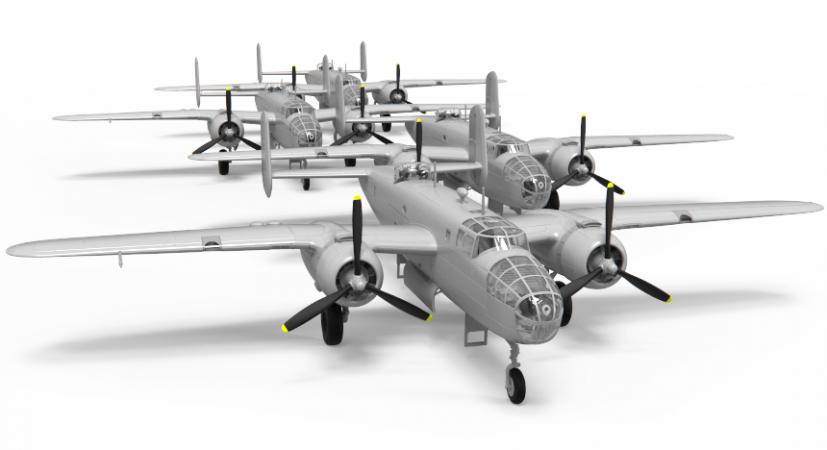
This evocative computer rendered 3D screenshot featuring a B-25B variant of the Mitchell is taken from an angle which must have been familiar to the commander of USS Hornet, as each of the 16 aircraft neared the end of their short take-off run
Originally developed in response to an Air Corps requirement for a high performance attack bomber, North American Aviation produced their NA-40, which first flew in January 1939, but failed to impress in trials. Losing out to the rival Douglas DB-7 (A-20 Havoc), North American designers continued to work on improving their aircraft, certain that it had all the qualities to succeed as a strike bomber and following the Air Corps issuing a further requirement for a medium bomber in March 1939, the revised NA-62 was ordered into production. Even though the aircraft was now destined for USAAF use, the aircraft was continually developed throughout production, as the North American engineers were convinced their aircraft could be even better. The most significant improvement came ten aircraft into the production run, when stability issues forced a redesign of the outer wing sections – rather than continuing with the constant dihedral of the earlier machines, designers incorporated a slight wing anhedral angle outboard of the engine nacelles, which gave the aircraft a distinctive gull-winged appearance. With a number of other improvements added to these early production aircraft, the B-25 soon began to show great potential as a highly effective medium bomber.
Given the name ‘Mitchell’, the B-25 was named in honour of Major General William ‘Billy’ Mitchell who was a great champion of air power and a significant figure in the history of the US Air Force. As an airman serving on the Western Front in WWI, Mitchell had witnessed the rise of aviation first hand and was convinced that the aeroplane would play a significant role in any future conflict. This conviction would bring him into conflict with senior officials in both the US Army and Navy, as he vociferously argued against continued spending on battleships, as the aeroplane had rendered them almost obsolete. He famously arranged demonstrations where bomber aircraft would attack ageing warships to prove the vulnerability of these floating leviathans and followed this by proclaiming that all investment that would have been spent on battleships should instead be diverted to aircraft carrier production and history proved that his vision for the importance of military air power was well founded.
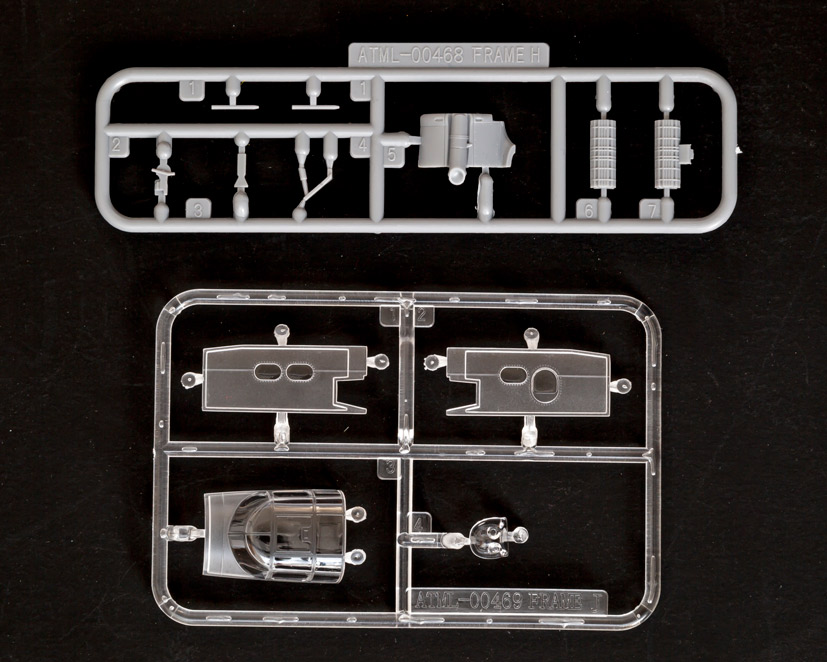
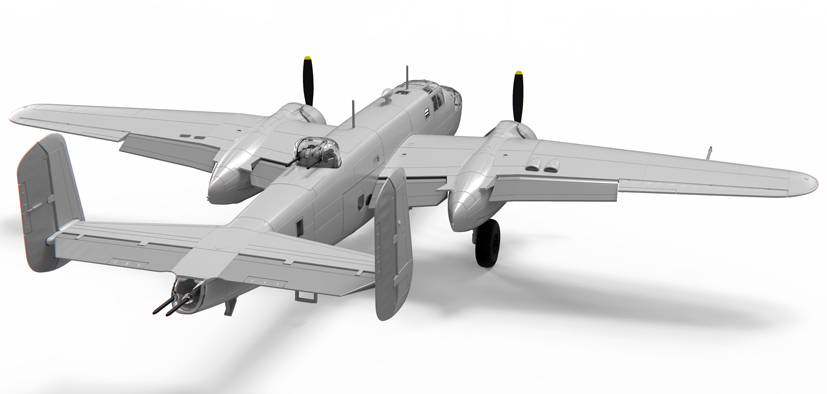
An exclusive first look for workbench readers at the additional parts which will allow the modeller to produce this famous variant of the B-25 Mitchell bomber
The latest release from our popular North American B-25 Mitchell tooling (A06020) includes additional parts to allow the early ‘B’ model of the aircraft to be modelled, a variant of the Mitchell which may not be amongst the most heavily produced versions of this famous medium bomber, but one which occupies a particularly important position in US Army Air Force history and indeed that of the entire Second World War. The aircraft which announced America’s offensive introduction to WWII and served to effectively demonstrate to the world that America would stop at nothing until they and their allies had emerged victorious from this conflict, the B-25B flew off the small, heaving deck of USS Hornet and into the pages of military history, making national heroes of the 80 brave men who volunteered for this perilous, yet hugely symbolic mission.
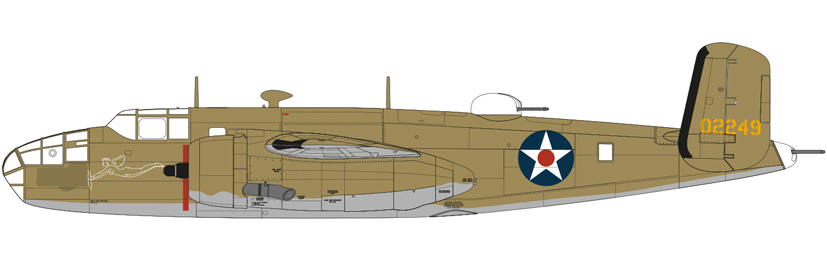
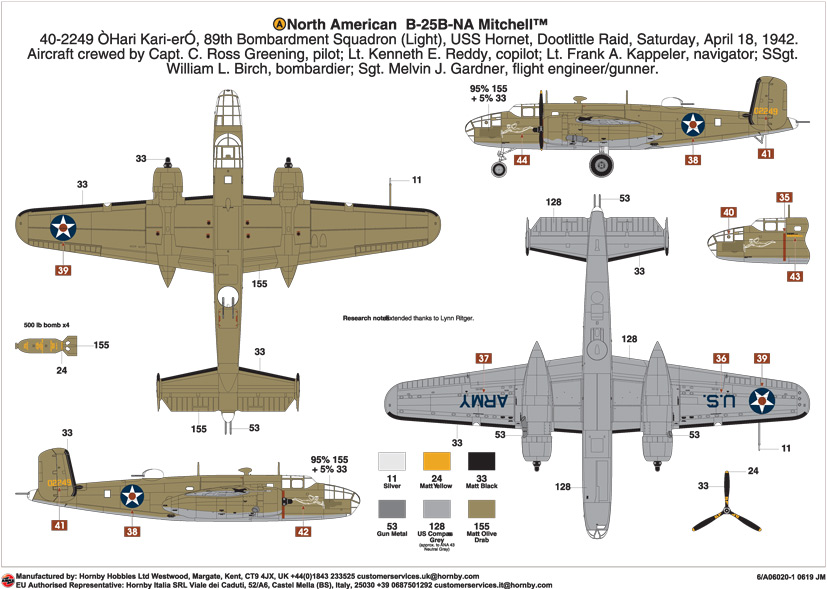
Full details of the lead scheme option which will accompany the release of this latest version of our popular 1/72nd scale B-25 kit, which commemorates one of the sixteen aircraft which took part in the Doolittle Raid of April 1942
In the weeks which followed the devastating Japanese surprise attack against the US naval base at Pearl Harbor, American Military planners established the ‘Joint Army-Navy bombing project’, to explore the feasibility of mounting an effective bombing strike against targets on the Japanese mainland. Although such a strike could not hope to match the scale of the Pearl Harbor attack, the phycological impact of hitting Japanese home targets could have a profound impact on their enemy, whilst at the same time bolstering support for the war amongst the American population. With America now fully committed to war, the raid would also demonstrate their fighting resolve to their allies, particularly those who had already been waging war for over two years. The original plan called for a number of Army Air Force bombers to be flown from the deck of a US Navy carrier, recovering the aircraft to the same carrier on the completion of their mission. The most suitable aircraft for such an undertaking was the relatively new North American B-25B Mitchell bomber, but as plans began to take shape in earnest, the recovery of the bombers to the heaving deck of an aircraft carrier steaming somewhere in the Pacific Ocean was never going to be a viable option. The alternative was no less challenging for the crews, but at least gave them a fighting chance of making it back to solid ground – one of the bombers would serve as a pathfinder, dropping incendiaries to ‘light up’ the target area, with the rest of the force following on and guided by the resulting fires. Each aircraft would then make for landing sites in China, where they would hopefully make successful forced landings and attempt to avoid capture by Japanese troops. For plans such as these and the extremely hazardous nature of the mission, hero aviators are needed and America could count on such men as Jimmy Doolittle, a daredevil pilot and national celebrity, who intended to lead this important mission himself. All he needed to do now was to recruit around 80 of America’s finest young airmen and convince them to take part in a top secret mission, which had no guarantee of their survival. As he had anticipated, he had no shortage of volunteers.
Training for the Japan raid began in early March 1942, with Twenty four B-25B Mitchell bombers being drawn from the 17th Bombardment Group USAAF, each one stripped of unnecessary equipment and benefitting from the addition of extra fuel tanks. Crews embarked on an intensive period of training, where they practiced everything from low altitude cross-country flying, to perfecting evasive actions following the bombing of targets at these low altitudes. Eventually, sixteen aircraft were embarked on the carrier USS Hornet, as this was the maximum number the ship could accommodate – with the Mitchells lashed down on the deck of the ship, there was little room to spare and significantly, the first aircraft to leave the ship would be doing so with just a short length of deck to safely make their take-off run. The task force would attempt to take the bombers to within 400 miles of the Japanese coast, before turning into wind and launching the aircraft and this was only after Doolittle had managed to persuade the task force commander to take his men 200 miles closer to the target whilst the force was en route, to give the mission maximum success potential. Fearful of detection by one of the many Japanese radio equipped picket boats in the area, the plan also included the option to launch early, if the task force was discovered, to avoid possible attack by enemy land based attack aircraft.
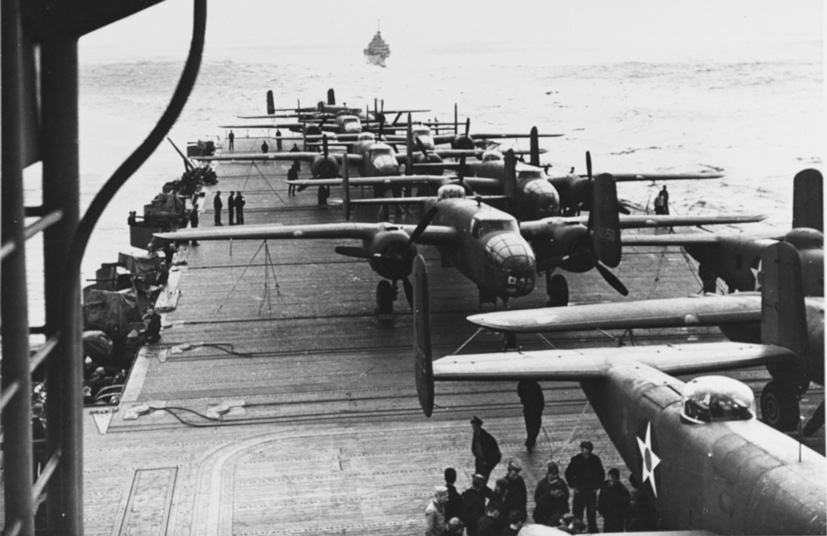
The historic scene aboard USS Hornet as she steamed towards her launch point off the coast of Japan and this significant raid which would send an important message to America’s enemies
As the USS Hornet task force steamed towards the Japanese coast and aircrews prepared for their historic mission, they were indeed spotted by an enemy ship and the decision to launch the Mitchells early was immediately was taken. Just after 8am on 18th April 1942, the first of sixteen B-25B Mitchell bombers lifted off the relatively short deck of USS Hornet and set course for Japan – this would be the first time that any of these airmen had taken off from the deck of an aircraft carrier at sea. Flying at extremely low level, the raiders had a six-hour flight ahead of them before reaching their targets, with the strong possibility that they would be intercepted by enemy fighters and subjected to heavy anti-aircraft fire once they reached the coast. If the crews managed to complete their mission, they would then have to set course for China, aware that from this point onwards, it was very much a case of every man for himself.
North American B-25B Mitchell 40-2249 ‘Hari Kari-er’ was the eleventh bomber to take off from the deck of USS Hornet at 08.56, with her crew assigned to bomb targets in the Yokohama area. Approaching the Japanese mainland north of their intended waypoint, the bomber inadvertently flew over an active enemy air base and almost immediately came under fighter attack. Whilst pilot Ross Greening lined the aircraft up for its bombing run, his gunner shot down one enemy fighter and damaged a second, before then turning his guns on any targets of opportunity he could see. With the bombs dropping on a large oil refinery and storage facility, the aircraft set course for China, all the time fearful of further enemy air attack. Unable to locate their assigned landing airfield, the crew bailed out of their aircraft some 200 miles inland of the coast and despite sustaining a few minor injuries, all five men landed safely – ‘Hari Kari-er’ flew on un-manned for a while, before crashing in the mountainous region between Zhejiang and Anhui provinces.
Although the ‘Doolittle Raid’ was undoubtedly a tremendous propaganda success for the Americans and galvanised national support for the struggles to come, Jimmy Doolittle actually regarded the operation as a failure. All sixteen Mitchell bombers had been destroyed and three of his men had been killed during these actions, whilst others had become prisoners of war. Tragically, three of these captured airmen were put on trial by their Japanese captors and executed for alleged war crimes. When news of this heinous act was delivered to the nation by President Franklin D Roosevelt, the people of America responded in the only way they could, by purchasing $11 Billon in war bonds, assisting the war effort and hoping to avenge their countrymen.
One relatively unknown story of the Doolittle Raid is the selfless and extremely courageous manner in which ordinary Chinese people helped the surviving raiders, giving them shelter and arranging their safe transportation across the country. Many of these people would pay a heavy price for the part they played in assisting the Americans, as Japanese troops exacted a vicious revenge.
On reaching safety, most of the Doolittle Raiders returned to active flying duties with the USAAF, with many going on to serve in the Far East, Mediterranean, European and North African theatres.
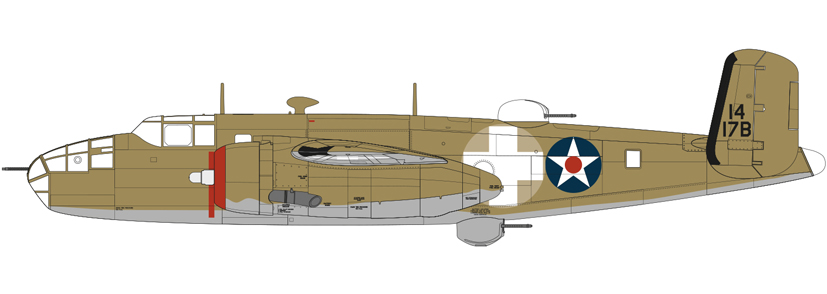
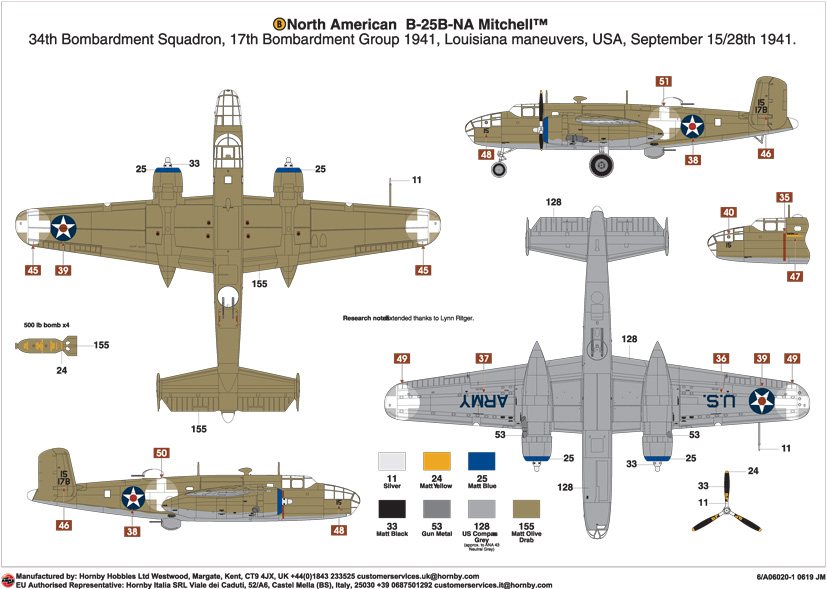
This fascinating scheme option presents the modeller with a B-25B Mitchell which took part in the huge Louisiana Manoeuvres, prior to America’s entry into the Second World War. At the time, these were the largest battle simulations the world had ever seen
The 17th Bombardment Group of the US Army Air Force had the distinction of being the first group to receive the new North American B-25B Mitchell bomber, with the first aircraft arriving at McChord Field on 25th February 1941. Further aircraft would arrive over the next few months and by June, the entire group would be required to re-locate to a new home at the recently constructed Pendleton Field, in Oregon. During this time and even though war was already raging in Europe and the Japanese were expanding their empire in South-East Asia, life for the pilots of the 34th BS, 17th BG must have been rather pleasant. Although their flight training programme was intensive, duties would include practice bombing sorties, or cross-country flying to the North American facility at Inglewood, California, where they would pick up the latest Mitchell additions to their squadron’s numbers. Their growing experience in flying this capable new bomber would be required sooner than they thought.
During the second week in September 1941, the entire 17th Bombardment Group relocated to Jackson, Mississippi, where they were scheduled to take part in the largest war game exercise the world had ever seen. Following a root and branch assessment of America’s ability to wage war in 1940, serious shortages in men and equipment had been identified and plans were immediately put in place to rectify this situation. The 'Great Louisiana Manoeuvres' of September 1941 would test the effectiveness of these remedial actions and involve around 470,000 men spread over 3,400 square miles of Louisiana and Texas land, with two great armies acting out two different operational scenarios over the course of the two week exercise. These simulated battles were conducted in as near to actual combat situations as could be achieved, with American military commanders knowing that their men would be forced into this war in the very near future and they wanted to equip their troops with valuable experiences which would stand them in good stead on the battlefields to come. These mighty battles were fought without a single shot being fired, however some of the tactics used in securing military objectives in Louisiana would later be used on the battlefields of Europe and in the Pacific.
Following the end of the Louisiana Manoeuvres, the 17th Bombardment Group would spend the next few weeks conducting a series of further exercises, operating from several bases and all the time gaining more experience in operating their new Mitchell bombers. Crews were hoping that Christmas 1941 would allow them all a short period of relaxation and time away from training, however the Japanese attack at Pearl Harbor would dash these hopes and ensure a busy period flying anti-submarine patrols along the Washington and Oregon coastline. They would quickly gain more experience flying the B-25 Mitchell than any other group in the USAAF, experience which would stand them in good stead for a significant operation which would take place in the spring of 1942. Moving base yet again in February 1942, this time to Columbia Army Airfield in South Carolina, the group began practising short take-off and landings, along with low-level cross country flight operations, in preparation for the ‘Doolittle Raid’ and America’s strike at the heart of their Japanese enemy.
Destined to be an incredibly popular addition to the Airfix range, this latest release from the B-25 Mitchell tooling includes new parts to allow either a ‘Doolittle Raider’ or an aircraft which took part in the pre-raid ‘Louisiana Manoeuvres’ to be modelled, both of which mark this important early variant of America’s Magnificent Medium. A06020 is scheduled for an Autumn release.
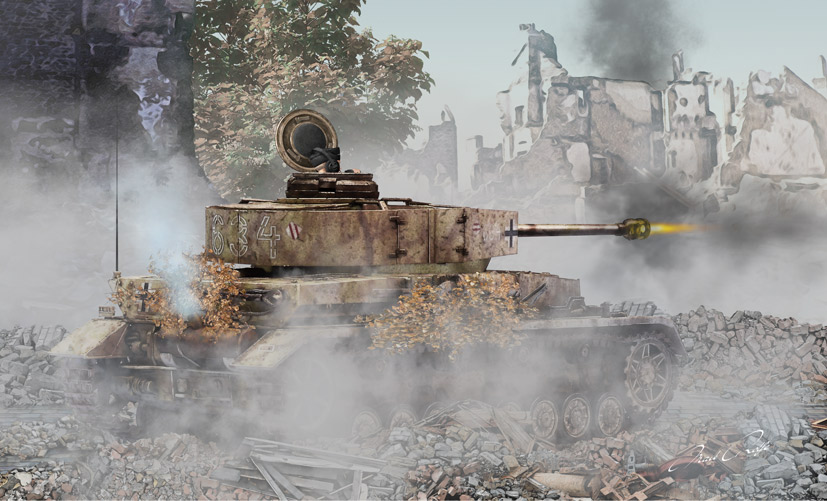
Box artwork featuring a spaced armour equipped Panzer IV, the most heavily produced German tank type of the Second World War
Modelling enthusiasts with an interest in tanks and armoured military vehicles would have been pleased to see the announcement of a new series of 1/35th scale kits in the 2019 Airfix model range, particularly as it includes some of the most iconic armoured fighting vehicles in the history of warfare. The first three releases in this series are already available in good model shops and we are pleased to report that they will soon be reinforced by the next three models, each one featuring new Airfix artwork and including two appealing scheme options in which to finish your kit. The previously released Tiger I early variant will soon be joined by a late war example of this famous tank and for the first time, a Panzer IV and an M10 tank destroyer will also be available in the series. Already proving to be popular and extremely cost effective additions to the Airfix kit range, let’s take a closer look at the three new models which will be available soon.
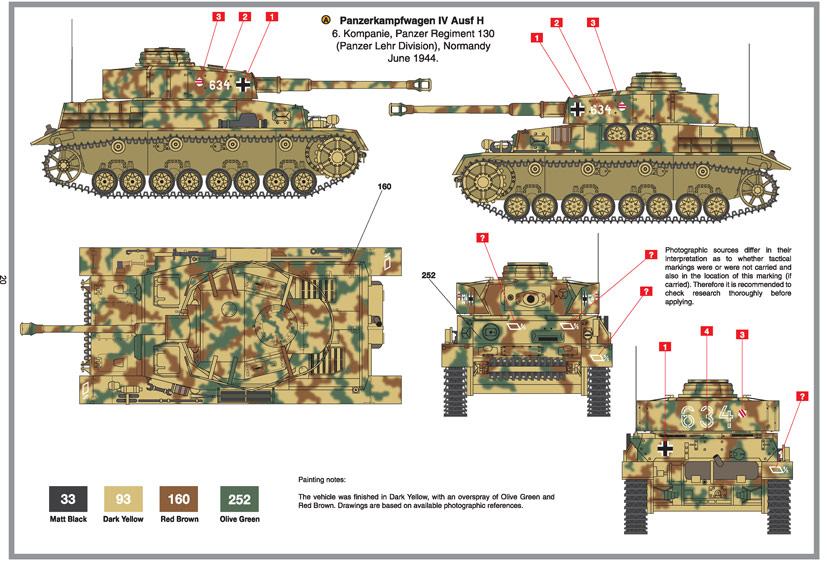
Full scheme options for this Panzer IV which took part in actions following the D-Day landings
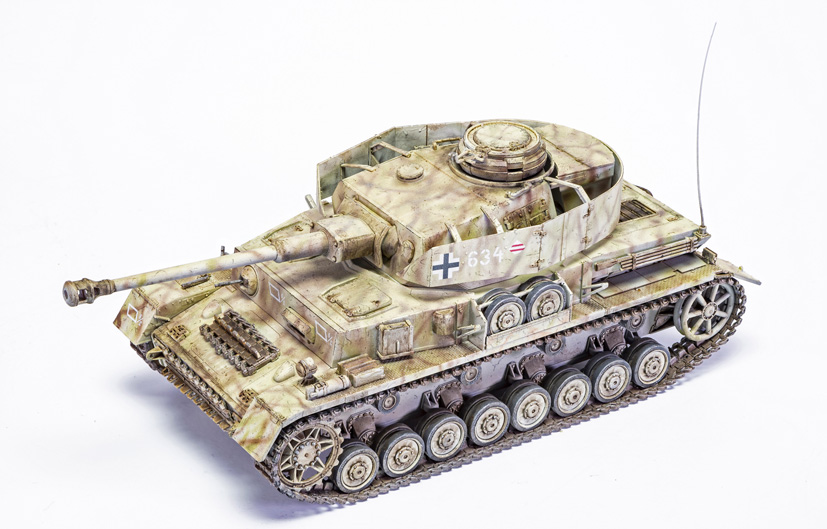
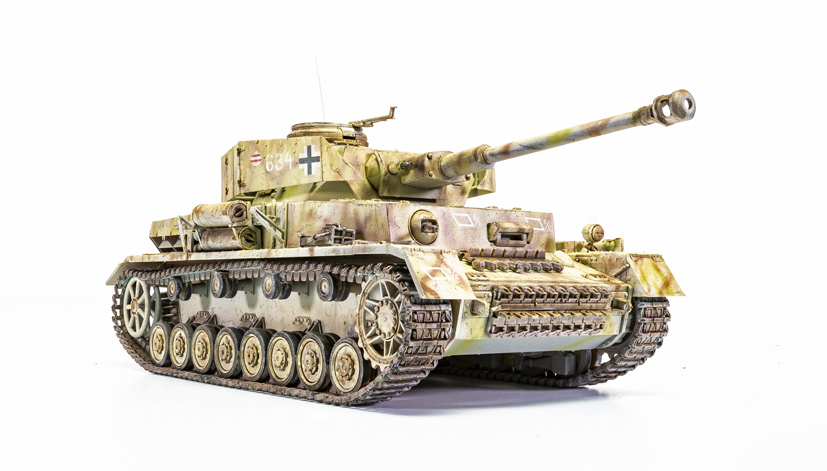
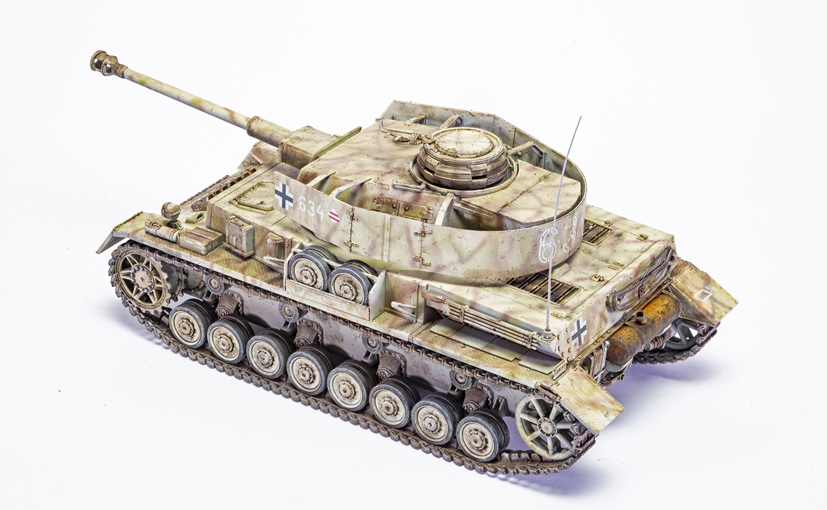
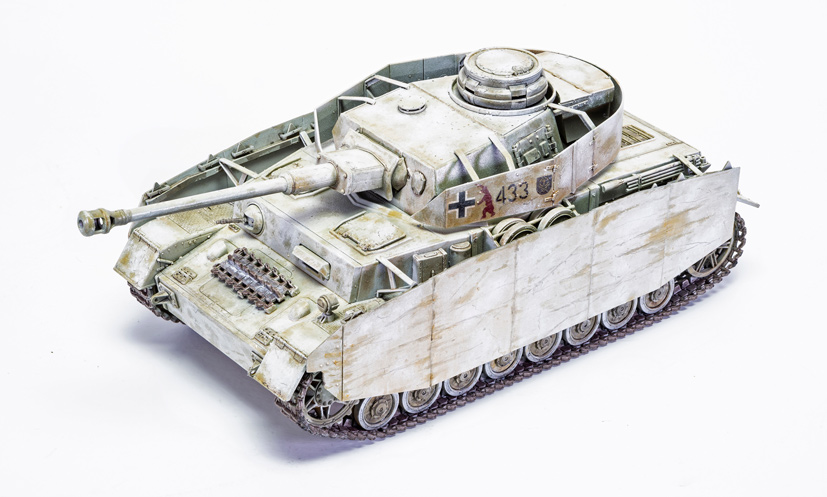
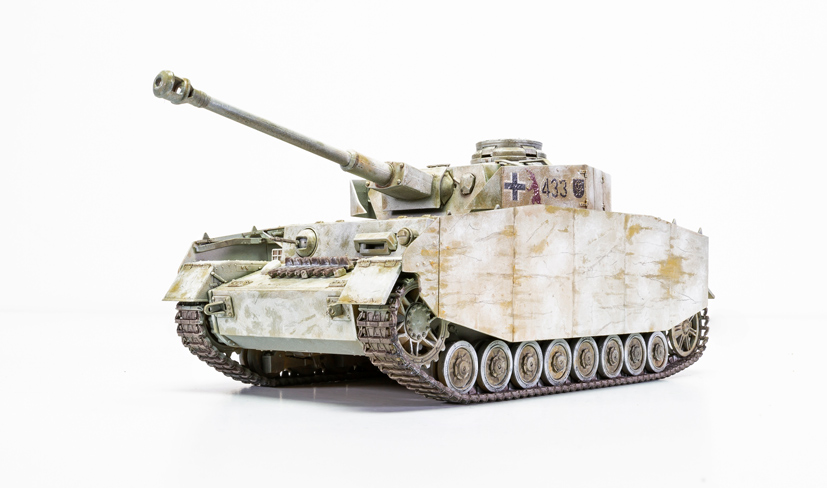
This exclusive series of build images feature a model finished in this A scheme to be included with this kit
The Panzer IV has to be considered one of the most important tanks of the Second World War and formed the backbone of the Wehrmacht’s panzer divisions throughout the conflict. Originally developed as a ‘Medium Tractor’, due to restrictions placed on Germany by the Treaty of Versailles and their inability to build weapons of war, the first production vehicles began to appear in 1936 and represented the very pinnacle of tank design at that time. The designation of these first tanks was Panzerkampfwagen IV, Ausf A and perhaps the most impressive feature of these machines is that the final H and J variants which were deployed during the Allied invasion of Europe and in defence of the Reich, were basically the same as the first tanks to be produced. Upgraded and improved throughout their service life, the Panzer IV was continually made more combat efficient, however, these changes were mainly around increasing the tank’s armour protection, equipping it with more effective weapons, or fitting the latest vision and sighting equipment, as opposed to a re-design of the tank itself. Designed to be relatively simple to maintain and reliable in the field, the Panzer IV actually shared many components with the earlier Panzer III and whilst Hitler became somewhat obsessed with producing bigger, heavier and more complex tanks, it would be the Panzer IV which continued to equip armoured divisions in their battles against Allied ground forces.
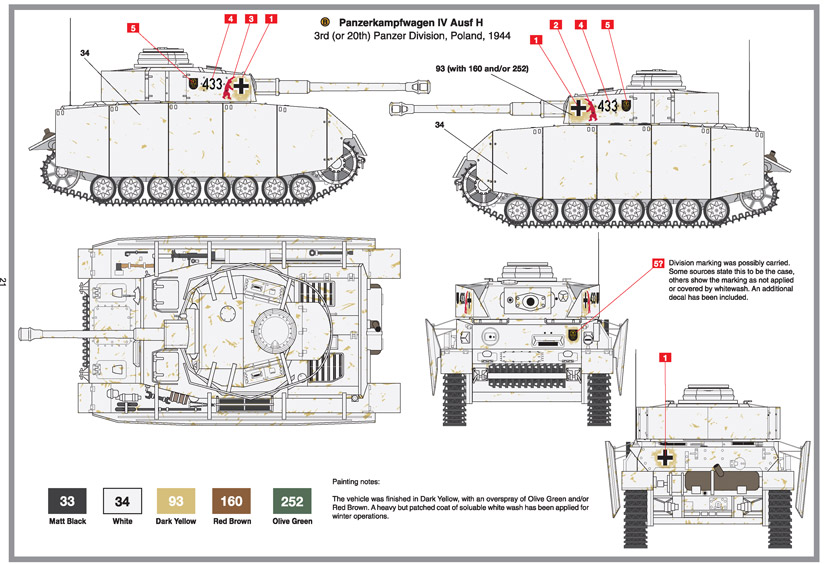
Full scheme details for this rather distinctive looking side armour equipped Panzer IV Ausf H, which is wearing a field applied winter paint wash
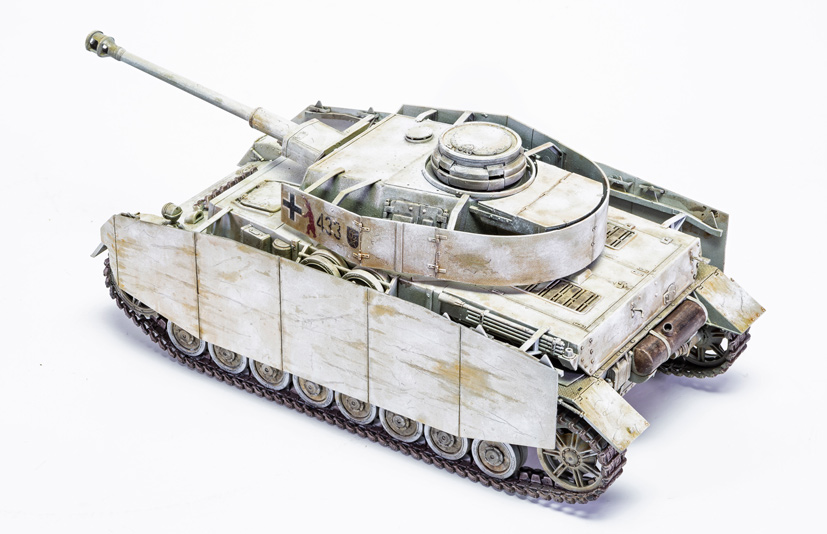
Altering the outward appearance of the tank dramatically, the attachment of additional ‘spaced armour’ to a vehicle was intended to reduce the effectiveness of enemy anti-tank rifle fire on the thinner side armour of the tank and even to cause a deflection of a solid round if struck by one, thus increasing its survivability and acting as reassurance to its crew heading into combat. Protecting the tracks and running gear was always a major concern for panzer crews, as an immobile tank was a vulnerable tank and as soon as a crew was forced out to effect any repairs, they were targeted by enemy snipers or infantry, if the fighting was at such close quarters. Following combat with the superb Soviet T-34, improvements in German tank design philosophy led to the introduction of the Panther, a tank which is generally regarded as the replacement for the Panzer IV, but one which was over-engineered and never available in enough numbers to fully supersede its predecessor. As it was, large numbers of Panzer IVs would be operated alongside the heavier Panther and Tigers and even as late as D-Day, the most common tank encountered by Allied armoured divisions would be the ubiquitous Panzer IV. With almost 8,500 tanks built during its production run, the Panzer IV chassis was also used as the basis for a number of specialist armoured vehicles, such as mobile assault guns, tank destroyers, self-propelled artillery pieces and mobile anti-aircraft guns.
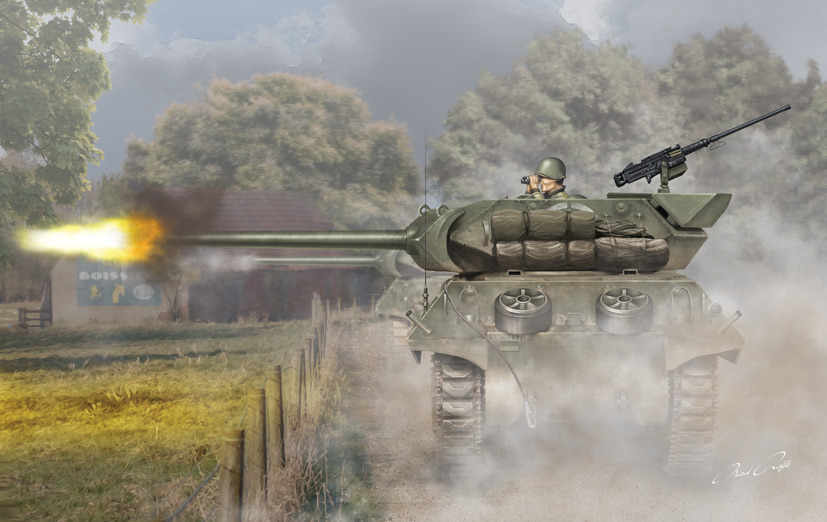
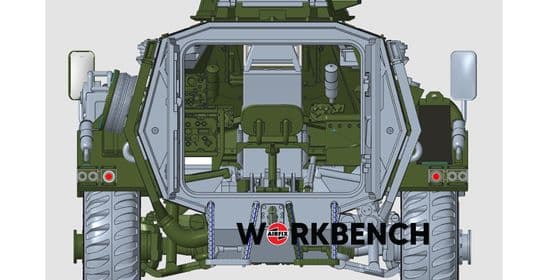
Clearly illustrating the commanders excellent viewing capability from the open turret of the M10 tank destroyer, this box artwork could be set in the Normandy countryside, in the weeks following the D-Day landings
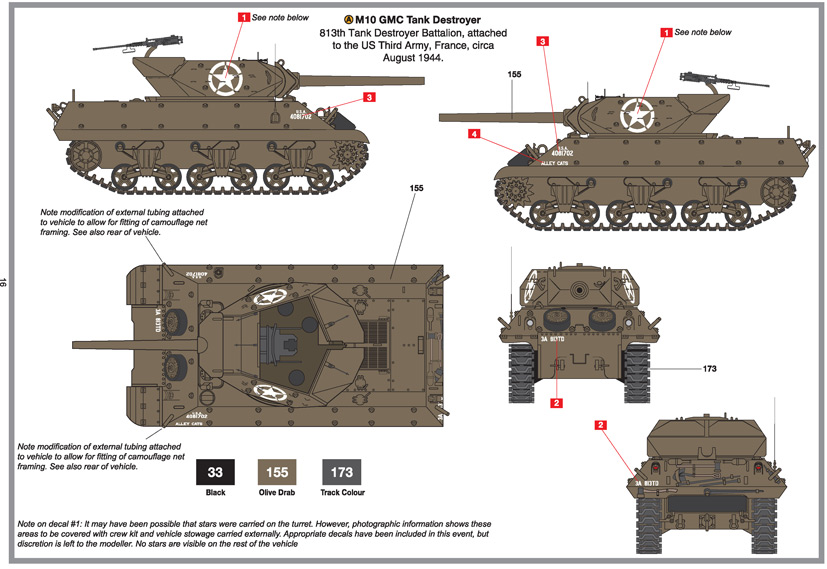
Full scheme details for this US M10, which was employed in the liberation of French towns following the D-Day landings
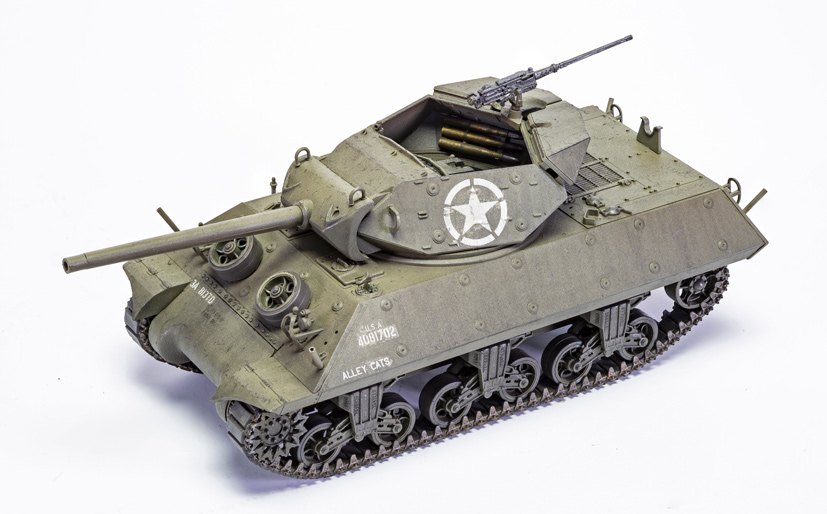
A selection of build images featuring this US 813th Tank Battalion M10 tank destroyer

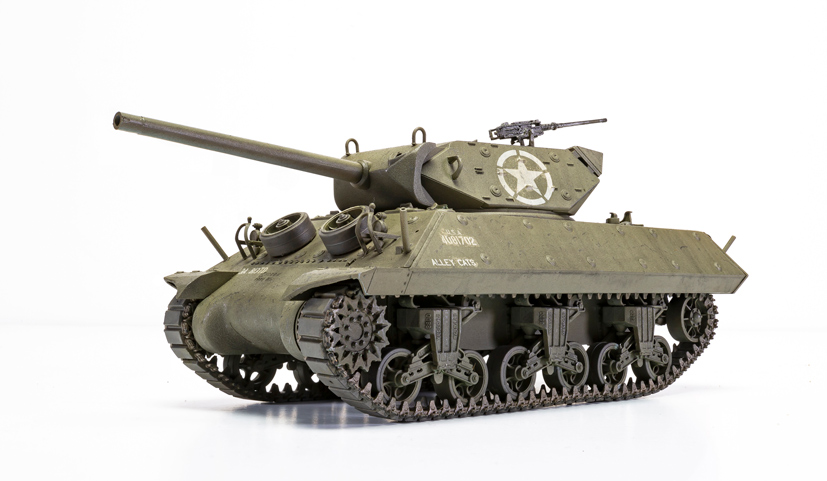
Numerically the most important Allied armoured vehicle of its type during WWII, the M10 Gun Motor Carriage was a tank destroyer intended to wreak havoc amongst massed German Panzer units, using speed and large numbers to halt any enemy armoured breakout. Utilising many design components from the Sherman tank, such as its hull, tracks and rollers, the M10 appeared to be the ideal solution to having a mobile anti-tank platform to supplement static defensive guns, either hunting down enemy tanks on the battlefield or driving them towards ground covered by dug in anti-tank units. Sacrificing armour for mobility, the M10 mounted a 3-inch Gun M7 in a manually traversed, open topped turret and was first used in combat in March 1943 during the North African campaign. The main armament was effective against the Panzer III and IV tanks which it was designed to combat, however the introduction of heavier Panther and Tiger tanks, with their thick armour and more powerful guns made the M10 extremely vulnerable and operating units became well versed in mounting fast hit and run attacks, using hills and buildings to conceal their presence from return fire. Although M10 units were usually held in reserve by the time of the Normandy landings, rushing forward to counter any significant armoured concentrations, the fluid nature of combat dictated that many of these tank destroyers simply moved with offensive armoured units, dealing with whatever enemy opposition they encountered. Usually, the M10 would hope to get in the first shot in any combat engagement, before disengaging and repositioning for subsequent firing opportunities, or have other M10s fire from their positions, using the same fire and retreat tactic. With a maximum rate of fire of ten rounds a minute, a well drilled M10 team could place plenty of firepower on enemy targets, however, the relatively light armour employed on their vehicle always left them vulnerable to return fire.
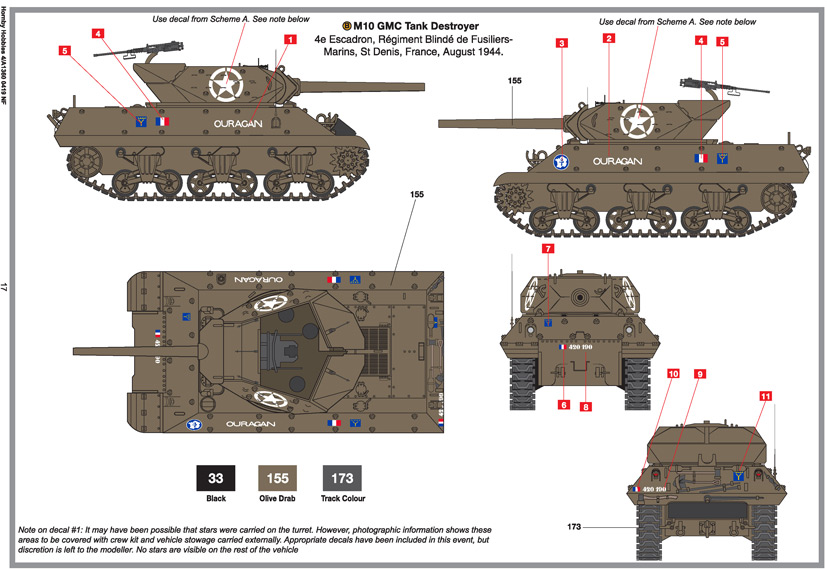
Scheme details for this rather unusual French Army operated M10, which would have been extremely well received as it helped to drive the Germans out of the French countryside. We are sorry, but we did not have a built sample of this kit at the time of putting this blog together
Combat experiences using the M10 showed that whilst the open topped turret design had many beneficial features, such as ease of locating enemy targets, communicating with infantry support units and getting out of a tank which had been hit, it did leave the crew extremely vulnerable to injury from above. Debris and shrapnel from air burst shells, or mortar and grenade attack from enemy infantry were very real threats for an M10 crew and in one extreme case, one particular driver of an M10 tank destroyer suffered the loss three entire turret crews in separate air burst and grenade attack incidents, whilst he remained safe in the hull of the vehicle. Used by both the British and Free French Armies, around 6,500 of these tank destroyers were built and they would take a heavy toll of German tanks, artillery pieces, pill boxes and other vehicles.
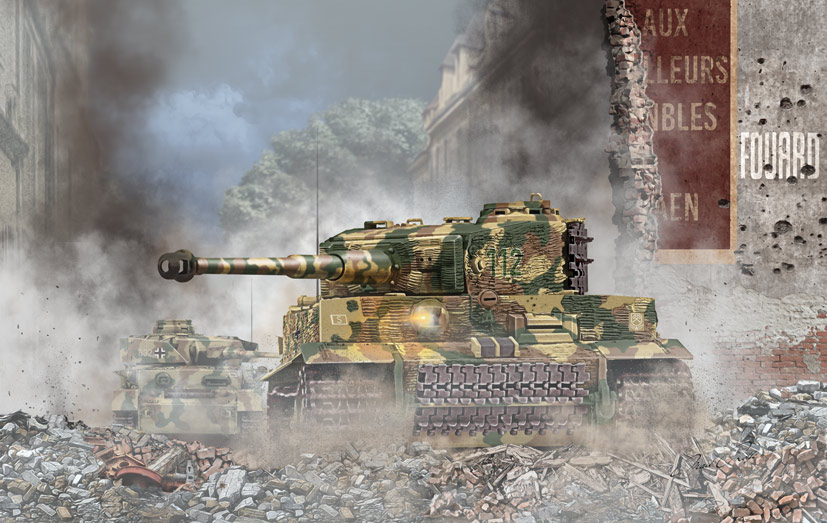
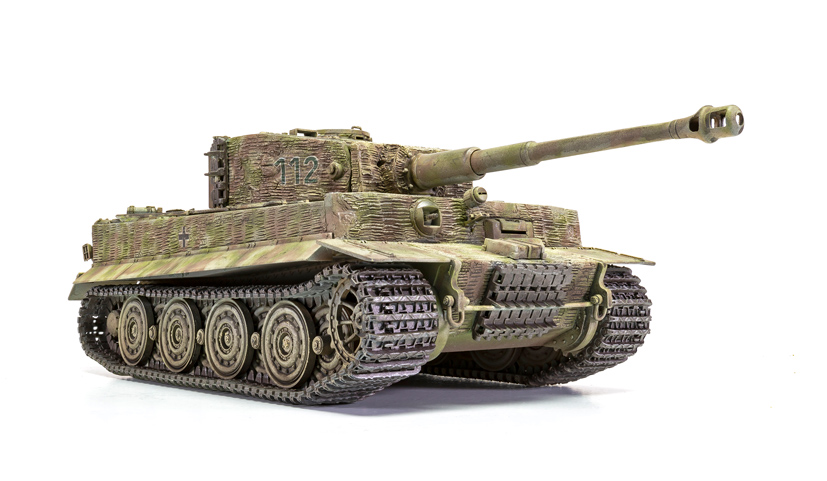
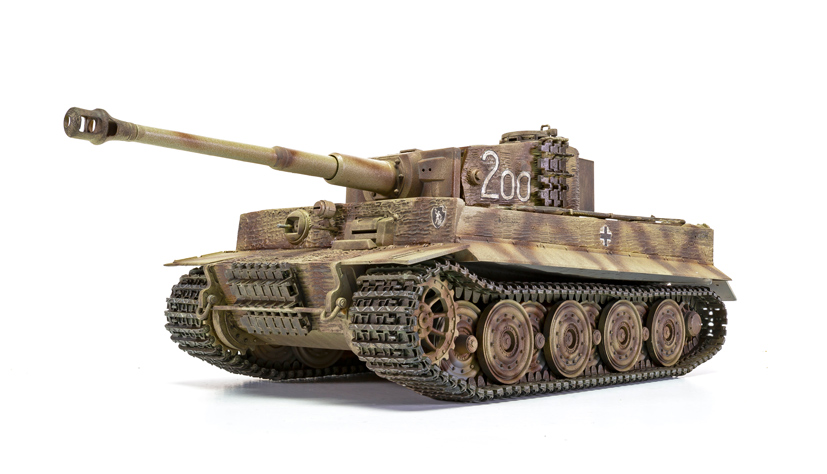
Still a fearsome sight, even though there has been 75 years of tank development since the mighty Tiger was battling to repel the Allies following the D-Day landings
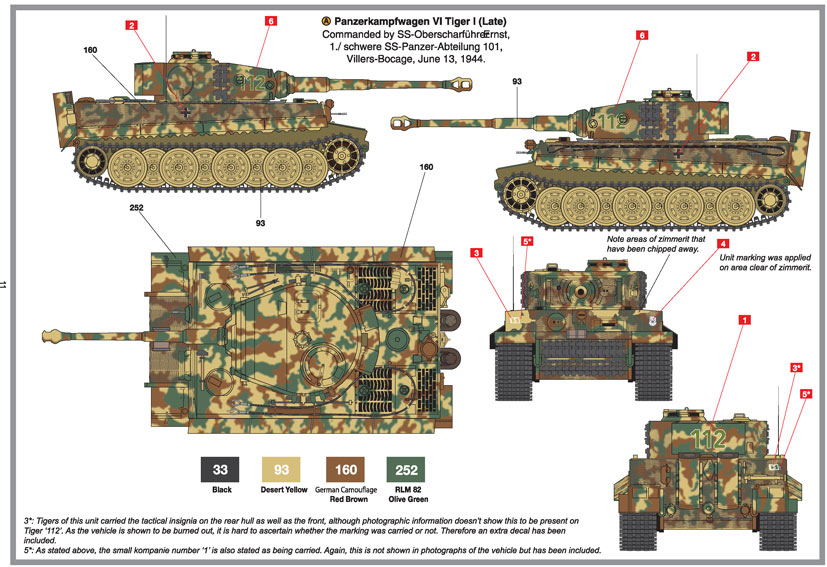
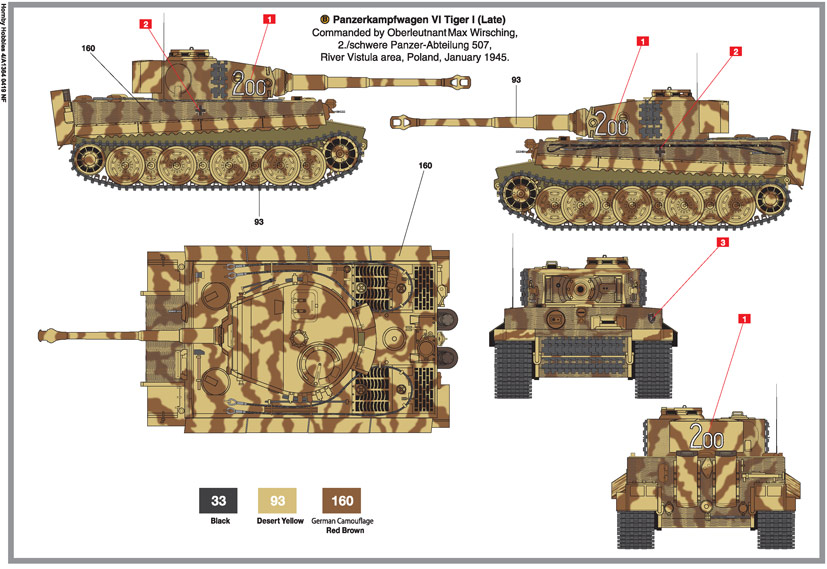
Representing a fine example of late war Tiger I camouflage, this magnificent machine was the mount of a post D-Day Tiger commander SS-Oberscharfuhrer Heinrich Ernst
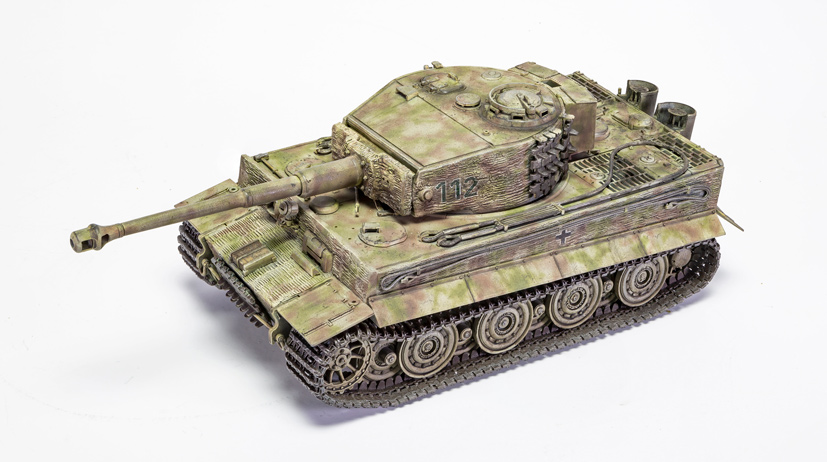
These beautiful build images clearly illustrate why the Tiger I continues to be one of the most popular modelling subjects across the world
When the mighty Tiger I was first introduced in the Autumn of 1942, it was the most powerful tank in the world and a feared adversary on any battlefield. Unfortunately, the tank was over engineered and extremely expensive to produce, at a time when the Wehrmacht needed large numbers of new tanks to change the fortunes of war back in their favour. To make matters worse, the first Tiger tanks were rushed into service before many of the technical issues associated with new weapons could be ironed out and consequently, its introduction was much less effective than it should have been. Difficulties ranged from operating such heavy tanks on the soft ground of Russia, to the challenging handling of this monster’s Maybach V-12 engine and a transmission which had eight forward and four reverse gears, all of which had to be negotiated during the rigors of combat. Perversely, for a weapon which was designed to give panzer units a fighting edge, the first crews to receive this awesome tank during the siege of Leningrad were preoccupied with not allowing one of the new Tigers to fall into enemy hands and were more concerned with destroying their own tanks than destroying those of the enemy. As it was, even though large numbers of Soviet tanks began to fall to the 88mm gun of the Tiger, the Russians managed to secure two virtually combat ready examples of the Tiger I by the early spring of 1943, which they thoroughly evaluated.
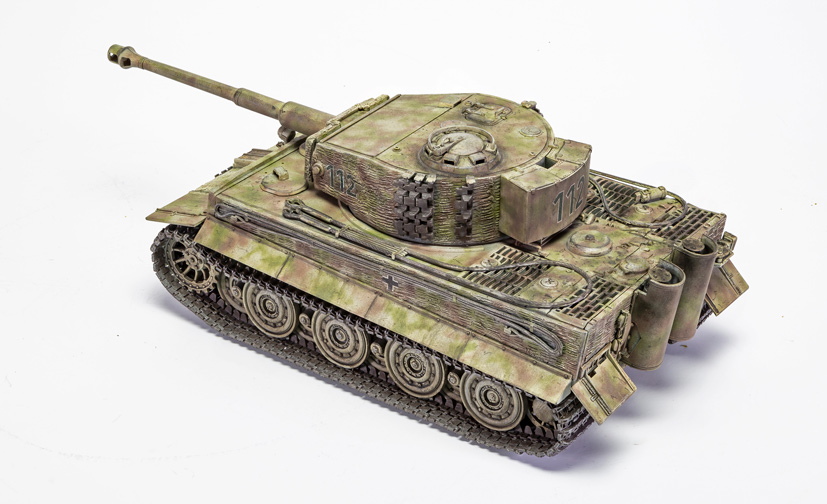
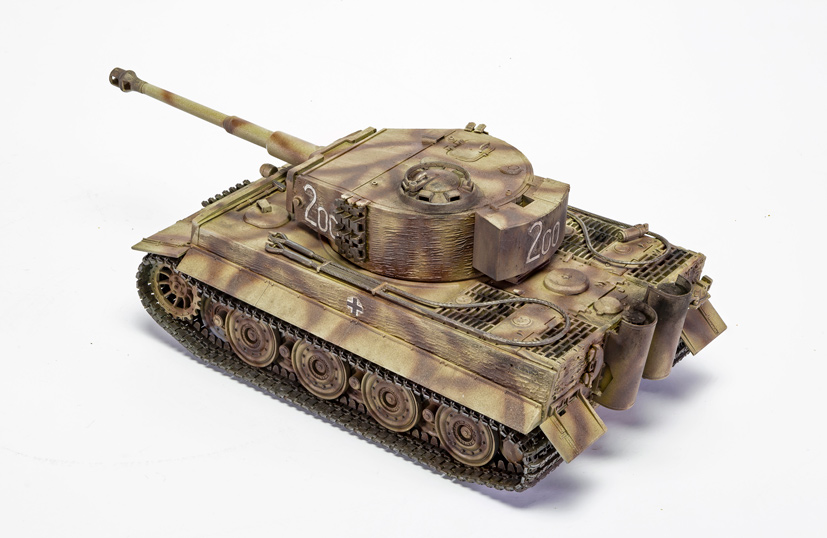
More Tiger action, this time featuring yet another variation of camouflage scheme adopted by these tanks which continue to be a source of fascination
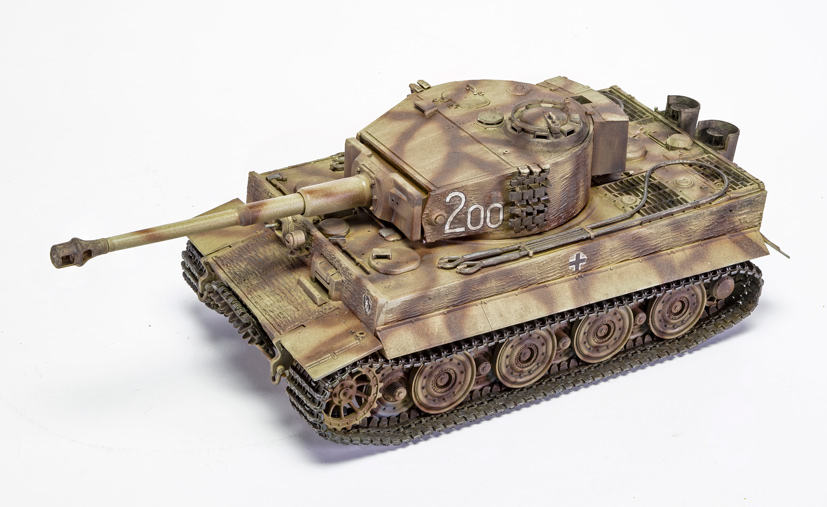
A final selection of build images, which will temp anyone with an interest in WWII armour models
The application of Panzer camouflage markings throughout the Second World War is a fascinating subject in its own right and one which continues to challenge modellers and historians to this day. As the war progressed, the basic standardisation of colours began to show some non-standard variations and the early Panzer Grey and Desert Yellow (for tanks used in the North African campaign), was replaced by a more elaborate collection of colours and patterns. When you add to this the fact that the strict colour stipulations issued to paint manufacturers during the early years of the war were relaxed for a number of reasons and tanks eventually started to be delivered to units wearing just their Red Brown base colour, this subject is very much open to interpretation and unless trusted colour photographs exist, it can be difficult to corroborate the definitive scheme applied to many tanks. With effective camouflage often buying a tank commander valuable seconds on the battlefield, time which could quite literally mean the difference between another victory or death, individual commanders were allowed a degree of autonomy when it came to the presentation of their tanks. The application of paint in the field was rarely done other than when the vehicle was at a field station for repairs or to take on fuel and ammunition and whilst access to spray guns and paint stocks was usually possible, it has to be remembered that a tank in operation was as vulnerable to friendly fire as it was from enemy action and anything too radical could increase the possibility of being targeted by other German units, in addition to the enemy. With a commander’s tank needing to be camouflaged from both air and ground attack, any manner of temporary camouflage was often applied, to suit the terrain in which current operations were taking place – this could take the form of camouflage netting, particularly when in a static, concealed position, but was more likely to be tree branches, foliage and even straw on a moving vehicle. When operating in winter conditions, a temporary whitewash was often applied, with variations sometimes including the overpainting of turret numbers and national insignia. As with all AFVs, temporary paint applications would begin to fade almost immediately, once again allowing the modeller a degree of artistic licence.
The next three kit releases in our new 1/35th scale military vehicle range are scheduled to arrive imminently and if you have yet to reserve your example, they should be available to pick up in good model stores over the next few weeks. We look forward to bringing you details of the next round of releases in this popular series in a forthcoming edition of Workbench.
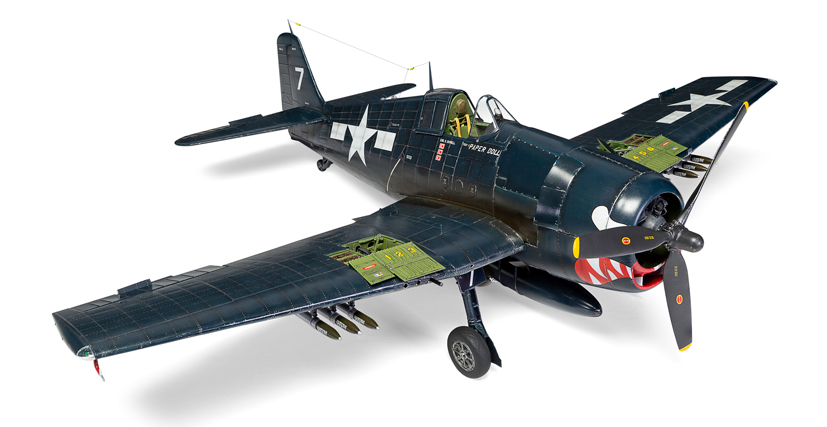
Our recent ‘Hellcat first flight anniversary competition’ saw 6,500 Workbench readers heading for the Airfix website to register their entry
To mark the release of our spectacular new 1/24th scale Grumman F6F-5 Hellcat kit and to commemorate the 77th anniversary of the first flight of the prototype aircraft, the Airfix marketing team launched a competition on the Airfix website, offering one lucky winner the opportunity to own one of these beautiful new kits and the model which certainly seems to be the talk of the hobby at the moment. The text in support of the competition included a big hint as to the correct answer from the three available options and went something like this:
On this day in 1942, the Grumman Aircraft Engineering Corporation rolled their latest prototype fighter design out of their factory in preparation for its first flight, less than twelve months since contracts to build the aircraft had been signed. This rugged, exceptionally well-engineered aircraft was the successor to the company’s diminutive F4F Wildcat, which was already in US Navy service and would become only the third monoplane fighter built for US Navy service. Utilising the latest aviation technologies and world leading manufacturing techniques, what Grumman produced was an aviation classic and a fighter which would go on to be considered the undisputed ‘mount of aces’.
As soon as the F6F Hellcat arrived with US Navy units in the Pacific from August 1943, pilots knew they had a real war winner on the decks of their carriers. Built after Grumman had sought advice from several serving US Navy ‘ace’ pilots, the Hellcat came ready to fight and ready to challenge the dominance of the Mitsubishi Zero, which until that time had reigned supreme in the Pacific. With Hellcats starting so score aerial victories almost as soon as they were introduced, it would quickly establish itself as the aviation ‘King of the Pacific’ and allowed the US Navy to gain a hard fought supremacy of the air over the next few months, one they would never again relinquish until the end of the war. With Hellcats accounting for more than 75% of all victory claims made by US Navy pilots during WWII despite its relatively late combat introduction, the Hellcat is undoubtedly the most successful naval fighter in the history of warfare and one of the world’s truly great fighting aeroplanes.
The competition proved to be a resounding success and received just over 6,500 entries over the active period, with 5,920 of these respondents selecting the correct answer. Our winner was selected at random from this huge number of correct entries and Richard Lyons emerged as our lucky winner – congratulations to Richard and thank you to everyone who helped to make this yet another successful Airfix competition. It is about time we thought about including another competition in Workbench – perhaps we will see what we can rustle up for the next edition.
We are afraid that’s all we have for you in this latest edition of Workbench, however, we will be back as usual in two weeks’ time with a further selection of Airfix modelling delights for your enjoyment. In the meantime, if you have any suggestions for subjects you would like to see covered in a future edition of the blog, or ways in which we could enhance your enjoyment of Workbench, please do not hesitate in contacting us. We can be reached via our usual e-mail address workbench@airfix.com or by contributing to our Workbench thread over on the Airfix Forum. If social media is more your style, you could access either our Airfix Facebook page or Twitter channel, (using #airfixworkbench), where you will find plenty of modelling news, views and discussion taking place. Whichever medium is your preference, please do get in touch, as it is always interesting to hear from fellow modelling enthusiasts and the projects you have on the go at the moment.
As always, the Airfix website is the place to go for all the latest model release information, with our New Arrivals and Coming Soon sections both quickly accessed by clicking either of the links above. As updating the website is an ongoing process, a quick search through each section of the Airfix web pages will often reveal new information and updated images in many of the product sections and this is always an enjoyable way in which to spend a few spare minutes.
The next edition of Workbench is due to be published on Friday 19th July, when we will have more news and modelling features from the fascinating world of Airfix.
On behalf of the entire Workbench team, thank you for your continued support our Airfix blog.
The Airfix Workbench Team
© Hornby Hobbies Ltd. All rights reserved.