Welcome to this latest edition of our Workbench blog and all the news, updates, and modelling exclusives from the fascinating world of Airfix.
You lucky people have another double blog posting weekend to spend time with this weekend, as we prepare to welcome two kit re-introductions to the current 2025 range, one a Luftwaffe classic, with the other being a diorama staple which is making only its second release appearance in an Airfix range.
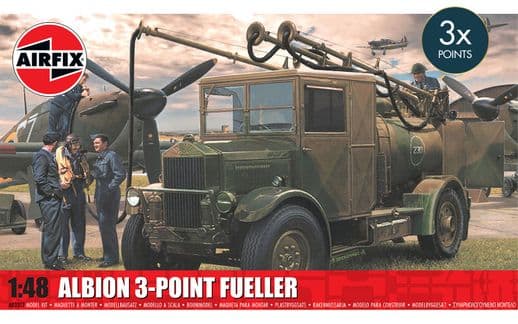
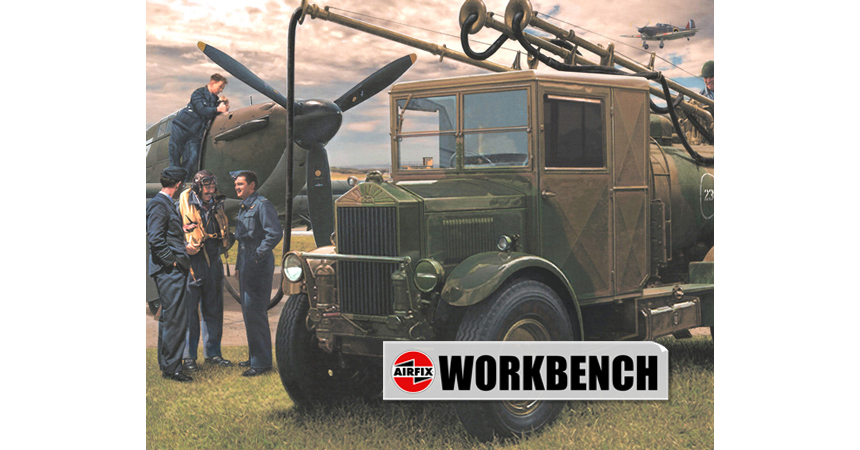
As you will have deduced from the title of this posting, our subject for this blog is something of a model airfield diorama classic, an airfield vehicle kit which was released as a new tooling ten years ago and is making only its second run appearance in an Airfix range, our 1/48th scale Albion three point refueller. Clearly illustrating how commercial vehicle manufacturers rose to the challenge of war in producing and modifying their vehicle range for the war effort, we will be taking a wider look at this fascinating subject, before going on to look at this particular kit release, using a series of built model images, and decoration artwork to illustrate the points raised.
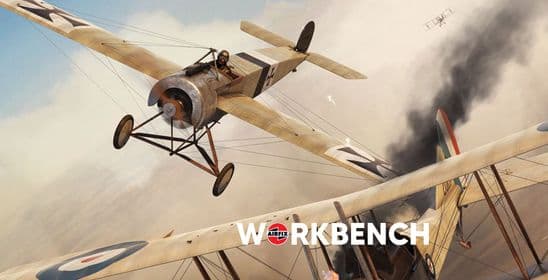
In our second blog post for the week, we will be making a relatively swift return to our 1/72nd scale Focke Wulf Fw190A-8/F-8 kit, but for two very good reasons. Firstly, we are now in possession of a series of built model images finished in both scheme options offered with this kit, and secondly, this hugely appealing kit should be in stock and available by early next week.
Please join us as we continue our blog journey into the fascinating world of Airfix modelling this weekend.
Based on an existing commercial vehicle chassis, the Albion 463 was adapted for use in several military applications, including ambulance and aircraft refuelling vehicles.
As the world watched in horror as German military forces pounded Poland and ‘Blitzkrieged’ their way across western Europe at the start of the Second World War, it must have appeared to the military planners of other nations that the Wehrmacht had discovered some radical secret which almost ensured victory in any offensive operation they mounted. A crucial component of this success was clearly the fast moving mechanised units they could call upon, and it seems that whilst the rest of Europe looked on nervously, Germany had secretly managed to totally re-invent and re-equip its armed forces, making theirs the most modern, mechanised fighting force in the world. Feverishly attempting to re-equip their own forces, Europe braced itself for the coming onslaught.
As we now know, the reality of this situation was actually quite different from this preconception and whist the Wehrmacht's panzers rolled through the defences of Poland, Belgium, Netherlands and onwards into France, the support infrastructure behind them was anything but fully mechanised. Without doubt, Germany's Panzer Divisions were incredibly well equipped and even better trained, however, these impressive units only ever made up around 25% of the German Army and for the rest, it was actual horsepower which kept them moving, both from a transport and supply perspective.
This situation resulted from the rapid expansion of the German Army during the 1930s and how at that time, few ordinary people in Germany even had access to a motor vehicle, let alone were able to drive one. Bringing this fact starkly into focus, America could boast a ratio of 1:5 in relation to the number of cars to people in the country, however in Germany, that same ratio was an astonishingly low 1 car to every 89 people, the worst in Western Europe at that time.
With this being the case, on the eve of war, the German Army could boast around 400,000 horses in service, with all the associated infrastructure challenges that must have brought with it, and by the time of Operation Barbarossa and their strike East, this figure had swollen to an incredible 750,000 horses for the attack, approximately one horse for every 4 troops committed. When considering the historic perception of the strength of the modern Wehrmacht during the Second World War, these are actually rather startling details.
As one of the vehicles already in service with the Royal Air Force, Albion 3-Point Fuellers were also sent to France in support of the RAF Advanced Air Striking Force.
What the Germans became incredibly adept at doing during the early years of WWII in particular, was commandeering as many of the enemy's vehicles they possibly could and subsequently pressing them into Wehrmacht service, something which actually required an impressive degree of mechanical ingenuity. They were taking large numbers of vehicles they had not designed, manufactured or introduced themselves, becoming proficient in operating, maintaining and repairing them, something which required an incredible degree of skill and organisation.
In post war Britain, with the dark clouds of war now looming ominously, the British Government were acutely aware that their existing inventory of fire engines, casualty evacuation vehicles and general service trucks was sadly lacking and as a consequence, immediately set about an ambitious programme of expansion. Officially ‘encouraging’ many of the motor manufacturing companies of the day to return to the production of lorries in support of this program, they were in desperate need of as many rugged and reliable, no frills commercial vehicles as they could get their hands on, proven existing designs with a reputation for effectiveness.
Using chassis designs which were already in production, and making only modest (if any) changes to cabin arrangements, the vehicles easily made the transition to military service and would therefore go on to become hard working general supply trucks with a multitude of uses, fire appliances and ambulances for use both on the home front and increasingly, on battlefields across Europe and the Mediterranean. The mechanical workhorses of commerce were about to go to war.
Despite the ramped-up production of transport vehicles right up until the start of the Second World War and through to the end of the so called ‘Phoney War’, it's generally accepted that Britain was still significantly under-equipped when it came to numbers of military vehicles of all types in 1940, a situation which was just about to get much worse. Although the evacuation of almost 340,000 troops from the beaches of Dunkirk during the early summer of 1940 was nothing short of miraculous, the fact that the British Expeditionary Force had to leave the vast majority of its equipment behind on the beaches of northern France was a catastrophic setback to an already dire logistical situation for Britain, one which required immediate action.
Modelling is a great way for us to replicate wartime airfield scenes in scale diorama form.
As Britain was plunged into a second devastating war of the 20th century, it's interesting to note that almost thirty companies in the country were engaged in the manufacture of commercial vehicles, from household names such as Albion, Ford, Bedford and Morris, to lesser known specialist manufacturers, such as Scammell. Clearly, in order to address the supply issues facing Britain's military, these companies were going to have to come under the overall control of a central co-ordinating body, and the establishment of the Ministry of Supply effectively provided this, immediately all but ending the production of vehicles for most civilian needs, whilst at the same time also procuring the manufacture of vehicles from overseas manufacturers wherever possible.
It is now generally accepted that almost 530,000 trucks and tractors were produced by Britain's various manufacturing companies during the Second World War, a figure which does not include production figures for cars, motorcycles or ambulances, and whilst this is certainly impressive, wasn't achieved without experiencing some significant difficulties. Having so many different vehicles manufactured by a multitude of different companies dictated that managing this, arranging for effective training and support and an adequate supply of spare part, proved to be a logistical nightmare.
Not only were the British unable to standardise on a couple of vehicle types to make the logistics of supply easier to manage during WWII, but the inability to also bring the economies of scale to the operation meant that everything was more expensive to procure than it could have been, meaning less vehicles could be produced as a consequence.
Nevertheless, the situation was so pressing that something of a make do and mend attitude had to be adopted, and taking all factors into consideration, the British managed to keep their vehicle supply wheels turning relatively effectively. For those troops engaged in maintaining these supply lines, the vehicles they operated invariably offered little in the way of protection from the elements, let alone enemy fire. Even though they would invariably be heading towards combat zones with their valuable cargoes, they were doing so in trucks which were nothing more than commercial vehicles sporting a fresh coat of military paint finish.
Our scale tribute to one of the many vehicles produced by the successful Albion Motors Ltd of Scotland.
One of Britain’s most successful motor companies, the Albion Motor Car Company Limited was originally established at Biggar in South Lanarkshire, Scotland in 1899, initially as a relatively modest business with just seven employees. They initially concentrated on establishing a motor car manufacturing business, and as such, released their first car in 1900 featuring an 8 horsepower geared engine, a combination clutch and solid tyres. After releasing several successively more impressive car types, the company decided to concentrate on the production of commercial vehicles from 1909 onwards, and during the Great War, the company went on to produce a great many 3-ton, chain driven trucks for the War Office.
Many of these wartime vehicles would shed their military credentials in the years which followed the end of the war, and would find new roles as motorised public charabanc vehicles, and saw the start of an extremely profitable period for the company, as it continued with the production of increasingly heavy commercial vehicles, in addition to also branching out into buses. In April 1931, the Albion Motor Car Company Limited changed its name to Albion Motors Ltd, adopting their distinctive ‘sunrise’ logo at the same time.
Following the rename, the company continued to go from strength to strength, and would go on to produce a growing number of impressive vehicles, becoming one of Britain’s most prosperous companies and a major manufacturer in Scotland. The 1930s saw the company introduce its first 5-ton truck, and later, develop their own 4-cylinder direct fuel injection diesel engine, with the company gaining a reputation for specialising in ‘cab over engine’ designs. Whilst their distinctive buses all benefited from impressive names, their commercial vehicles were just referred to by alpha-numeric denotations.
Their lofty position within the hierarchy of Britain’s motor manufacturing industry meant that Albion were one of the companies approached by the War Office, as they initiated their huge expansion of vehicle production for military and civil defence use. They would go on to see several of their existing designs immediately adapted for military applications, including their Albion 463 chassis and cab.
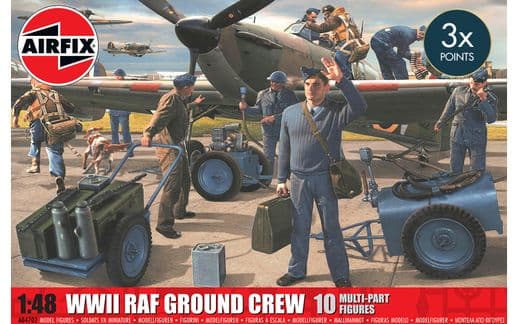
Our box artwork really does convey a sense of just how busy a wartime RAF fighter station would have been.
During the 1930s, the Air Ministry initiated trials across a number of the nation’s commercial vehicle manufacturers, as they were looking to procure a substantial number of two axle chassis machines to provide support across a variety of roles and mainly for service with the Royal Air Force. Albion Motors Ltd of Scotland adapted their Model 463 chassis for the trials, recategorizing the vehicle as their Albion AM463, with the AM prefix referring to its Air Ministry adaptation.
Well versed in the production of rugged and reliable commercial vehicles, the Albion design found favour with the Ministry by virtue of its generous ground clearance, impressive rough field handling, radiator protection bar and reliable engine options all made this the ideal vehicle for the anticipated new role. The Albion AM463 was duly selected and deliveries to the Royal Air Force commenced from 1935 onwards, and included general transport bodies, the most numerous ambulance configured vehicles, and the one we’re interested in here, the innovative 3-point fueller.
These vehicles were all about solid construction and general reliability, with a minimum of maintenance being required once they were in service, however, if something were to go wrong, how it was quick and simple for even the most basically qualified mechanic to fix. These vehicles had to be out on the airfield earning their keep and little concern was given to the comfort of those operating them – the cab gave them shelter from the weather, but that was about it!
The next series of images all feature a recently completed model of our highly regarded Albion 3-Point Fueller model kit, one which would benefit any display of 1/48th scale WWII RAF fighters.
As you can imagine, an inter-war airfield of an expanding Royal Air Force was a busy place, and a great many vehicles were pressed into service to enable daily activities to take place efficiently. This might include a variety of vehicles commandeered for the task, particularly during the years prior to the Air Ministry placing their orders for bespoke vehicles procured for military use.
One of the most important tasks on any airfield was the transportation and delivery of aircraft fuel, collecting fuel from the dump which would typically be on the extreme outskirts of the airfield and supplying it to aircraft as they needed it. When the Albion 3-Point Fueller first entered RAF service, it would be used to refuel such aircraft as Hawker Harts and Hinds, Gloster Gauntlets and Gladiators, but as the RAF modernised, would soon be servicing Battles, Lysanders, Blenheims and of course Spitfires and Hurricanes.
As flight operations increased dramatically during this time, their services would have been in great demand, refuelling aircraft which were being used heavily for training flight purposes, and later when mounting standing patrols along Britain’s coastline. The Albion AM463 3-Point Fueller was quite an innovative design, featuring three long fuel delivery booms, which are often described as allowing three aircraft to be refuelled simultaneously, however, this seems to be something of a misnomer.
Even single seat fighters are quite large aircraft and in order to allow an Albion to refuel three at the same time, two aircraft would have to be either side of it, with one at the rear, all with their noses pointing towards the bowser, which seems to be a little impractical and somewhat dangerous. As early Spitfires had two fuel tanks and Hurricanes three, it’s much more likely that the trio of fuel deliver booms on the Albion were used to fill the different tanks on the same aircraft quickly and efficiently, before moving on to the next aircraft which required fuel.
Following the declaration of war in September 1939, an agreement between Britain and France saw the deployment of the RAF Advanced Air Striking Force to bases around France, with the majority of aircraft being light bombers, but with squadrons of Hurricane fighters for their protection. A major military commitment, this also required a great many ground trades and their support equipment to make the journey across the English Channel, including a fleet of Albion fuellers.
Clearly, these vehicles were needed for the expeditious operation of British aircraft operating in France, but would have little chance of returning to the UK should anything other than an early truce be the outcome of any military skirmish. As it was, Blitzkrieg proved to be much more than a skirmish, and the vast majority of the British equipment sent over to support these operations were abandoned following the hasty retreat of British and Allied forced from the beaches of Dunkirk.
Back home, British airfields now braced themselves for the German onslaught which was surely about to come, and Albion fuel bowser crews would be busier than ever. It does have to be said that by the time of the Battle of Britain, these vehicles were in the process of being replaced by more modern vehicles with a greater fuel carrying and delivery capability, however, every single vehicle was going to be needed if the RAF were going to repel the all-conquering Luftwaffe, which including all the remaining Albions in service.
They would actually work tirelessly throughout the Battle of Britain supporting the efforts of not only the ‘Few’, but also the massive contribution Bomber Command made during this period, keeping British aircraft in the air, where they could be of most impact. As this is often described as Britain’s darkest hour, it’s not surprising to learn that few pictures of Albion fuel bowsers in operation during that time are thought to exist, as this simply wasn’t important then. We do, however, have one very famous image which was taken at RAF Fowlmere during the Battle of Britain, showing an Albion refuelling a rather scruffy looking Spitfire, so with that being our inspiration, we’re going to use this airfield as our blog base of operations.
The airfield at Fowlmere can trace its origins back to the First World War and the construction of a rather impressive facility which included three double and a single Belfast Truss hangar complex, along with substantial living quarter accommodation and infrastructure buildings. Designated as a large training base, it’s interesting to note that the first residents at the airfield were actually American, with the arrival of the 165th Aero Squadron on 15th March 1918 – American aircraft would be regular residents at Fowlmere in the years to come.
The end of the war brought about a dramatic change in fortunes for the airfield, which was one of many selected for closure. Unfortunately for Fowlmere, it was situated just over 4 miles away from the airfield at Duxford, which was to remain open by virtue of its better road and rail connections. Incredibly, despite being an extremely significant airfield complex, all of Fowlmere’s buildings an airfield infrastructure was demolished in 1923, leaving little or no trace of its Great War origins.
During the spring of 1940, a satellite airfield for Duxford was created on land close to the position of where the old Fowlmere aerodrome had been, but this time having much less in the way of amenities. The Spitfires of No.19 Squadron arrived from the beginning of July 1940, and crews detached there had to make do with tented accommodation, and just a handful of Nissen huts for their use. This was the period where the famous photograph showing an Albion AM463 3-Point Fueller servicing a Spitfire was taken, as the airfield saw extensive use throughout the Battle of Britain.
During the Battle of Britain, the basic facilities at Fowlmere were used by the pilots and support teams operating Spitfires, Hurricanes and Defiants, as this satellite airfield would play a major role in the aerial defence of Britain at that time.
The airfield was later allocated for USAAF use and from the spring of 1943, underwent a period of significant expansion, as facilities were brought up to full all-weather operational status. The construction of several blister hangars, permanent buildings, concrete taxiways and hardstanding for aircraft and accommodation block took place at speed and on completion of the works, the airfield was designated US Station 378 – Fowlmere.
From April 1944, the P-51B Mustangs of the 339th Fighter Group arrived, tasked with flying bomber escort missions into enemy occupied Europe, but it didn’t take long for the Americans to give their new home something of a less than complimentary, if ultimately affectionate nickname of the ‘Hen Puddle’. The fighters of the 339th would see heavy combat in the period leading up to and just after D-Day, eventually posting an impressive record of over 653 enemy aircraft destroyed either on the ground, or in the air, 286 of them in April 1945 alone.
With the Americans returning home after the end of the war, Fowlmere was returned back to RAF control, and while they didn’t relinquish that control until 1957, the airfield almost immediately started returning back to the farmland it previously was.
Although kits such as our Albion 3-Point Fueller make for interesting and unusual 1/48th scale build projects in their own right, they are much valued by those modellers who like to display their models as part of a wider diorama presentation. Almost serving as a scale representation of the historic wartime photographs we all find so fascinating, a well presented model diorama display will capture the attention of onlookers whether they are fellow modellers or not, and can always be relied upon to be the stimulus for engaging conversation.
Building something like a 1/48th scale Spitfire, Hurricane or Defiant can be rewarding enough for most modellers, and produce a fine representation of the famous aircraft, but placing that aircraft in the centre of a display which features airfield support vehicles and ground crews clambering all over it takes the build to a different level altogether, turning an impressive build into a fascinating scale snapshot of a wartime scene. No matter the scale and no matter the aircraft subject, a little research and some scale vehicles and figures can transform any build project and once we discover the delights of diorama building, there’s simply no going back.
With several airfield support kit sets featured in the current range in both 1/72nd and 1/48th scales, including our 1/48th scale WWII RAF Ground Crew Set, we’re looking forward to welcoming the highly regarded 1/48th scale Albion 3-Point Fueller into our warehouse in the next few days, and certainly by next weekend. As it’s been absent from the range for such a long time, we expect diorama modellers to be stocking up before it disappears once again.
We are afraid that's all we have for you in this latest edition, but we will be back next Friday with more project development updates and the very latest Airfix kit exclusives. In the meantime, we are always keen to hear your views on all things Airfix and in particular, any thoughts and opinions you may have regarding our Workbench blog. If you would like to drop us a quick line, could we please ask that you use our workbench@airfix.com email for all correspondence.
To re-visit any of the Airfix blogs we have produced over the past seven years or so, please head to our main Workbench hub, where you will find our entire blog back catalogue and all the Airfix design projects we have already covered.
All our dedicated official social media sites can be accessed by clicking the respective link icons at the foot of this page, or by heading to the Airfix homepage. Other useful Airfix links are:
Facebook, YouTube, Twitter and Instagram official sites
Please join us for more Airfix updates next week and thank you for your continued support.