Welcome to this latest edition of our Workbench blog and all the news, updates, and modelling exclusives from the fascinating world of Airfix.
In a year which has already seen the world commemorating and celebrating several significant WWII anniversaries, this year’s Battle of Britain Day commemorations will be marking 85 years since the pilots of Fighter Command repelled the incessant Luftwaffe attacks against British targets, including day and night attacks against London.
With Britain standing alone, and Europe firmly under the heel of the Wehrmacht, the summer of 1940 would see a nation preparing to face an onslaught the like of which had never been seen, a fight for its very survival, along with that of the free world at that time. With the English Channel acting as a natural barrier to invasion, German military planners knew they would have to rule the skies over Britain, if a risky amphibious assault against the country had any hope of success, but with the Luftwaffe sweeping all before it during the early months of the war, and with overwhelming odds in their favour, surely such a victory was only a matter of time.
On this side of the Channel, Britain prepared to defend everything they held dear, and whilst the Battle of Britain is often championed as the ‘Few’ facing the many, what the Luftwaffe and German forces were up against was an entire nation, a Britain steadfast in its resolve, and ready for the challenge ahead.
In this latest edition of Workbench, through the medium of scale modelling, we will be attempting to highlight how the Battle of Britain was much more than just Spitfires against Messerschmitts, and how this aerial struggle proved to be pivotal in the wider context of the Second World War, with many different facets making significant contributions.
It's Battle of Britain anniversary weekend in this latest edition of Workbench.
Our new Battle of Britain Gift Set makes for a fitting modelling tribute to this year’s Battle of Britain 85th Anniversary commemorations.
For most people, when they think of the Battle of Britain, and our nation’s finest hour, they think of the Spitfires and Hurricanes of Fighter Command prevailing against a previously unvanquished enemy, an enemy which was far stronger in number than they were themselves. A David and Goliath encounter fought amongst the clouds, how a relatively small number of brave pilots who were subsequently christened Churchill’s ‘Few’, managed to stave off the threat of invasion, something which would be the culmination of a terrible period of defeats for Britain and her allies, however unlikely that may have seemed.
As we head towards this latest 85th anniversary commemoration of Battle of Britain Day, the stirring sight (and sound) of a sky filled with formations of restored Spitfires and Hurricanes may well fill us with immense pride, but when it comes to accurately recounting the events of the summer of 1940, are we looking deeply enough into what was unquestionably one of the most significant periods in British history – the 'Few' were certainly not alone.
As modellers, our love of the hobby and enthusiasm for the subjects covered in scale construction kit form have been fuelled by stories of the many extraordinary acts performed by ordinary people during wartime years. Whether our goal is to produce scale representations of the aircraft flown operationally by these heroes, or simply as model tributes to their selfless devotion to duty, the Battle of Britain has always provided plenty of inspiration for the world’s modelling community, with manufacturers seemingly sharing their fascination for the subject.
With no shortage of related kits for us to choose from, during the course of this latest update, we will be attempting to show that when it comes to the period during the summer of 1940 we refer to as the Battle of Britain, there are actually many more aircraft types to select from than many would ordinarily assume, and whilst the Spitfires and Hurricanes of Fighter Command will always be high on every modeller’s list, how we shouldn’t overlook the significant contributions of both Bomber and Coastal Commands, and the Fleet Air Arm when making our project selections.
The incident commemorated by this artwork took place during air operations covering the Dunkirk evacuations.
The period prior to the Battle of Britain was nothing short of disastrous for Britain and her Allies in Europe. The start of the Second World War had shattered the hopes of many European nations that a diplomatic solution to avoid conflict could be secured, and how a German Military which had been building up for years was now the most fearsome fighting force the world had ever seen. Devastating attacks against Poland, Denmark and Norway were followed by a strike against France, which saw German forces sweeping through Belgium, the Netherlands and Luxembourg, and the British Expeditionary Force engaging German troops for the first time.
Six weeks of fighting ended with the surrender of France, and a lightning war which shocked not only Allied forces, but also the rest of the world who looked on in horror. Surely this devastating victory was just the precursor to Germany taking control of much of Europe, and the beginning of a new dark age for the continent, however, German forces didn’t have it all their own way during the French campaign, and even though Hitler took the opportunity to enjoy a period of sightseeing in Paris, his forces had been depleted. Were they truly capable of mounting an amphibious strike across the English Channel?
Allied forces fighting in France had been much more effective in challenging the Germans than is usually recognised, to the point that we should probably accept these successes as being a significant factor in the Luftwaffe failing to secure victory in the Battle of Britain which followed. Both the Air Component of the BEF and the French Armée de l’Air fought tenaciously in defence of France, claiming somewhere in the region of around Luftwaffe 1800 aircraft destroyed or damaged over France, a figure which represented 36% of their total aircraft strength at the time.
As you might imagine, the air campaign over France (including air operations covering the Dunkirk evacuation) were equally costly for the Royal Air Force. They had lost just under 1000 aircraft and a great many skilled pilots during this period, losses which would be hard to make good, at a time which was unquestionably the most significant in the nation’s recent history. The French Air Force had lost approximately 1400 aircraft of all types, many of which had been destroyed on the ground by the Luftwaffe, with the combined air forces of Holland and Belgium losing a further 300 aircraft in the same period.
Operation Dynamo, or the ‘Miracle of Dunkirk’ as it came to be known, would see a maximum effort being mounted by the Royal Air Force, not necessarily to diminish the fighting capabilities of the Luftwaffe, but more to keep them occupied and away from the evacuation beaches, whilst an almost unbelievable 338,000 troops were rescued and brought back to Britain. Although the loss of all their equipment in France was devastating for the British Army, wrestling an unlikely victory from the very jaws of defeat was a significant achievement under these extreme circumstances, but could it serve as a fighting catalyst for what Britain was surely about to face in the weeks and months ahead. Could Prime Minister Winston Churchill harden the resolve of his people to keep fighting until her powerful ally across the Atlantic could be persuaded to bring her might to bear?
RAF pilots would open their victory accounts during the fighting in defence of France during May 1940.
As the last of the RAF’s Hurricane fighters landed back at their home airfields in Britain, following the fighting in France, and the last ships had left the seas around Dunkirk, Fighter Command could take stock of its fighting strength. Initially at least, that situation was desperate, - with just an estimated 750 fighter aircraft available, a maximum of around 500 of these were available for combat operations.
Intelligence reports claimed they were facing a Luftwaffe air armada which totalled 3,000 aircraft at least, and despite their losses over France, German pilots were supremely confident and desperate to test themselves against the Royal Air Force. Germany was at the peak of its military powers and whilst they appeared to be delaying their all-out onslaught against Britain somewhat, this didn’t seem to matter, as victory would ultimately be theirs.
Essentially, the Luftwaffe needed to destroy Fighter Command and to achieve total air supremacy over southern England, before a hazardous cross-Channel amphibious assault could be mounted, although many in the German high command were of the opinion that the destruction of the Royal Air Force would ultimately see Britain suing for peace, one which would be arranged on Germany’s terms.
In Britain, although they knew the German onslaught was coming, this delay in all-out aerial combat proved fortuitous in the extreme. Although bloodied, Fighter Command were certainly not out, and they were rebuilding and preparing at an impressive rate. By the time the Luftwaffe mounted their first major raids against land targets, Fighter Command’s strength of available aircraft had effectively doubled to 1000 fighters, and they also had a tireless champion, in the form of Air Chief Marshal Sir Hugh Dowding.
Dowding was a pragmatic man who took his responsibilities for the defence of Britain incredibly seriously. This had previously seen him refusing to send Spitfires to France, as it would degrade Britain’s defensive capabilities, and ordering the use of RADAR, new technology which would be the electronic eyes of Fighter Command during the struggle ahead.
The Chain Home station at RAF Poling in West Sussex.
In addition to organising the production and repair of his fighter aircraft, Dowding’s masterstroke was unquestionably the establishment of a fully integrated air defence and communication system, something which would ultimately ensure that fighters were in the air when and in the right places when they were needed most, reducing the need for wasteful and strenuous standing patrols for his pilots.
The Dowding System was the world’s first integrated wide-area, ground controlled air defence network and it would prove to be Britain’s secret weapon in meeting the Luftwaffe challenge. Taking the information gathered by the Chain Home and Chain Low radar stations, and combining this with the invaluable information gathered by the Observer Corps, all this information was relayed to Fighter Command HQ, quickly disseminated and passed to respective Sector Stations. From there, sector Operations Rooms, which were plotting incoming raids as they developed in real time, could pass details on to anti-aircraft defences and if required, scramble fighters to intercept the raid, with developing information relayed to aircraft whilst they were in the air.
This system worked, and it was absolutely vital to Britain’s response to the Luftwaffe onslaught, but would it be enough?
Facing such a perilous situation as the nation did during the summer of 1940, British military planners obviously had to have contingency plans in place in the event the brave pilots of Fighter Command were unable to overcome the challenge posed by the mighty Luftwaffe. Should this prove to be the inconceivable outcome of the battle, the country would be bracing itself for the imminent arrival of German ground troops on British beaches, and that being the case they needed to ensure they faced an extremely hostile reception.
If the Royal Navy had not already taken a heavy toll of invasion craft, the landing troops would have to run the gauntlet of strong coastal defences, the regular army (which was still significant in number and re-equipping after the Dunkirk evacuations) and the Local Defence Volunteer Force, who may have been less professional than their military counterparts, but were steadfast in their resolve, and stood ready to defend their homeland.
Had Fighter Command failed to stem the Luftwaffe tide, plans were in place to use many different aircraft types to attack the landing beaches unloading German troops, including the de Havilland Tiger Moth.
In the air, what remained of Fighter Command would attempt to cover the aircraft of Bomber Command, as they mounted unrelenting strike attacks against the landing beaches, in an attempt to prevent the invaders from establishing beachheads and moving inland. In addition to this and waiting poised to strike, Operation Banquet called for Army Cooperation and Training Commands to deploy their aircraft in an offensive role, attacking the beaches in groups of five or six aircraft, but from multiple directions at the same time. The aircraft had been specially modified to carry bombs and machine guns and whilst their offensive capabilities would clearly be limited, it was hoped that their sheer numbers and frequency of attack would have had a demoralising effect on German troops landing in Britain, in a similar manner to how they themselves had employed Blitzkrieg.
Operation Banquet Light was an extension of this plan, and intended to equip some of the RAF’s lightest aircraft with the ability to carry a bomb load, no matter how small that was. Aircraft such as the Tiger Moth training biplane would have been used for such missions and had it come to this, many of the missions would have been flown by military student pilots or members of the public who held a flying licence.
Thankfully for the nation, not to mention for the pilots allocated to the task, Operation Banquet was never put into action, however, you can’t help but imagine what it might have looked like to see large numbers of de Havilland Tiger Moth biplanes attempting to drive the German invaders back into the English Channel. It would have certainly shown the German’s that they would have to fight for every inch of British soil, or swim back to France to avoid their wrath.
With aircraft on both sides of the English Channel being prepared for battle, now for the first time, Luftwaffe aircrews would be operating at a distinct tactical disadvantage. The English Channel stood as a significant natural barrier for them, meaning that fighter aircraft would only have limited time over Britain if they were to make it safely back to their bases, and if they suffered combat damage, were shot down, or experienced mechanical issues with their aircraft, it was highly likely that the war would be over for them.
Flushed with their airborne successes to date, Luftwaffe Commander in Chief Hermann Göring boasted to Hitler that his fighters would sweep Britain’s skies of the British fighters, and how his bombers would level RAF airfields in a matter of days. He ordered all available forces to be moved to airfields as close to the northern coast of France as possible, and told them to prepare for attack. Early skirmishes were something akin to two boxers sizing their opponent up, reluctant to fully commit their forces, and consisted mainly of operations attacking shipping in the English Channel, with the Luftwaffe attempting to goad Fighter Command into larger scale combat.
For the first time, if Luftwaffe airmen were shot down, or had mechanical problems, they were effectively out of the war at best.
With a determined and organised Royal Air Force awaiting them, not to mention the technology behind radar and the Dowding System, it wouldn’t take long before Luftwaffe losses started to mount and wranglings within the force would begin to undermine the confidence Göring had boasted to Hitler about. Would Dowding, or Göring make the better preparations for battle, and who would emerge victorious?
Ultimately, as the world watched as this mighty clash of war eagles converged, the outcome of the battle would be decided by the brave airmen of Britain and Germany, along with the vital support network behind each of them. Everything was very much in the balance, with both sides relatively evenly matched all things considered. As those incredible, yet terrifying events unfolded, a few relatively small decisions and developments would decide the immediate fate of Europe, and the direction of the Second World War. Facing incredible odds against them, could the young airmen of Britain, the Commonwealth and the rest of the free world stand against the all-conquering might of the Luftwaffe?
Twenty percent of the pilots rising to face the Luftwaffe during the Battle of Britain were not British nationals.
As Britain prepared to face the onslaught of the Luftwaffe during the summer of 1940, the ranks of her air force already benefitted from the personnel support of both her Commonwealth Nations, and those from many other overseas countries. Not only would this prove crucial in providing pilots to bolster the ranks of Fighter Command during the Battle of Britain, but also in the years which followed, continued to see a steady flow of trained airmen for the Royal Air Force.
In addition to this, the British Commonwealth Air Training Plan would ensure that the vital training of student pilots could take place out of the line of fire, a benefit prospective Luftwaffe pilots would not benefit from.
By the outbreak of the Second World War, significant numbers of Commonwealth airmen were already members of the Royal Air Force, many of whom would go on to fight during the Battle of Britain. Leading the way were 127 New Zealand pilots, followed by 112 from Canada and out of the 450 Australian pilots in RAF service at the beginning of the war, 32 would go on to see service during the Battle of Britain. With pilots also coming from South Africa, Northern and Southern Rhodesia, Newfoundland, Barbados and Jamaica, the contribution of these pilots was essential, and must be recognised.
In addition to this, as German forces blitzkrieged their way across Europe, a great many brave airmen from several European nations also made their way to Britain, determined to continue the fight against an enemy who had caused so much misery in their own homelands. The proud and extremely capable pilots from Poland and Czechoslovakia would go on to prove decisive during the battle, displaying great valour and tenacity in the face of the Luftwaffe onslaught. Pilots from Belgium and France would also bolster the ranks of Fighter Command during the Battle of Britain, along with the neutral pilots from Ireland and the USA.
Just under 3,000 Fighter Command airmen would take part in the Battle of Britain, with that number consisting of no less than 16 British, Commonwealth and friendly Allied nations. Significantly, 1/5th of these brave pilots were of non-British nationality.
Famous American Olympian Billy Fiske flew the Hawker Hurricane during the Battle of Britain, and made the ultimate sacrifice in helping his British comrades.
When Britain stood alone and needed the young men of the Royal Air Force to stand against the might of the all-conquering Luftwaffe, a great many airmen answered that call, however, not all of them were native to these shores. American Pilot Officer William Meade Lindsay ‘Billy’ Fiske III was born in New York in June 1911 and by the time he volunteered to join the Royal Air Force in August 1939, and only by convincing officials that he was a Canadian citizen, he was already a national hero back in his homeland.
In 1928, Fiske was the driver of the US five-man Olympic bobsleigh team which claimed the gold medal at the St. Moritz games, and at the age of just 16 years, also became the youngest ever gold medal winning Olympian in the process, a record which would stand until 1992. He would also go on to retain the Olympic title four years later at the Lake Placid games, but declined the chance to go for an unprecedented third medal in 1936, as the games that year were being held in Germany, and he was strongly against the political situation in the country.
When later joining the Royal Air Force, Fiske believed that he was the first US citizen to join the force after the outbreak of hostilities, something which he was extremely proud of.
Posted to fly the Hawker Hurricane with No.601 Squadron at Tangmere, when he arrived at his first operational unit, he had never actually flown a Hurricane, so embarked on an intensive period of familiarisation flying. After just eleven hours in the Hurricane, he flew his first operational sortie on 20th July 1940, during the opening skirmishes of the Battle of Britain.
Fiske was in a Hurricane once again on 11th August, when twelve Hurricanes from No.601 Squadron engaged in combat with a heavy force of Messerschmitt Bf 109s and 110s off the Isle of Wight. His subsequent combat report claimed one of the Bf 110s as a ‘probable’ victory, one of three probable claims he would go on to make during his short combat career flying with the Royal Air Force.
On 16th August, No.601 Squadron and Billy Fiske were scrambled once again, this time to intercept a force of Junkers Ju-87 Stukas which were heading for their home airfield at Tangmere. During a frenetic fifteen minutes of combat, multiple Stukas were shot down, the airfield suffered many bomb strikes, however, Fiske’s Hurricane was hit by defensive fire from one of the German dive-bombers.
RAF No.303 Squadron would famously enter the Battle of Britain fray manned by Polish pilots, and would give an impressive account of themselves.
With the engine of his fighter seized and with a bullet also rupturing the aircraft’s fuel tank, Fiske, knowing how valuable fighters were to Fighter Command at that time, decided that he was going to nurse his stricken aircraft back to Tangmere for a landing. Tragically, after crossing the airfield boundary and making an almost perfect wheels up landing, the aircraft burst into flames when it came to rest, with the pilot still trapped inside the cockpit.
Despite the heroic efforts of two of the stations ground staff, who unstrapped the unconscious airman from his seat and dragged him from the burning aircraft, Billy Fiske sustained grievous injuries. To make matters worse, the station medical centre had taken a direct hit during the Stuka attack, and the station medical officer was himself injured. Even though he did manage to administer morphine to the Hurricane pilot, he could do little more because of his own condition, and instructed the men to take Fiske directly to Chichester Hospital. Tragically, Pilot Officer Billy Fiske would lose his fight for life there the following day, having suffered surgical stress from the terrible injuries sustained during the Hurricane crash landing.
Billy Fiske was laid to rest with full military honours at Boxgrove Cemetery in Sussex on 20th August 1940, with a memorial unveiled to him at St Paul’s Cathedral the following year. The memorial reads, ‘Here was a young man for whom life held so much. Under no compulsion, he came to fight for Britain. He came and fought, and he died. An American citizen who died that England might live.'
Although Billy Fiske is widely regarded as the first American airman to have lost his life during the Second World War, his countryman Flight Lieutenant James Davies had tragically been lost at the end of June 1940, but as he had moved to Wales well before the start of the Second World War and had been in the Royal Air Force since 1936, official records listed him as being British.
Bomber Command aircrews made a significant contribution in attempting to relieve the pressure on their comrades in Fighter Command. The Bristol Blenheim would be used in the bomber, heavy fighter and reconnaissance rolls during the Battle of Britain.
Although the Battle of Britain is now rightly celebrated as a triumph for the heroes of Fighter Command, they were ably supported in their efforts by the hundreds of strike operations mounted by Bomber Command throughout, a contribution which is often overlooked. Bomber Command had been fully committed to the struggle throughout the period covered by the Battle of Britain, attacking factories and communications infrastructure in an attempt to disrupt Germany’s ability to re-supply forward areas in northern France.
Concerted night bombing attacks were directed at rail marshalling yards and canal networks deep into German territory, and medium bombers launched raids against airfields in northern France and the Low Countries which were now being used by the Luftwaffe. In addition to this, the targeting of ports, harbours and enemy shipping was all intended to disrupt German invasion planning from the very start, even though these attacks proved incredibly hazardous for all the crews engaged in flying them.
Bomber Command officials were given clear instructions that should the threat of imminent invasion come to pass, they would be required to launch a maximum offensive effort targeting the embarkation ports in France at short notice, and should that prove to be the case, probably by daylight and with little hope of friendly fighter protection.
During a busy August 1940, Bomber Command mounted 2,227 sorties against enemy targets, with 714 of these directed towards Luftwaffe airfields in occupied Europe. RAF Blenheims initially made their attacks during daylight hours, however, these missions resulted in heavy casualties, and soon reverted to night attacks. Bomber Command’s efforts were hampered by the fact that it was estimated that the Luftwaffe operated from some 400 airfields during this period, moving regularly in order to protect their forces from such attacks, making the ability to assess the impact of such raids incredibly difficult to corroborate. Having said that, forcing German defences to expect regular attacks at short notice would have been of great help to Fighter Command in their own struggle, although as we have already mentioned, went largely unheralded.
Bomber Command raids against Berlin brought about a significant tactical change in Luftwaffe operations, one which many historians believe may well have taken away any chance they had of securing victory in the Battle of Britain.
Perhaps the most significant contribution made by Bomber Command came on the night of 25th/26th August 1940. On that night, they responded to the accidental and completely unauthorised Luftwaffe bombing of London the previous day, by launching their own attack against Berlin. They would return several times over the next few days to the absolute fury of Hitler, who promised to flatten London in response. Enraged, he ordered his Luftwaffe commanders to target London with immediate effect, a change in strategy which finally saw Fighter Command’s airfields being spared further Luftwaffe attention.
This was the salvation Fighter Command had been praying for, and would become a pivotal turning point in the eventual outcome of the battle. Göring’s bombers would be unprotected for much of the time over London, as his fighters didn’t have enough fuel for combat and to make it home across the Channel. Mounting bomber losses saw the fighters being ordered to stay protecting them, effectively removing their tactical advantage, and handing the initiative to the Spitfires and Hurricanes of Fighter Command.
This change in Luftwaffe strategy allowed Fighter Command to replenish and reorganise and for the first time, were able to face the enemy in ever greater numbers. They were not going to let this change in fortune pass without taking full advantage, reclaiming the skies above southern England.
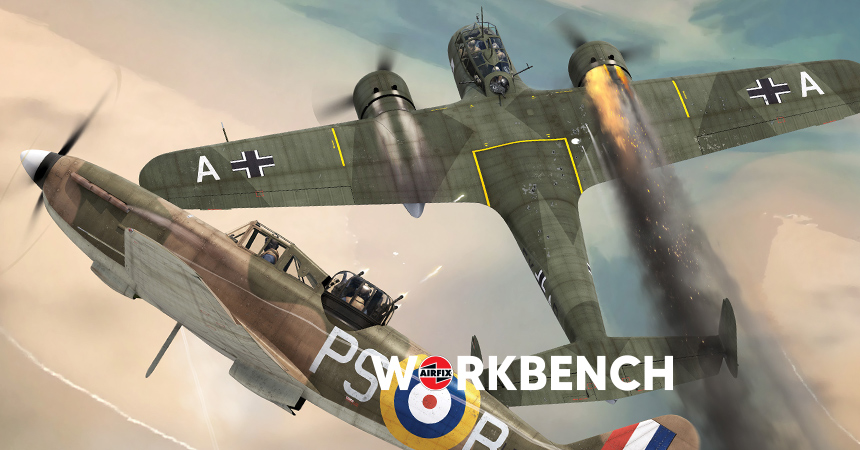
Fighting during the Battle of Britain was much more than just the enduring aerial contest between the British Spitfire and German Bf 109E.
With the 85th anniversary of the Battle of Britain now upon us, we can expect to see news articles and media content celebrating the achievements of the ‘Few’ and the Spitfires and Hurricanes of Fighter Command, but how this doesn’t exactly tell the full story of this historic aerial clash of eagles. With the wider contribution of Bomber Command, Coastal Command, Army Cooperation, RAF Training Command and the Fleet Air Arm during the battle, there are a great many more aircraft possessing links to the Battle of Britain than most people might think, even though these types may not be held in the same affection as the main fighters of the day.
As modellers, the aircraft which took part in the Battle of Britain have always provided us with an enduring source of inspiration when it comes to subject matter, something which is about to continue with the advent of this year’s significant anniversary. Although aircraft types such as the Spitfire, Hurricane and Messerschmitt Bf 109 will always take star billing when it comes to our tribute build projects, there are other aircraft types worthy of our consideration. Using the mediums of Airfix box artwork and built model imagery, let’s take a closer look at some of them now.
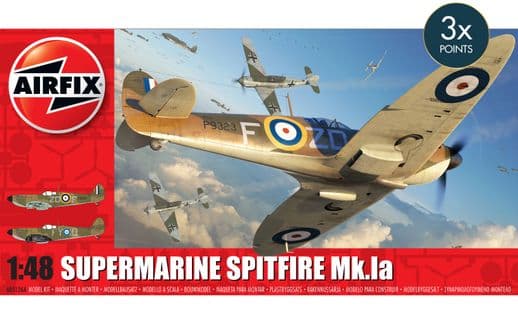
An aircraft which continues to be instantly recognisable the world over, the Supermarine Spitfire was the RAF’s most advanced fighter type during the Battle of Britain, and historically, is often lauded as the aircraft that saved Britain during its darkest hour. Whilst the Spitfire appeared to transcend the realms of simply being an aircraft type, becoming a symbol of Britain’s defiance in the face of adversity, it has to be acknowledged that it was actually the Hawker Hurricane which proved to be the most successful defensive weapon during this period.
An aircraft which would go on to be regarded as one of the most important types of the entire war, and one which formed the backbone of Fighter Command throughout Second World War, the beautifully clean lines of the Spitfire would bely its ruthless effectiveness as a fighting aeroplane, a symbol of hope for the British people and one which quickly earned the respect of the Luftwaffe. The name ‘Spitfire’ would become feared by Luftwaffe pilots during the summer of 1940 and as more and more of their aircraft failed to return from operations over England, their demise was always attributed to the much vaunted Spitfire, even though in many cases it would be Hurricane squadrons which actually scored the decisive victory.
Making its first flight around six months before the Spitfire, the Hurricane was arguably the most important aircraft to enter service with the Royal Air Force. An effective combination of traditional manufacturing techniques and cutting edge aviation technologies, the Hurricane was the first RAF production aircraft to exceed 300mph in level flight, and the first eight-gun monoplane fighter to enter service.
At the outset of the Battle of Britain, the Hawker Hurricane was the most numerous Royal Air Force Fighter in service and despite the fact that it was seen as being inferior in capability to the Spitfire, it would prove to be Britain’s most effective weapon during the coming struggle. A reliable and extremely capable fighter, the Hurricane was a stable gun platform which was preferred by many pilots engaged in this struggle, able to make short work of any Luftwaffe aircraft which strayed into its sights. Adopting construction methods which allowed battle damage to be patched up more easily than the duralumin skinned Spitfire, the Hurricane could be repaired at its home airfield, and could therefore be relied upon to be where it was needed most during the summer of 1940, in the air and fighting.
Around 35 squadrons of Hurricanes were in service at the start of the Battle of Britain, a number which would see them as by far and away the most important component of Britain’s defence system. They would account for at least 605 of all Luftwaffe aircraft losses during the battle.
One of the more interesting aircraft to see service during the Second World War, it’s interesting to note that the Boulton Paul Defiant turret fighter actually made its first flight and service introduction after both the Hurricane and Spitfire This unusual aircraft was developed to combat large formations of enemy bomber aircraft which were thought to be the main threat to British airspace at the time, but incredibly, achieved this without the ability to fire its guns in a forward attitude, like traditional fighters did.
Powered by the same Rolls Royce Merlin engine used by both the Hurricane and Spitfire, the Defiant featured a powered dorsal turret which housed four .303 Browning machine guns for offensive firepower, which could be brought to bear during beam attacks of enemy bomber formations, in a concentrated arc of fire. During early skirmishes with the Luftwaffe in operations to cover the Dunkirk evacuations, the RAF’s Defiants scored some spectacular combat successes, as German pilots mistakenly identified the aircraft as a Hurricane, only to come under heavy fire before they realised their mistake.
Luftwaffe pilots quickly worked out the limitations of the Defiant and developed tactics to negate its turret fire advantage, meaning that the fighter was unable to operate in contested airspace without fighter protection of its own. Before the Battle of Britain was over, the Defiant had to be withdrawn from day fighter operations, but would go on to prove successful in the roles of Air Sea Rescue support and establishing Britain’s night fighter force.
An aircraft which is not usually associated with the Battle of Britain, the Gloster Gladiator biplane fighter may have represented the pinnacle of fighter technology when it entered RAF service in early 1937, but by the start of the Second World War, had been superseded by the latest monoplane fighters. Although the Gladiator would see extensive service in Norway, the Mediterranean, North Africa and the Middle East, only one RAF squadron would use the Gladiator during the Battle of Britain, as they were sent to operate from Roborough airfield, to protect the naval dockyards at Devonport.
Wearing the standard Royal Air Force day camouflage markings of the period, No.247 (China-British) Squadron flew many standing patrols over their assigned area, but didn’t see actual combat with the Luftwaffe during the battle. They were sent to intercept an incoming raid of Messerschmitt Bf 110 heavy fighters at one point, but were relieved by a squadron of Hawker Hurricanes before they could engage in combat.
Further north, No. 804 Naval Air Squadron operated Sea Gladiators in the defence of the naval base at Scapa Flow, and it was reported that several RAF stations had Gladiators available for point defence if required, although again, non would see combat.
The Bristol Blenheim is actually an extremely important aircraft to mention in this section, as it was used in bomber, fighter and reconnaissance roles during the Battle of Britain. One of the most important aircraft types in the history of the modernising Royal Air Force, when the prototype Blenheim took to the air in April 1935, it was one of the fastest aircraft in the world, and even when it was fitted out with the additional equipment required for military service, was still faster than the RAF’s front line biplane fighters of the day.
As we saw earlier, during the Battle of Britain, RAF Blenheims were engaged in attacking Luftwaffe airfields in France and the Low Countries, but suffered terribly at the hands of German defences. As one of the most numerous RAF aircraft types in service at the start of the Second World War, around 200 of those aircraft would subsequently be modified to serve as long range heavy fighters, but would suffer a similar fate to the Defiant when used against Luftwaffe raids during daylight hours. They would ultimately be relegated to night fighter and night intruder operations, but only after its crews had made a valiant contribution to the defence of Britain during the summer of 1940.
As we have already seen, a great many other aircraft would see service in a variety of roles during the battle of Britain, such as the Armstrong Whitworth Whitleys, Handley Page Hampdens and Vickers Wellingtons of Bomber Command, along with other types such as the Westland Lysander, Avro Anson and even the venerable old Tiger Moth all being available for action if called upon.
It has to be said that from a modelling interest perspective, the aircraft operated by the ‘enemy’ have always proved to be at least as popular as the British aircraft types when it comes to scale subject matter, something which still seems to be the case to this day. As the two opposing sides were engaged in the same terrifying historic aerial struggle, it somehow seems fitting that from a modelling perspective at least, both forces are represented equally in scale terms, and how 85 years later, our hobby continues to serve as a fitting tribute to the aircrews on both sides who contested the Battle of Britain.
Without question one of the world’s great fighting aeroplanes, the Messerschmitt Bf 109 would not only see service throughout the Second World War, but when first entering service in 1937, it would be the fighter design against which all future fighter aircraft would be measured. A relatively diminutive aircraft with powerful engine and heavy armament, the Bf 109 was a hunting aeroplane pure and simple, and would score its most significant successes during the Battle of Britain when its pilots were allowed to roam the skies looking for enemy targets as they presented themselves.
When later forced to stay close to the bombers, they lost their tactical advantage and became much less of a threat to the pilots of Fighter Command, who by that stage were able to challenge German formations in large numbers. Carrying only enough fuel for around twenty minutes combat time over London, the Bf 109 was very closely matched in fighting capabilities to both the Spitfire and Hurricane, with each aircraft possessing strengths and weaknesses over the other.
The most heavily produced fighter aircraft in history, the Messerschmitt Bf 109 would become the mount of aces, or ‘Experten’ as the Luftwaffe would refer to them, and whilst the Luftwaffe didn’t actually regard the scoring of five aerial victories as signifying an Ace pilot, an incredible 204 of its pilots would reach or exceed this mark during the Battle of Britain.
Messerschmitt Bf 110 Destroyer
An aircraft type which enjoyed high ranking support amongst the Luftwaffe top brass, trials undertaken during the 1930s showed that the attributes of a heavy fighter would prove crucial in any future conflict, with the greater range and offensive firepower these aircraft possessed allowing them to be much more devastating operationally when compared to smaller, lighter fighter aircraft. Developed as the Luftwaffe’s aerial ‘Destroyer’, the Messerschmitt Bf 110 was an excellent aircraft, but one which was initially deployed in a role it was never intended to perform, that of a close air support fighter.
Nowhere near as fast or as nimble as the single engined Bf 109, the larger Messerschmitt Bf 110 suffered terribly at the hands of the RAF during the Battle of Britain, as it was sent to dogfight against opponents which were much more suited to the task, with many falling to their guns as a consequence. Nevertheless, despite being at something of a combat disadvantage, if an RAF fighter did find itself caught in the gunsight of a Bf 110, it would be in serious trouble.
During the Battle of Britain, it was soon discovered that Messerschmitt’s Destroyer could not operate in contested airspace without the protection of single engined fighters, however, during operations on the Eastern Front, North Africa and the Mediterranean, the Bf 110 would once again prove its worth as a fighting aeroplane. It would find its operational calling when converted to specialist nightfighter operations, where the attributes which made it so attractive to Luftwaffe officials in the beginning could all be brought to bear.
One of the most distinctive and feared aircraft of the Second World War, the Junkers Ju 87 Stuka was regarded as the aviation symbol of Blitzkrieg and during the early months of WWII, appeared more sinister than any other machine of war. Capable of mounting devastatingly effective dive bombing attacks, the Luftwaffe’s Stuka squadrons would have an important role to play during the Battle of Britain, however, RAF pilots quickly learned how to exploit the vulnerabilities of the aircraft and if they were caught by Spitfire or Hurricane without fighter protection, it was unlikely the crew would be returning back across the Channel to fight another day.
Scoring significant successes against shipping and coastal radar sites during the early skirmishes of the Battle, the Stuka would become a less familiar sight in the skies above Britain as the conflict progressed, as they fell easy prey to the pilots of Fighter Command. Stukas would also serve in small numbers as night intruders during the Blitz campaign against London.
Junkers Ju 88
A truly exceptional aeroplane, the Junkers Ju 88 was a Schnellbomber which proved versatile enough to be classified as a successful multi-role aircraft throughout its long service history. The most modern of the Luftwaffe bombers committed to operations over Britain during the summer of 1940, when these aircraft were used in shallow dive bombing attacks, they were extremely difficult for Britain’s defences to deal with, but again if caught without fighter protection, were still vulnerable to the Spitfires and Hurricanes of Fighter Command.
These impressive aircraft equipped five Kampfgruppen during the Battle of Britain, with these aircraft quickly showing themselves as the most capable strike aircraft the Luftwaffe could field at that time. Despite this, as the RAF slowly gained the upper hand, even the excellent Ju 88 would begin to fall in larger numbers, as the skies above Britain became a foreboding place for any Luftwaffe airman to be during daylight hours. Nevertheless, the Ju 88 would be produced in great numbers and see action until the very final days of the Second World War.
The Luftwaffe’s main strike bomber during the Battle of Britain, the twin engined Heinkel He III may have been developed during the inter-war years as a fast civilian airliner, but from the very beginning was always regarded as something of a ‘Wolf in sheep’s clothing’. Easily making the transition from masquerading civilian aircraft to medium strike bomber, the Heinkel He III’s which took part in the Battle of Britain looked very different to the first variants to enter Luftwaffe service. The introduction of a redesigned cockpit and front fuselage section not only created a roomier, more streamlined working environment for both the pilot and his bombardier, it also made the aircraft much sleeker in appearance, very much improved the frontal visibility for the pilot. This shorter, taller nose section was now being completely glazed and gave the Heinkel its most distinctive feature, one which would make it amongst the most recognisable shapes of the entire Second World War.
In addition to giving the Heinkel its unmistakable profile, the new fully glazed cockpit afforded the pilot an exceptional field of view, but on the downside, also made the front of the bomber a tempting target for enemy fighter pilots, affording the unfortunate crew very little in the way of protection in such circumstances.
Sweeping all before them during the early stages of the war, the Battle of Britain would prove to be a chastening experience for Luftwaffe, and for Heinkel crews in particular, as the speed and manoeuvrability advantages the aircraft had possessed when it first entered service had now been nullified. Against the determined attacks of RAF fighters, Heinkel bombers were extremely vulnerable, unless they were protected by large numbers of supporting Messerschmitt Bf109s.
Although considered essentially obsolete as a bomber capable of operating in contested airspace from this point in the war onwards, the Heinkel He III would have to soldier on in a variety of offensive roles for the remainder of the war, with almost 7,000 of these distinctive bombers having been produced by the time the final aircraft rolled off the production lines in September 1944.
Dornier Do 17 – 'The Flying Pencil'
Another aircraft which was initially developed masquerading as a civilian aircraft, by the time of its service introduction, the Dornier Do 17 was a highly advanced aircraft. Fast and agile, possessing an extremely distinctive profile, the aircraft would soon inherit the name by which it would become infamous, the Luftwaffe's 'Flying Pencil', a name by which it would be referred to throughout its service career, by both friend and foe alike. These first ultra-sleek aircraft were initially powered by Daimler-Benz in-line engines, however, the constant shortage of engines added to a need to endow the aircraft with ever greater power would see the aircraft equipped with several different powerplants, including the Bramo Fafnir radial engine, which gave the aircraft its classic profile and the one by which most modellers will recognise it.
By the time of the Battle of Britain, with so many aircraft already in service, the Dornier would be an incredibly important asset for the Luftwaffe, with brave crews operating what was effectively an obsolete aircraft type and the slowest of the trio of strike bombers heading for Britain, but having to soldier on. With their engines optimised for low altitude operations, Dornier Do 17 bombers were required to fly daring low altitude strike raids against specific targets and a great personal risk to their crews, flying at almost wave-top height in order to evade Britain's radar defences, before popping up over the coast and heading inland for their assigned targets at full speed.
At those altitudes, any damage sustained from either striking a high obstacle or being hit by ground fire could often be fatal for crews, however despite this, they continued to be used for such missions and continued to suffer losses.
The Dornier's disappointing performance during the Battle of Britain finally confirmed fears that the aircraft was no longer suitable as a high altitude bomber for the Luftwaffe, however, it would continue to be used in ever decreasing numbers in several different theatres and in a number of different roles over the next few years. Production of the Dornier Do 17 would come to an end during the summer of 1940, as more capable bomber types started to enter Luftwaffe service.
Some aircraft would later be modified for use as nightfighters and using the latest airborne interception radar equipment, would also have the distinction of helping to establish Germany's nightfighter defence system and in the process, claim many a Bomber Command aircraft as a night victory.
Although it isn’t difficult to find other aircraft types in kit form which possess links to the period covered by the Battle of Britain, the above aircraft would be the main combatants during the summer of 1940, as this aerial duel would decide the immediate future of both the British nation and the rest of the free world. Although the outcome lay in the balance right up until the end of October 1940. The pilot heroes of Fighter Command prevented the Luftwaffe from gaining air superiority over southern England, and with it, removing the threat of invasion and keeping Britain in the fight.
Various Airfix ranges have earned a proud reputation for including model subjects commemorating the aircraft of the Battle of Britain over the years.
Perfectly articulated by Winston Churchill in a speech made in the House of Commons on 20th August 1940, he included the immortal line, “Never in the field of human conflict was so much owed by so many to so few.”
How right he was, and on this 85th Anniversary, of those events, it’s entirely appropriate that we continue to remember and show gratitude for their sacrifice and steadfast devotion to duty.
Before ending our tribute to the heroes of the Battle of Britain, we wanted to let readers know that the latest in our successful series of Collector’s Coins has just been released, and is available now. With this latest design created specifically to commemorate this year’s significant anniversary, the image header above shows the unique design created to mark this as one of the most impressive coins we have commissioned to date.
By the time this week’s edition of Workbench is published, news of the coin’s existence will have already been communicated to Airfix fans, using the copy below:
To commemorate this significant moment in history, we’re proud to introduce the exclusive 85th anniversary Battle of Britain Collector’s Coin. Showcasing the iconic Spitfire and Hurricane soaring over London, this striking metallic coin features the Airfix logo on the reverse.
Limited to 500 pieces, this coin is available with any in-stock purchase of £50+ at airfix.com. Once they’re gone, they’re gone—don’t miss your chance to own a unique piece of Airfix history.
If these coins appeal to you, then this is unquestionably one not to be missed.
For qualifying orders, this beautiful commemorative coin is available now.
We're afraid that's all we have for you in this latest edition of the Airfix blog, but we will be back next Friday with more project development updates and the very latest Airfix kit exclusives. In the meantime, we're always keen to hear your views on all things Airfix and in particular, any thoughts and opinions you may have regarding our Workbench blog. If you would like to drop us a quick line, could we please ask that you use our workbench@airfix.com email for all correspondence.
To re-visit any of the Airfix blogs we have produced over the past TEN years or so, please head to our main Workbench hub, where you'll find our entire blog back catalogue and all the Airfix design projects we have already covered.
All our dedicated official social media sites can be accessed by clicking the respective link icons at the foot of this page, or by heading to the Airfix homepage. Other useful Airfix links are:
Facebook, YouTube, Twitter and Instagram official sites
Please join us for more Airfix updates next week and thank you for your continued support.