Welcome to this latest edition of our Workbench blog and all the news, updates and modelling exclusives from the fascinating world of Airfix.
Our subject for this week's latest development update blog brings another new kit scheduled for imminent range re-introduction to our attention, one which is our scale modelling tribute to one of the most significant fighting aeroplanes of the 20th century. When most people think of famous single engined fighters of the Second World War, they would usually consider such types as the Supermarine Spitfire, Hawker Hurricane, Messerschmitt Bf 109 and North American Mustang, all aircraft designs which share one common design feature (particularly in their initial development guises), they were all land based fighter types. There was another aircraft which should certainly command more attention than it usually does, one which whilst it may have been operating on the other side of the world, shared many of the impressive qualities possessed by the aircraft above. One of the foremost fighting aeroplanes in the world following its introduction in 1940, the Mitsubishi Zero was designed to be equally adept at operating from the decks of aircraft carriers, as it was from land bases and for the first few years of conflict, it was without equal in the Pacific region.
In addition to discovering why the Zero has to be considered one of the most important military aircraft in the history of flight, we prepare to welcome its scale re-introduction into an Airfix kit range by showcasing the beautiful new box artwork produced in support of its release, before going on to look at the new decal/scheme option included with this appealing kit. We will also hopefully convince you that no display of scale WWII fighting aeroplanes can be considered complete unless it includes this aviation War Eagle of the Pacific.
Designed for range and speed, the Mitsubishi Zero fighter was the ideal aircraft with which to conquer the Pacific, however, its development included compromises which once discovered by the Americans, quickly removed its operational advantage.
"Mitsubishi Zero-Yasukuni" by Paul Richter (Photographer) is licensed under CC BY-SA 3.0.
At the beginning of the 20th century, Japan embarked on a period of significant industrial expansion, a development which was clearly fuelled by the nation's desire to expand their sphere of influence across the wider Pacific region and would require the creation of one of the world's most powerful navies. Indeed, this expansion would see Japan creating a powerful, modern navy which was only behind Britain and the US in terms of size and capability, therefore posing a significant threat to peace in the region.
With the emergence of both air power and the aircraft carrier destined to have a huge roll to play in any future conflict, the Japanese Navy issued requirements for a modern fighter aircraft to both protect the fleet and to support offensive operations, with this aircraft required to satisfy an incredibly demanding specification brief. Military officials at that time were of the opinion that aircraft which were designed from the outset to operate from the decks of aircraft carriers were limited in comparison to types designed to operate from land bases and therefore decreed that the new aircraft should be designed for speed, manoeuvrability and operational performance first, with its naval capabilities only coming into play once these important considerations had been achieved. The result of this search would be the Navy Type 96, or as it would become more commonly referred to, the Mitsubishi A5M 'Claude'.
From a Japanese perspective, the early 1937 introduction of the A5M marked an important turning point for the nation, reducing Japan's dependency on the need to secure western aircraft types for their air forces and allowing their indigenous industries to gain the technological and manufacturing proficiency they would need in the years ahead, particularly when their expansionist endeavours inevitably led to war. The A5M Claude was a modern all-metal, high-performance monoplane fighter which featured fixed undercarriage and a very Spitfire-like elliptical wing design, and whilst its service introduction would take place in early 1937, relatively large numbers of aircraft were still flying by the end of hostilities in August 1945. Interestingly, even as the first aircraft were taking off from the new Japanese carriers on which they were operating from, the navy were already looking for its even more capable replacement.
With air power clearly having a significant role to play in the years to come, the Japanese Navy were looking for a new fighter with which to take on the Pacific, not only one which was at the cutting edge of current fighter technology, but one which had the range to enable it to strike first in any naval engagement. These specifications were so demanding that if a manufacturer was able to satisfy them, the resultant aircraft would be something very special in the world of aviation.
With the need for this vital work to begin without delay, the specifications were issued to both Mitsubishi and Nakajima, however on closer examination of the requirements, the design team at Nakajima considered them unachievable at that time and as a consequence, almost immediately withdrew from the project. This left Mitsubishi to design the fighter and whilst they too had initial reservations, they were determined to find solutions to this rather unique set of aviation challenges. Significantly, they knew that if they were to be successful in their quest, the design of the new aircraft would have to make use of materials which were light, yet incredibly strong and even then, would have to employ further weight saving measures if the aircraft was to satisfy the demanding range requirements imposed on the new fighter.
Range, range and more range, the Mitsubishi A6M Zero was the prefect fighting aeroplane for service over the huge expanses of the Pacific region, with this historic picture showing an aircraft taking off from the deck of the IJN carrier Akagi during the Pearl Harbor raid.
In order to achieve this, they made use of a new type of aluminium alloy in the construction of the aircraft, a top secret material which whilst being developed in Japan, had yet to be used in the construction of an aeroplane. It possessed the strength they were looking for, but was lighter than traditional materials, and even though they would still be required to develop new manufacturing techniques in order to successfully use this material effectively, their new fighter project was now underway. The design team would incorporate further weight saving measures, drilling holes in this already light material, just to save a vital few additional pounds, clear in the knowledge that the military favoured speed, manoeuvrability and range over firepower and survivability. Their thinking was something along the lines of, what use was a heavily armoured aircraft if it didn't have the range to come into contact with the enemy?
What Mitsubishi eventually managed to produce was nothing short of an aviation marvel, a naval fighter aircraft which possessed performance superior to any similar aircraft currently flying and one which satisfied the incredibly challenging brief which had frightened off their major design competitor at the outset of the project. On entering service in July 1940, the Mitsubishi A6M Zero was the most advanced naval fighter in the world and the aircraft the Japanese Navy had been hoping for - now they truly had an aircraft capable of sweeping Pacific skies clear of all potential adversaries and giving naval units unrivalled 'eyes in the skies'.
Light, relatively heavily armed and possessing the ability to operate over incredible distances with its internal and external fuel carrying capabilities, the Zero was a revelation and when this was combined with the robust training program Japanese pilots had access to, would go on to become a formidable opponent in the Pacific Theatre, unmatched in air combat terms until the introduction of the Grumman Hellcat in 1943. With excellent visibility for its pilot, a sturdy wide-track undercarriage and boasting an incredibly low stall speed, the Zero proved to be the ideal naval fighter and enabled the Japanese Navy to continue making territorial gains throughout the Pacific region.
Keen to assess the capabilities of their new fighters, a small number were sent to bolster forces fighting in China during September 1940, with the first combat engagement taking place on the 13th of the month. On that occasion, 13 Zero fighters were escorting bombers raiding the city of Chungking, when they were engaged by a formation of around 40 Russian built Polikarpov I-15 and I-16 fighters, and during the ensuing dogfight, at least 27 of the Chinese fighters were shot down, without the loss of a single Zero. This engagement was also reported to have been significant for another reason, as it produced the first Mitsubishi Zero 'Ace', as pilot Koshiro Yamashita accounted for five of the Polikarpovs.
In combat, the Zero would initially be without equal, possessing the range to engage the enemy far from its home carrier, only to return from combat with fuel to spare and in many cases, with further victory claims for its pilots. A proficient dogfighter, the Zero would boast a combat success ratio of 12 to 1 and during early engagements against Chinese and Russian aircraft, actually posted figures far in excess of these, helping to earn the fighter a fearsome reputation amongst those unfortunate enough to have faced it in combat. By the time of the Pearl Harbor attack, Japan had around 330 Zero fighters equipping front line units, with more held in reserve for home defence and training duties.
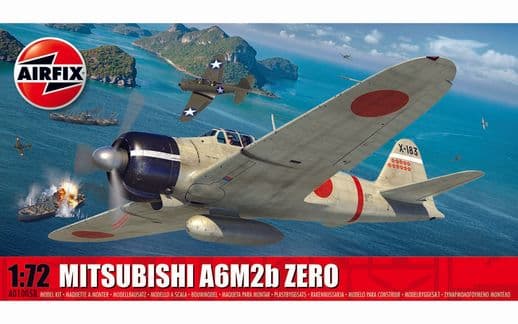
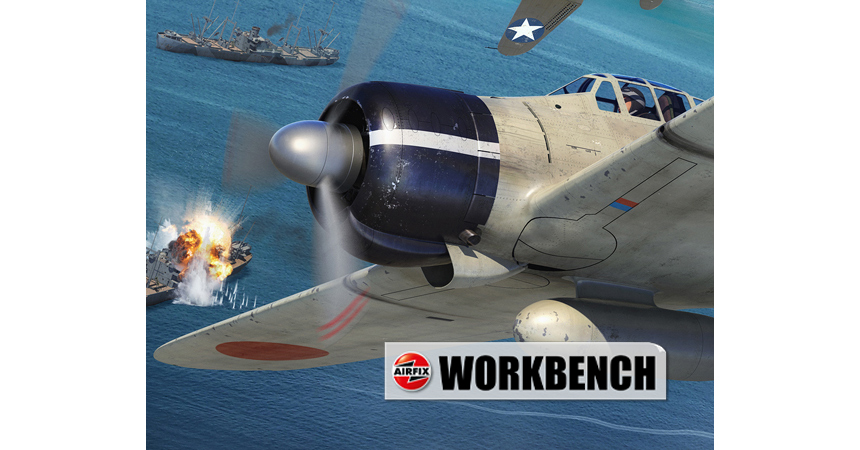
New box artwork produced to support the re-introduction of this classic aeroplane into the current Airfix range.
As you might expect for an aircraft which has to be regarded as one of the most famous and capable combat aircraft in the history of aviation, Airfix have been associated with the Mitsubishi A6M Zero in 1/72nd scale for a long time, with the original tooling dating back to 1959. Back then, the kit was presented in the early bagged packaging, but as an affordable series one kit offering, was a popular choice with young modellers working their way through the Airfix range at pocket money pricing levels. A staple of many an Airfix range over the years, the Zero was re-tooled in 2011, bringing this classic aircraft up to date with current levels of modelling detail and accuracy, maintaining its position as one of the legacy subject kits within the Airfix range.
The last time an individually presented A6M Zero kit occupied a position within an Airfix range was back in 2019, so the impending re-introduction of this latest incarnation of our Mitsubishi Zero fighter kit will no doubt be welcomed by many. As mentioned previously, no display of important aircraft types from the Second World War can ever be considered complete unless it has at least one example of an A6M Zero within it and with the aircraft seeing widespread service with both Naval and Army Air Force units during WWII, this figure really does need to be a minimum of two examples, particularly as both services presented their aircraft so differently.
Let's now take a look at the details behind the new scheme option which will accompany the impending release of this new Mitsubishi A6M2b-21 Zero kit:
As Allied aircraft began to fall to the guns of the Japanese Zero, tactics quickly had to be developed before the enemy fighter could gain complete superiority of the skies over the Pacific. With the Zero possessing unrivalled manoeuvrability, no Allied pilot should ever contemplate engaging the fighter in a dogfight, because there would only be one aircraft returning to its home carrier following such an encounter and it would be the one sporting a large red Hinomaru on either side of its fuselage. In fact, it's interesting to note that Japanese pilots were capable of performing such tight turning manoeuvres during a dogfight that they actually ran the risk of damaging the wings of their fighters and were therefore discouraged from performing such manoeuvres. This became such a concern that modifications were actually made to the design of later models which restricted the ability to perform such tight turns, a move which intentionally reduced the combat performance effectiveness of this magnificent aircraft.
Allied pilots quickly learned not to tangle with the Zero and instead played to the strengths of their own fast, rugged and heavily armed fighters. On encountering the Japanese fighter, US Navy pilots used a 'Zoom and Boom' tactic, making slashing attack runs against the Zero, firing during high speed passes on the enemy aircraft, before making a wide sweeping turn to maintain speed, before returning to make subsequent attack runs. Allied pilots soon began reporting that if a Zero was hit with an accurate machine gun burst, it had a tendency to either burst into flames, or simply dive into the ocean and following the capture of an abandoned Zero sometime later, military officials were able to understand why.
On detailed inspection of the captured Zero, the Americans discovered that the legendary range and manoeuvrability of the Japanese aircraft had been achieved by accepting something of a design trade-off. The Japanese fighter had an almost complete lack of armour protection for vital components (which included the pilot) and perhaps even more surprising for an aircraft which was required to operate over vast expanses of ocean, had no provision for self-sealing fuel tanks. The Zero had revealed its Achilles heel and this vital information was quickly disseminated throughout the US Navy, with pilots now knowing how to defeat their feared adversary. Zeros soon began to fall in ever greater numbers to the guns of US Naval aviators and as the quality of Japanese replacement pilots began to reflect the increasing pressure they were now finding themselves under, the day of the Zero had come to an end.
Full scheme details for this A6M2b-21 Zero which was the mount of ace pilot Yoshiro Hashiguchi.
Japanese naval aviator Yoshiro Hashiguchi graduated from the 42nd Pilot Training Course in September 1938, having just celebrated his 20th birthday and was initially assigned to the 12th Kokutai. He would remain with this unit following its deployment to central China in June 1939. In January the following year, he was transferred back to serve as a flight instructor to deal with the huge influx of new trainee pilots passing through Japan's flight training programme, nut by November 1941, has once more joined an operational unit, this time the 3rd Kokutai.
Following the outbreak of war with the US, he would go on to fly operational sorties over the Philippines and from the Dutch East Indies, including whilst operating from the newly captured airfield at Denpasar. Japanese forces invaded the island of Bali on the night of 18th February 1942, with the operation being so effective that Allied forces had no idea that the airfield at Denpasar had been overrun. The first US pilots knew about the situation was when they started taking incoming ground fire whilst attempting to land, something they were not going to question after landing their aircraft - an immediate change of plan was required.
Within two days of its capture, the airfield was full of Japanese aircraft and offensive operations from the field started to take place. During one of these early operations, Hashiguchi was injured whilst strafing a US airfield on lle Yande, completing the mission despite suffering a bullet wound to his hip. He would go on to see plenty of action operating from land bases in the region, particularly from Rabul, with Guadalcanal offering the opportunity to increase his victory tally to 'Ace' status. A trusted and competent airman, Yoshiro Hashiguchi would often be asked to fly as wingman for some of the most senior pilots in the Japanese Naval Air Force at that time, a reflection of the high regard in which he was held.
Full box artwork presentation for a kit re-introduction which will see one of the most important combat aircraft of the Second World War joining the Airfix range once more.
Transferring to operating from aircraft carriers from December 1943, he would also later participate in the savage aerial combat during the Battle of the Philippine Sea, where the American Navy would score a decisive victory. From this point forward, the Japanese Navy would be incapable of mounting large scale offensive operations and were very much on the defensive, something which would also impact on the career of pilot Yoshiro Hashiguchi. Required to change his assigned carrier several times over the next few months, he would be posted as missing presumed KIA in October 1944. He would be credited with at least ten confirmed aerial victories, all whilst flying the A6M Zero fighter.
Despite its undoubted superiority at the start of WWII, the Mitsubishi Zero traded light weight and exceptional range for vital component protection, which included the pilot and it didn't take long for the Americans to find out how to effectively overcome its many excellent qualities. Almost 11,000 of these magnificent aircraft were built and despite the fact that the A6M Zero was still in service at the end of the war, it had long since been outclassed by the latest breed of American naval fighters.
A beautiful scale model example of this most famous Axis fighter from WWII, we look forward to welcoming the Mitsubishi A6M2b-21 Zero back into the 2023 Airfix range early next month, so we don't have to wait long now. A really interesting build project for modellers of any age and experience, please keep an eye on the kit's product page for availability confirmation.
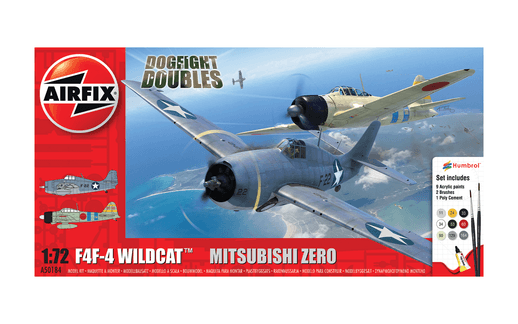
A Dogfight Double kit pairing which commemorates one of the most significant naval battles in the history of warfare.
We couldn't leave the subject of the Pacific air war during WWII without also including our dual kit tribute to the battles fought for aerial supremacy between the Mitsubishi Zeros of the Japanese Navy and its initial US Navy counterpart, the Grumman F4F Wildcat. It's almost as if the past few weeks of updates have brought us to this position of scale Pacific conflict, with recent subjects such as the return of the Brewster Buffalo to the range and talk of the enduring popularity of our Dogfight Doubles kits all covered in recent weeks, and now the A6M Zero taking centre stage. With our 1/72nd scale Dogfight Doubles F4F-4 Wildcat and Mitsubishi Zero kit still being available and this kit effectively commemorating the air confrontations of the Battle of Midway, it really would be remis of us if we didn't also revisit details of this existing release as part of this latest update.
A kit which comes complete with poly cement, paints, brushes and iconic dogfight display stand, this kit features one of the fiercest aviation rivalries from the Second World War and with very few kits now remaining in our warehouse, this could definitely be worth something of a stash punt for many of us, although it does have to be said that if a Wildcat allowed a Zero to get as close as it is in the box artwork, he was in big trouble.
As far as military engagements of the Second World War are concerned, there can be few which hold the strategic significance of the Battle of Midway, particularly with regard to conflict in the Pacific Theatre. The six months which followed the devastating surprise attack against American forces at Pearl Harbor were a succession of victories and territorial gains for the Japanese Empire, with America still licking her military wounds and reorganising her forces for the concerted campaign to come against the Japanese. From a Japanese perspective, could they class the Pearl Harbor attack a success, or was arousing a giant an incredible military blunder?
The aim of the attack was to neutralise the threat posed by the mighty US Pacific Fleet and specifically, their aircraft carriers and none of these were present during the attack. Even the Japanese knew that once American industrial might could be brought to bear, they would not be able to compete militarily, so their plan was to destroy the American carrier force and with it, buy their own forces time to raid and plunder unchallenged throughout the Pacific region for a period of time. Once their position was threatened, they could fight the Americans and inflict a heavy defeat, gambling that this would bring them to the negotiating table and a territorially advantageous peace agreement for the Japanese. That was their thinking and with the most effective naval strike force in the world at their disposal, it could be argued that whilst including many assumptions, was not completely without merit.
The one thing which stood in the way of this plan was the powerful American Pacific carrier fleet and Japan’s pressing need to destroy it. Japanese military planners knew that the Americans were fully aware of their intentions and would never commit their ‘flat tops’ to a devastating all out surface engagement, where the carriers would be extremely vulnerable to both air and surface attack. What the Japanese needed was a diversion, something which would draw the American carriers out into open ocean, so they could be attacked by the Japanese Navy’s highly proficient air strike forces.
A model presentation, this Dogfight Double kit allows modellers to display a classic WWII aerial duel in scale form, aircraft which performed essentially the same role, but each possessing very different attributes.
Once again relying on stealth and deception to keep the American’s very much on the 'back foot', an attack against the US military facilities on the strategically vital Midway Atoll was planned, with a strong attack fleet making it seem as if an impending invasion of the islands was about to take place, something which the American’s could surely not allow to go unchallenged. Once their carriers were committed to battle, these would then become the main targets for Japanese strike aircraft, achieving Japan's most pressing military objective in one devastating blow.
The Japanese attack force assembled for Midway was impressive and included the four heavy aircraft carriers Akagi, Kaga, Hiryu and Soryu, all of which were protected by a strong supporting force of battleships, heavy cruisers and destroyers. Their complement of around 260 aircraft was probably the most effective naval strike force in the world at that time, excellent aeroplanes flown by experienced and well trained airmen and should things go their way, they could hardly have been better prepared.
Unfortunately for them, there did remain one critical factor which placed their forces at a huge tactical disadvantage - they had no idea where the US Pacific Fleet and their all-important aircraft carriers were. Recent supporting reconnaissance flights over Pearl Harbor had been driven off by strong defensive forces and the task force spotter aircraft had failed to locate a single American ship in advance of the engagement. To make matters worse, the Japanese force had been spotted by land based aircraft operating from Midway, with their detection resulting in the commencement of air attacks.
The scene was set for a pivotal Pacific showdown and potentially, an aerial engagement which would determine the outcome of the entire Pacific war.
Grumman F4F-4 Wildcat ‘F-22’ VF-8 ‘Fighting 8’, USS Hornet (CV-8), Battle of Midway, June 4th 1942.
Recently upgrading their aircraft, the US Navy’s VF-8 re-equipped with the F4F-4, the latest variant of Grumman’s diminutive Wildcat fighter. The new Wildcats featured a number of design modification which were a direct result of British requests following their combat use of the aircraft in Europe. The new variant featured an increase in armament from 4 to 6 machine guns (although ammunition carrying capability was not increased), the installation of additional armour protection for the pilot and self-sealing fuel tanks, all of which improved the aircraft’s combat survivability. The additional adoption of Grumman’s ingenious wing folding mechanism would allow twice as many new Wildcats to be stored on the decks of aircraft carriers, compared with previous variants. Unfortunately, all these modifications added significant weight to the fighter and as the engine was not updated to compensate, this resulted in an unwelcome loss of performance. Knowing that the Wildcats would be coming up against the fast and extremely agile Mitsubishi Zero, famous naval aviator Jimmy Thach is reported to have said of these modifications, ‘If you can’t hit an enemy fighter with four guns, you won’t hit him with six!’
Nevertheless, the Wildcat was an extremely rugged fighter which was capable of absorbing significant combat punishment and still bring its well protected pilot home, something a Zero pilot could not count on. US Wildcat pilots knew not to tangle with the nimble Mitsubishi fighter in a tight, turning dogfight, instead electing to make successive slash and run attacks against their enemy, negating the manoeuvrability advantage of the Zero and hoping to exploit its vulnerabilities, which were an almost total lack of protection for its pilots and the absence of self-sealing fuel tanks. Fighter tactician John ‘Jimmy’ Thach developed a method to give Wildcat pilots a better chance of claiming victories against the highly manoeuvrable Zero, which became known as the ‘Thach Weave’. If a Wildcat in your flight had a Zero on their tail, other fighters in the flight would turn in to make a head on pass towards their squadron mate, either shooting down the Zero in the process, or forcing them to disengage - a risky, but extremely effective tactic. A flight leader and his wingman would fly regularly intersecting weaving flight patterns for mutual defence, hoping to catch an unsuspecting enemy fighter pilot in a hail of American bullets.
Full scheme details for this classic US Navy aircraft.
The first time the ‘Thach Weave’ tactic was used in combat came during the Battle of Midway, when Jimmy Thatch was leading a flight of six Wildcats on a mission to provide fighter cover for strike aircraft from USS Yorktown attacking the Japanese carrier fleet. The Wildcats were engaged by between 15 and 20 A6M Zero fighters and in the ensuing dogfight, the ‘Thatch Weave’ tactic allowed Jimmy Thach to shoot down three Zeros, with his wingman claiming a fourth. Only one Wildcat was lost during this engagement.
Based on the US Navy Carrier Hornet for the duration of the Battle of Midway, the Wildcat fighters of VF-8 were not only tasked with flying combat air patrols to protect the American ships from enemy attack, but also to protect strike aircraft which were hoping to score a decisive victory against the Japanese aircraft carriers. In one heroic, yet ultimately futile action, ten Wildcats from the Squadron were lost on a single mission, as they were so desperate to provide effective fighter cover for the Douglas SBD Dauntless dive bombers which were looking for the Japanese strike force. With the SBDs possessing a significantly greater range, the Wildcats simply ran out of fuel and were forced to ditch in the Pacific.
During the Battle of Midway, USS Hornet was awarded a Presidential Unit Citation for actions which saw the carrier’s aircraft involved in the sinking of the Japanese heavy cruiser Mogami and the crippling of the cruiser Mikuma. In addition to this, they also inflicted damage on the destroyers Asashio and Arashio.
Mitsubishi A6M2B-21 Zero (Zeke) DII-I8I, Japanese Carrier ‘Soryu’, Battle of Midway, June 4th, 1942.
The air combat credentials of the magnificent Mitsubishi A6M Zero fighter are without equal, particularly during the yearly years of WWII, where this aircraft reigned supreme in the skies above the Pacific. The Zero was designed as a long-range carrier based fighter and by the time of its introduction during the summer of 1940, it was the most capable naval fighter in the world and the envy of every carrier air group. With its impressive combination of speed, manoeuvrability, range and firepower, the Zero proved to be a fearsome adversary and in the hands of the well-trained Japanese pilots, would go on to post an impressive combat success ratio of 12:1 when engaged in early skirmishes with US airmen.
The Zero was, however, not without its flaws, with the lack of protection for its pilot and no self-sealing fuel tanks being the most significant, omissions which would ultimately claim the lives of many Japanese pilots. In addition to this, the slender design of the fighter did not lend itself to significant future development, particularly the adoption of more powerful engines, which meant that once the American’s caught up, the Zero would never again regain its fighting superiority.
The A6M2B Type 0 Model 21 introduced some significant modifications to the first Zero fighters to enter service and would become the most heavily produced early variant of the fighter. With modifications applied to aircraft No.66 onwards off the production line, this variant incorporated folding wing tips to facilitate more effective carrier operation and significantly increased range capabilities, with both greater internal fuel tanks and the ability to carry an additional under fuselage external drop tank. Around 740 of this variant were built by Mitsubishi, with a further 800 produced by Nakajima, with these improvements earning the Zero the reputation of being the finest naval fighter in the world.
For the Midway attack, the Zeros based aboard the Imperial Japanese Navy carrier Soryu were held in reserve of the first attack wave, both the protect the task force from American air attack and to prepare for an anticipated subsequent strike against US Aircraft carriers, once these had been detected. The Zero was an excellent fighter and more than a match for any American fighter of the day, let alone any less manoeuvrable attack aircraft sent against it. As a consequence, the Zeros at Midway would take an extremely heavy toll of US strike aircraft and would have provided the protection the Japanese force needed, had fate not intervened.
By the time of the Battle of Midway, the Mitsubishi Zero had already proved itself to be a formidable adversary, however, US Navy pilots were quickly learning what and what not to do when engaging one in combat.
In preparation for the Midway operation, Soryu had a total complement of 57 aircraft, consisting of 21 A6M2 Zero fighters (3 of which were intended to be flown and operated from Midway once the airfield had been taken), 16 D3A1 ‘Val’ dive bombers, 18 B5N2 ‘Kate’ attack bombers and two experimental reconnaissance aircraft. Although some of the ship’s strike aircraft were launched in support of the initial raid against Midway Atoll, Soryu’s Zeros were held back to perform Combat Air Patrol duties.
Not knowing the exact whereabouts of the American carriers was a significant tactical disadvantage for the Japanese task force, but it was by no means the only difficulty they faced on that fateful day. Having been detected by an American Catalina flying boat, the task force would come under incessant attack from Midway based aircraft, which definitely affected their tactical thinking. In addition to this, the strike against Midway was not decisive and a second raid would be required, but should the commander give the order to immediately undertake this second strike, or hold for the appearance of the US carriers, which were after all, their ultimate objective?
Both options would require the strike aircraft to be armed with different ordnance and in any case, the aircraft could not be prepared whilst the first strike aircraft were being recovered. This military quandary would prove to be the perfect storm of a predicament for raid commanders, with the delay swinging the initiative very much in the American Navy’s favour.
With strike aircraft from the American carrier force now aware of the location of the Japanese carriers, their dive bombers would ruthlessly press home their attacks, with Akagi, Kaga and Soryu all sustaining significant damage and Soryu being the first to sink. Although Hiryu did manage to launch strikes which would eventually result in the destruction of USS Yorktown, Midway would be a significant defeat for the Japanese Navy, with all four of the carriers committed to the operation lying on the bottom of the Pacific by the 5th June. Although Japanese forces were far from defeated, the war in the Pacific had taken a significant swing in favour of the Americans.
A beautifully appealing Dogfight Doubles kit release which currently still available, but is now down to low numbers in our warehouse.
A Dogfight Doubles kit release which features the two classic naval fighter aircraft which contested this pivotal battle from the early stages of the Pacific War, we now only have limited numbers of this appealing kit available and as it has unquestionable links to several of the blog updates posted recently, we thought it definitely worthy of a second Workbench mention.
We are afraid that's all we have for you in this latest edition, but we will be back next Friday with more project development updates and the very latest Airfix kit exclusives. In the meantime, we are always keen to hear your views on all things Airfix and in particular, any thoughts and opinions you may have regarding our Workbench blog. If you would like to drop us a quick line, could we please ask that you use our workbench@airfix.com email for all correspondence.
To re-visit any of the Airfix blogs we have produced over the past seven years or so, please head to our main Workbench hub, where you will find our entire blog back catalogue and all the Airfix design projects we have already covered.
All our dedicated official social media sites can be accessed by clicking the respective link icons at the foot of this page, or by heading to the Airfix homepage. Other useful Airfix links are:
Facebook, YouTube, Twitter and Instagram official sites
Please join us for more Airfix updates next week and thank you for your continued support.