

Welcome to this latest edition of our Workbench blog and all the news, updates and modelling exclusives from the fascinating world of Airfix.
For this week’s blog, we return to the subject of new 1/72nd scale aircraft model kits and two radial engine powered types which were produced on either side of the Atlantic Ocean. Up first, we will be looking at the latest release from our Grumman Wildcat tooling, an aircraft type which is often overlooked in favour of its larger and more capable successor, but one which was in itself arguably one of the most important Allied naval fighters of the entire Second World War. We follow this up by looking at the details behind the impending re-issue of a truly beautiful model kit, one which presents an aircraft whose impact could hardly have been more significant for the Royal Air Force, but one which again was arguably overshadowed by the aircraft which followed it into service, the Bristol Blenheim. With box artwork to share with you from both releases, we will also be looking at the scheme options included with each kit, to see whether one or the other might make it onto your own build schedule over the coming few months.
Before we begin, could we please just take a moment to remind readers who have yet to discover the delights of our new ‘Sprue Talk’ magazine programme on the official Airfix YouTube channel, that you could be missing out on something you may well find enjoyable. Intended as an around the table, informal discussion about all things Airfix, the first edition has been received really well and with the second edition about to go into production soon, there is nothing quite like being in at the start of a new initiative, which is the reason for this reminder. We also have some breaking news this week as far as ‘Sprue Talk’ goes, as we are delighted to confirm that it is now available to stream as a podcast on Spotify. If you like the idea of listening to all the latest Airfix conversations, but without the potential trauma of having to see our ugly mugs, then this podcast development might just be the thing for you.
In addition to this, the Airfix team are keen to get Workbench readers involved with the programme and would love to hear from you regarding future topics you would like to see the various guests discussing live. Go easy on us, but please send your suggestions to our usual workbench@airfix.com e-mail address. Right, on with the update.
Newly manufactured Grumman F4F Wildcat fighters showing the innovative ‘sto-wing’ wing fold mechanism which allowed for more effective operation at sea and was introduced with the F-4 variant of this famous fighter.
Prior to America’s entry into the Second World War, the European Allied powers who were already embroiled in conflict were desperate to secure as many modern US manufactured aircraft as they could get their hands on, just to allow them to continue confronting the seemingly unstoppable German war machine. Britain’s Fleet Air Arm did have an effective long range heavy fighter in the shape of the Fairey Fulmar, however, this aircraft was too large to be considered a manoeuvrable fleet defence fighter and as every Spitfire was desperately needed by the Royal Air Force to defend the homeland, they looked to America for help. The Grumman Aviation Company had built up a reputation for producing effective naval fighters for many years and the latest incarnation of their diminutive, rather barrel-bodied series of fighters was the F4F Wildcat. Europe’s need was so great that even before the US Navy had placed an order for the fighter themselves, both the French Navy and British Fleet Air Arm requested the aircraft, albeit with one or two configuration modifications to better suit their requirements.
Even though the Grumman F4F Wildcat could not be described as the most capable naval fighter aircraft of the Second World War, it certainly proved to be one of the most important, for both the US Navy and in British service. In Fleet Air Arm colours, the F4F was christened ‘Martlet’ and the procurement of large numbers of these rugged fighters significantly bolstered Britain’s naval forces. They would also go on to make a telling contribution to the war effort. Interestingly, Britain would be allocated all of the Grumman fighters ordered by the French (they had signed the Armistice by then), along with their own order and the aircraft would initially operate from RNAS bases around the British coastline, before going on to serve valiantly at sea during the Battle of the Atlantic.
For operations at sea, the little Grumman fighter proved to be perfect for Britain’s smaller escort carriers, a force which even included the converted former German merchant vessel Hannover (British escort carrier HMS Audacity). Grumman Martlet fighters from this ship were responsible for shooting down several Luftwaffe Focke Wulf Fw 200 Condor long-range maritime bombers, proving their worth as a highly effective convoy fighter.
Although more effective fleet fighters would eventually enter service with the Fleet Air Arm, the rugged little Martlet went on to see service throughout the Second World War, with almost 1,200 aircraft going on to see British service. Earning a proud service record during the Battle of the Atlantic, in actions off Norway and in the Mediterranean theatre, Fleet Air Arm Martlets adopted the US Wildcat name from January 1944 onwards, as British and American forces began to work more closely on combined naval operations from that time.
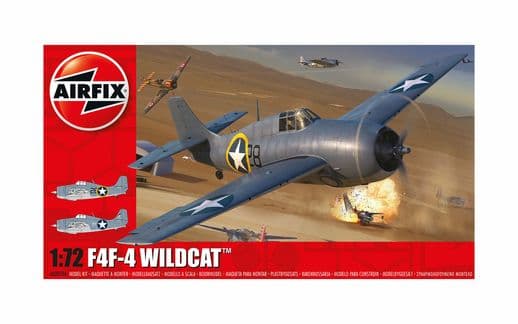
This stunning artwork has been produced to support the release of our latest Grumman F4F-4 Wildcat kit, with the image depicting actions over Cazes airfield at the beginning of ‘Operation Torch’.
With America now in the war and Britain keen to use this powerful new ally to stimulate the opening of the long hoped for ‘Second Front’, the Anglo-American invasion of French North Africa offered many potential strategic benefits, not least of which was the pressure it would relieve from beleaguered Soviet forces fighting the Germans in the east. The proposed ‘Operation Torch’ was considered to be the most ambitious naval operation yet undertaken in the European or African theatres, but with the territory to be assaulted occupied by Vichy France forces, the hopes were that the operation could take place without too much opposition, particularly as this was being positioned as an American led operation and political discussions had reaffirmed their intention not to fire upon the French unless fired upon themselves.
Desperate to avoid antagonising French forces and therefore increasing their fighting resolve, the operation was positioned as being US led with support from British naval and air power, purposely downplaying the fact that British troops would effectively be invading French held territory. The plan called for strong naval forces to support landings in three sectors, with the Americans making up a Western Task Force (Atlantic flank) and landing at Casablanca, with the British forming the central and eastern attack forces (in the Mediterranean), landing at Oran and Algiers respectively. A third British naval Task Force would cover the Mediterranean flank against U-boat and any potential Italian intervention.
At the head of the American element of the striking force, USS Ranger and her air combat wing were positioned off the western coast of Morocco and with the rest of the ships in this force, tasked with providing air cover for the landings, supporting troops, neutralising shore defences, protecting against Axis shipping and most importantly, ensuring the Vichy French Air Force did not have a say in the coming operation. On the eve of invasion, USS Ranger had 72 serviceable aircraft, mainly Dauntless bombers and Wildcat fighters, with the fighters coming from VF-41 and VF-9. This combined operation would see US pilots fighting with their British counterparts for the first time on such a scale and whilst the Americans possessed impressive firepower, many of her pilots and troops had little, if any, previous combat experience.
American built fighters versus American built fighters
Profile artwork for the ‘Operation Torch’ scheme option included with this latest release from out Grumman Wildcat tooling.
The Axis aircraft opposing Operation Torch airmen were significant and consisted of around 210 aircraft of all types, including US built Curtiss H-75A Hawk fighters and the French produced Dewoitine D.520. The French elected to paint their aircraft in a particularly brightly coloured manner, with their red and yellow tails and cowlings definitely helping with recognition during the melee of combat, but also identifying them as clear targets for Allied airmen. The scene was set for a US built fighter versus US built fighter confrontation, but only if the French airmen wanted to fight - if they stayed on the ground and made no attempt to engage the Americans, they would not be fired upon, something the Allied forces were clearly hoping for.
USS Ranger’s Wildcats were assigned the crucial task of providing air cover over the landing beaches and to neutralise any aerial threats posed by the airfields at Cazes and Rabat - Sale, but as the first Allied troops hit the landing beaches, would the French be prepared to fight. As they circled above both airfields, the pilots didn’t have to wait long for their answer, as French fighters immediately began to launch to engage them and as the fighting commenced, French aircraft continued to launch in ones and twos, often whilst their airfield was under strafing attack. Many of the French airmen were battle hardened veterans of the German attack against their country in 1940 and throughout this short campaign proved to be both brave and tenacious.
Despite their relative inexperience, meticulous preparation, excellent training and the rugged fighting qualities of the Grumman F-4F Wildcat ensured that an Allied victory was swift in coming and despite fighting bravely, Vichy French forces negotiated a ceasefire after just two days of intense fighting. USS Ranger’s air combat wing would score some significant successes during the short, but savage fighting, with its Wildcats claiming at least 6 aerial victories (with at least the same again as probables) and around 50 Vichy aircraft destroyed on the ground. Her aircraft also helped to neutralise the battleship Jean Bart and light cruiser Primagoet, in addition to destroying a submarine before it could put to sea.
Of the original 72 serviceable aircraft on the eve of battle, 16 were lost or classified damaged beyond economical repair, but more significantly, 43 would suffer hits as a result of ground fire or air combat actions, underlining the ferocity of the short-lived Vichy French defence.
Allied aircraft markings for Operation Torch
Full details for the lead scheme option included with our new 1/72nd scale Grumman F4F-4 Wildcat kit and the fascinating story of ‘Operation Torch’ and the Allied opening of the second front.
One of the most interesting aspects of the air operations during and in the lead up to Operation Torch was the subject of Allied air recognition. With the potential for British, American, Vichy French, Italian and German aircraft in the region, attempts had to be made to mitigate the possibility of friendly fire incidents and with many units reporting misidentification incidences during work up, a solution had to be found. With the RAF roundel looking so similar to the Vichy French Air Force equivalent and the general consensus being that French forces would be less aggressive towards American intervention, it was decided to give the impression that this was an entirely US led operation, with British aircraft having a large white ‘US star’ painted in their national insignia, overpainting the red and white centre sections. Most retained their thin yellow outer band in all positions, but not exclusively and there are some variations which can prove rather confusing for modellers looking at Operation Torch subjects.
On American aircraft, many sported slightly thicker yellow borders to their traditional national insignia, but again, there appeared to be quite a wide variation in how this instruction was interpreted. It seems as if only fuselage markings had to have the yellow disk added for recognition purposes, with wing roundels left untouched, however, so many deviations from this interpretation appeared to exist that it was probably just as well that combat operations lasted for just a few days.
The Grumman F4F-4 Wildcat presented here is one of the USS Ranger aircraft covering the Western landings and features a rather thick yellow band which slightly overpainted the aircraft’s squadron number on either side of the fuselage.
James E Swett would have a memorable introduction to combat flying and by the end of his first day fighting Japanese aircraft, he would have lost his Wildcat fighter, but not before becoming an ‘Ace in a Day’ and sending seven enemy aircraft to the bottom of Iron Bottom Sound.
As America was dragged into the Second World War following the devastating Japanese attack against military targets at Pearl Harbor, the diminutive Grumman Wildcat was the most numerous US Navy and US Marine Corps fighter available at that time and would therefore be required to take on the feared Mitsubishi Zero as America embarked on her military response. The Wildcat was heavier and much less manoeuvrable than its Japanese counterpart, however, it did have some significant advantages in its favour. The little fighter had much better protection for its pilot than the Zero and its self-sealing fuel tanks were essential for combat over large expanses of ocean. It was also built like a flying tank and could absorb incredible amounts of punishment, something many a Wildcat pilot came to appreciate when making it back to their home carrier having suffered significant combat damage.
American pilots quickly learned not to tangle with the Zero in a slow, tight turning dogfight, where they were much more exposed to the advantages possessed by the enemy fighter and instead attacked using a ‘slash and run’ tactic, which used altitude and speed as their advantages. They also developed a clever tactic of weaving attacks for mutual defence, knowing that their aircraft was tough enough to absorb plenty of punishment, something a Zero pilot most definitely could not rely on from their own fighter. The Mitsubishi may have been a thoroughbred fighting machine, but it was hampered by having an almost complete lack of protection for either pilot, or airframe, something US pilots would quickly learn to prey upon.
On the morning of 7th April 1943, novice US Marine Corps pilot James Elms Swett was preparing to fly his first combat mission from Guadalcanal airfield. Having recently retaken the Solomon Islands from Japanese occupation, the Americans were coming under almost daily attack by Japanese aircraft and on that day, a large incoming raid was expected - it would turn out to be quite a day for Swett and his Wildcat fighter.
Having completed a combat air patrol without incident, Swett and his fellow pilots from VMF-221 landed to take on fuel, only to be immediately ordered back into the air to intercept a large incoming raid heading through Iron Bottom Sound. They fell upon the large formation of Japanese attack aircraft over Tulagi harbour and immediately went into the attack, with Swett following a line of bombers as they started their dive attack runs. Starting with the nearest aircraft, he placed it in his sights and fired, shooting it down, before moving on to the next aircraft in line. By the time he pulled out of the dive, he had three victories to his name, however, his aircraft had taken return fire from the last Val dive-bomber and had also been the victim of friendly fire from shore based US Navy batteries.
Breaking off from the fighting, he flew over the harbour for a moment to check if his aircraft had suffered significant damage, but on finding that his rugged little fighter was still responsive, immediately looked to get back in the action. In a similar manner to his previous attack, he latched on to another line of D3A Vals, working from one to the next, giving each one a short but accurate burst, sending yet more careering into the sea. After around fifteen minutes of frenetic aerial combat, the young American airman had managed to down seven enemy aircraft on this, his first experience of combat flying. For this incredible feat of airmanship and valour, he would be awarded the Medal of Honor, America’s most prestigious military decoration.
With his Wildcat now badly damaged, Swett had no other option but to ditch the aircraft in Tulagi harbour, but was thankful to have been picked up by a rescue launch only minutes later. Returning to combat operations after a short period of convalescence, James E. Swett would survive the war having flown 103 combat missions and with 15.5 confirmed victories to his name, living to the ripe old age of 88 years. We wonder how many people were fortunate enough to hear an account of his first F4F Wildcat combat experiences first hand, because that must have been quite something to behold.
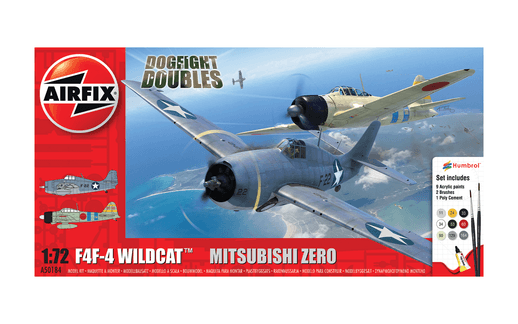
Full box presentation for a delightful addition to the Airfix range and one which is available on the Airfix website and at all good model stores now.
Not only did 1st Lt. James E. Swett achieve the coveted status of ‘Ace in a day’, he is one of the few airmen in history to have scored seven confirmed aerial victories on the same combat sortie, not to mention the fact that they were all secured during his first day of combat flying - quite an astonishing achievement.
This beautiful little Grumman F4F-4 Wildcat kit is now available and should be in all good model stores by the time this latest blog is published.
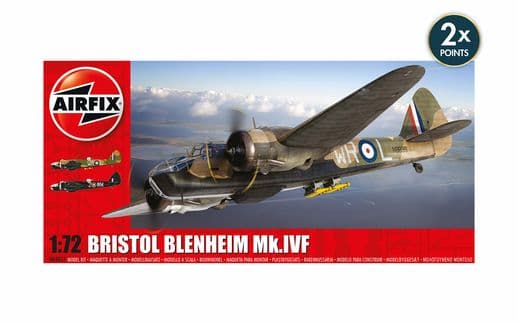
A magnificent aeroplane, it cannot be overstated how important the Bristol Blenheim was to the RAF at the start of the Second World War, playing a crucial role on both defensive and offensive operations. This aircraft is configured as a long range heavy strike fighter in typical early war markings.
A British aircraft type which occupies a similar historic position to that occupied by the American Grumman Wildcat, the Bristol Blenheim might have been a world leading aircraft design at the time of its first flight in April 1935, however, the world of aviation had overtaken it by the outbreak of the Second World War. Unfortunately for the RAF, the aircraft was in widespread service at the outbreak of hostilities and the aircraft would be required to carry a heavy burden during the first couple of years of conflict.
Developed as a private venture funded by a newspaper owner who was determined to capture the civilian aviation world speed record for Britain, the Bristol Type 142 was a sleek, twin engined cutting edge design, the profile of which was dominated by two imposing looking Bristol Mercury radial engines. Going on to capture the world speed record for a civilian passenger aircraft, the new Bristol design gave Lord Rothermere exactly what he had been hoping for, christening the spectacular new aircraft ‘Britain First’, before presenting it as an aviation gift to the nation.
During flight assessment trials, the performance of Bristol’s new aircraft proved to be something of an embarrassment for the Royal Air Force, who had only recently introduced their latest fighter into squadron service, the Gloster Gauntlet. Although the Gauntlet was undoubtedly an excellent aircraft in its own right and a full 56 mph faster than the Bristol Bulldog it replaced (it was actually the fastest RAF aircraft in service between 1935 and 1937), it itself was bettered by Rothermere’s Bristol Type 142 by a significant 77 mph. Indeed, even the Gloster Gladiator, which is regarded as the absolute pinnacle of biplane fighter design and was still under development at that time, was slower than the new Bristol passenger aircraft by some 50 mph.
Incorporating a host of advanced design features, including all metal stressed skin construction, retractable undercarriage and flaps, and variable pitch propellers, the new aircraft represented a significant leap forward in aviation technology and impressed military officials so much that they placed an immediate order for a bomber version of the Bristol Type 142. With an official designation of the Bristol Type 142M, the new RAF bomber was soon to be given its now famous service name of Blenheim Mk.I, an aircraft which heralded the arrival of a new breed of advanced RAF aircraft.
The first Bristol Blenheim Mk.I light bombers entered service in March 1937 with RAF No.114 Squadron, based at Wyton in Cambridgeshire. Replacing the squadron’s Hawker Hind biplane bombers, the new Blenheim immediately presented the RAF a welcome increase in offensive capability, as it was over 100 mph faster than the Hind and at that time, the fastest light/medium bomber in the world. Significantly, at the outbreak of the Second World War, the Royal Air Force had more Bristol Blenheims in service than any other aircraft type, in both the fighter and bomber role, aircraft which would go on to see extensive service during the battles to come. Indeed, just 63 minutes after Britain had declared war against Germany, a Blenheim of No.139 Squadron from RAF Wyton carried out the RAF’s first operational sortie of WWII, as it conducted a reconnaissance flight over the German naval base at Wilhelmshaven. The aircraft’s crew became the first airmen to cross the German coast in WWII.
The Blenheim Mk.IV is easily identifiable from its predecessor by virtue of its much longer nose and unusual sculpted profile. This aircraft is configured as a heavy strike fighter.
It could be argued that the first Mk.I variant of the Blenheim was a direct military derivative of the original Type 142 civilian airliner, however, the aircraft underwent further development almost as soon as the first bombers entered RAF service, with the new aircraft having quite a different appearance from its predecessor. Superseding the Mk.I on Blenheim production lines during 1938, the Mk.IV featured more powerful engines and increased protective armament for crews, but with the most distinctive feature being a much extended nose section. This nose was the working area of the onboard navigator, who sat at a plotting table just below the distinctively scalloped port side of this new nose.
The new extended nose also featured a remotely controlled rearward-firing machine gun pairing under the nose, however, despite these undoubted improvements and over 3,300 of this variant being produced, the Blenheim continued to lose ground to more effective designs, both British and those of her enemies. They would nevertheless continue to be flown operationally, by hero crews who faced these ever increasing odds with unimaginable bravery.
Underlining the importance of the Blenheim to Britain’s military planning at the start of WWII, the aircraft was not only used in its intended light bomber role, but it was also pressed into service as a long range heavy fighter, by both day and night, roles for which it was not designed, but ones it performed ably until more suitable aircraft could be introduced. Indeed, in its role as a nocturnal hunter, Blenheim crews helped with the introduction and development of airborne interception radar and the ability to detect attacking enemy aircraft at night with a much higher degree of accuracy, removing the need to mount costly and rather haphazard standing night patrols.
In early 1940, Royal Air Force officials announced that the airfield at North Coates on the Lincolnshire coast would now come under the control of No.16 Group Coastal Command, with No.248 Squadron and their Blenheim IV fighters relocating from Hendon by 24th February to become the first new residents. This unit had initially formed as a nightfighter squadron, but would eventually go on to see the majority of its wartime service with Coastal Command, although its initial period of transfer would require personnel to be particularly adaptable.
No sooner had the squadron come under the umbrella of Coastal Command, they were tasked with mounting daytime fighter patrols covering the vast expanses of the east coast of Scotland, before later flying armed reconnaissance sorties deep into the North Sea and over the Norwegian coast. Before long, they were on the move again, this time to be stationed at RAF Sumburgh in the Shetland Islands, with orders to mount shipping strike raids on Axis vessels in the North Sea.
From December 1943, No.248 Squadron converted to the de Havilland Mosquito and would see action in the lead up to and during D-Day, where they flew anti U-boat sorties, protecting Allied shipping in the channel.
The aircraft modelled here is an early war Blenheim Mk.IV in day fighter markings and configuration, a representation of how the first machines arriving at RAF North Coates would have looked. Also inspiring production of this kit’s stunning box artwork, the aircraft is presented in standard dark green and dark earth upper surfaces, with the undersides split half night, half white, although the ventral gun pack of the aircraft is painted all black. The port side of the bomb aimers front facing window is painted over in black and carries the aircraft identification letter ‘L’ in white.
The aircraft is also fitted with a pair of ‘Light Series Carrier’ bomb mountings on the lower rear fuselage, just below the ventral turret, units which allowed the aircraft to carry four 40lb General Purpose bombs, and/or four 20lb Fragmentation bombs on each unit. A fine representation of an early Blenheim Mk.IV, this might be a straight re-issue of a previous kit release, however, it proved to be incredibly popular with modellers and it has not been in an Airfix range since 2014.
Sir John William Maxwell Aitken was the son of the 1st Baron Beaverbrook (Canadian born newspaper magnate and Britain’s wartime Minister for Aircraft Production), educated in Britain and taking up a position in the Auxiliary Air Force during the mid 1930s. As a member of No.601 Squadron flying Bristol Blenheims, Aitken took part in the first RAF fighter offensive against a German target in WWII, as twelve Blenheims attacked the Luftwaffe seaplane base at Borkum on 28th November 1939. No.601 Squadron would later convert to Hurricanes and Aitkin would join a detachment of the units fighters sent to France as part of the Royal Air Force Component of the British Expeditionary Force, defending the country against German invasion.
Whilst in France, Aitken would be credited with three confirmed aerial victories, and several other enemy aircraft classified as ‘probables’, although it is highly likely that his actual tally was double this figure. On his return to Britain, he was promoted to acting Squadron Leader and given command of No.601 Sqn. at Tangmere. By the time Aitken joined No.68 Squadron as their Commanding Officer, he had already earned the status of ‘Ace’ pilot, with eight confirmed victories to his name. At that time, No.68 Squadron were using their Blenheim Mk.IVF aircraft in a night fighting role, based out of High Ercall in Shropshire and tasked with defending the industrial midlands from night bomber attack, however, the switch to nocturnal hunting didn’t appear to phase Aitken, as he would score another four aerial victories during this time.
‘Max’ Aitken would end the war as Wing Leader of the famous Banff Strike Wing, with 16.5 aerial victories to his name.
Full scheme details for ‘Max’ Aitken’s beautiful black RAF No.68 Squadron nightfighter, an aircraft in which he is thought to have scored four nocturnal aerial victories.
It is interesting to note that a restored version of the Blenheim which made its first post restoration flight at Duxford in May 1993, was finished as a Mk.IVF nightfighter and wearing the serial Z5722 and codes WM-Z. The scheme was selected in honour of Wing Commander the Hon Max Aitken DSO, DFC, CZMC, a representation of his personal aircraft during his time commanding No.68 Squadron at RAF High Ercall during 1941. The only airworthy example of a Blenheim in the world at that time, this aircraft would be lost in a landing accident when returning to Duxford after an Airshow appearance, but would form the basis of another restoration project, the one which still flies from Duxford to this day.
The actual Z5722 was damaged during a landing incident at RAF Catterick on 22nd February 1941 whilst serving with No.600 Squadron and after undergoing repairs, was allocated to No.68 Squadron. Its eventual fate is not definitively known, but it may have been written off at RAF Coltishall, after a pilot heading out on a solo training flight misjudged his take off and struck the ground at speed.
As for No.68 Squadron, they were formed at Catterick on 7th January 1941 as a dedicated night fighting unit, equipped with the Bristol Blenheim Mk.IV. Pilots selected for the squadron were mainly drawn from single seat fighter units, so quite an intensive period of conversion was required by many, not just for the nocturnal nature of their flying, but as they would be operating a multi-engined aircraft. Once operational, they moved south to a new home at RAF High Ercall, where they would be responsible for mounting the night defence of the Midlands. The unit are worthy of note as they helped to establish Britain’s network of night defences using autonomous airborne detection radar sets in their aircraft and using technology to replace the reliance on the random and relatively unsuccessful nature of night interceptions from standing patrols.
This truly is a beautiful scheme and for anyone fortunate enough to have seen the restored aircraft flying in these markings at Airshows during the 1990s, this simply has to be the scheme choice for you. Illustrating how important the Blenheim was to the RAF during the Second World War, this popular kit is scheduled for imminent release, a triumphant kit return after almost eight years away from our workbenches.
Making a long overdue return to the Airfix range, this latest 1/72nd scale Bristol Blenheim release will re-connect modellers with an aircraft type which is something of an unsung hero, but one which is deserving of much greater respect that it generally receives.
That’s all we have for you in this latest edition of Workbench, but we will be back as usual next Friday with more modelling news, updates and exclusive imagery from the fascinating world of Airfix. If you have any comments in connection with the blog, or would like to suggest a subject to be covered in a future edition, please do drop us a quick line using our workbench@airfix.com e-mail address. The Airfix team would be only too pleased to hear from you.
If you would like to continue the Airfix modelling discussions between editions of the blog, the Airfix Workbench Forum is the place to be, however, if you simply wish to keep up to date with all the latest Airfix modelling news, you can access our official social media sites, or simply head for the Airfix website, where you will find all the details you need.
If you have yet to add our sites to your favourites, you can find links to our Facebook, YouTube, Twitter and Instagram sites at the bottom of our website homepage.
As always, thank you for continuing to support our Airfix Workbench blog.