Welcome to this latest edition of our Workbench blog and all the news, updates, and modelling exclusives from the fascinating world of Airfix.
The current period of significant anniversaries we find ourselves in shows no sign of abating anytime soon, and whilst we may have been just a little previous in commemorating the first flight of the Messerschmitt Bf 109 last time around, we are historically spot on with our subject for this latest edition of Workbench, certainly at the time it’s being written in any case. Any anniversary year which commemorates the Battle of Britain also commemorates the Battle of France and the Dunkirk evacuations which preceded it, hugely historic events which rarely receive the same media coverage as the heroic achievements of Churchill’s ‘Few’, but certainly deserve recognition in the hearts and minds of we who benefitted from their sacrifices.
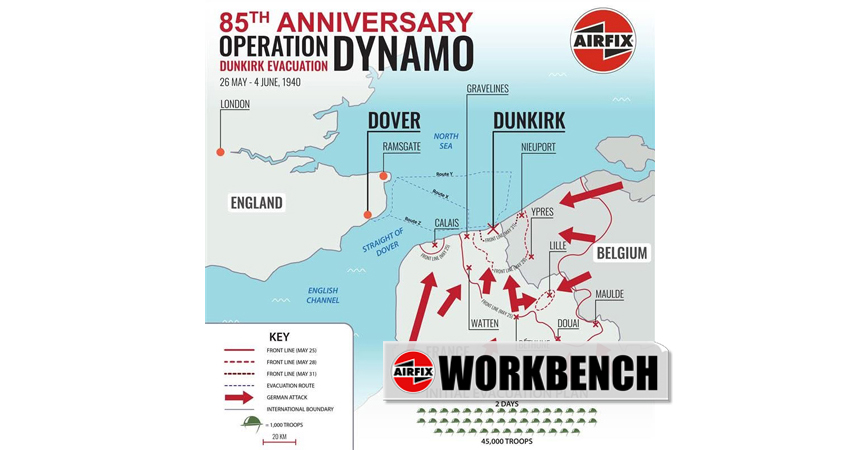
As this week’s title confirms, we continue on our 85th anniversary trail in this edition by looking at Operation Dynamo, or as it’s also referred to The Battle of Dunkirk, or simply the ‘Miracle of Dunkirk’. Exactly 85 years ago this week, Operation Dynamo was put into action, and the seaborne evacuation of the stranded British Expeditionary Force attempted by vessels large and small. With the German Army massing around the evacuation beaches, and the Luftwaffe pounding both the beaches and any Allied shipping from the air, how many troops would the operation save before German forces claimed their victory prize? And for the Allies, would Blitzkrieg bring about a swift end to the Second World War, and with it, a new dark age for Europe?
In this latest update, we will be looking at the historical context behind the Dunkirk evacuations, why the eventual number of troops rescued far exceeded initial official estimates and importantly, what role the Royal Air Force played during this crucial period in British history. Oh, and we might just take this opportunity to showcase a few pieces of Airfix box artwork to illustrate the feature into the bargain.
Such a desperate scene. The BEF and other Allied troops gathered on the beaches at Dunkirk, an uncertain fate awaiting them. Would they be rescued before the Germans rolled in over the sand dunes? Image in the public domain.
Following Germany’s attack against Poland and the subsequent declaration of war by Britain and France against Germany, an agreement of mutual military support established between the two allied nations saw the Advanced Air Striking Force being sent to France on the 2nd September 1939. Intended to provide a show of strength in deterring the Germans from attacking westward, this force initially consisted of 12 squadrons of aircraft, 10 equipped with the Fairey Battle light bomber and 2 equipped with Hawker Hurricane fighters.
Following on two days later, the British Expeditionary Force sailed across the English Channel as part of the same agreement, with their operations covered by the Air Component of the BEF. This force comprised of a further 4 fighter squadrons equipped with Hurricanes and Gloster Gladiator biplanes, with 4 squadrons of Westland Lysanders in an army cooperation role, and 4 squadrons of Bristol Blenheims as strike bombers and reconnaissance aircraft.
This mighty show of force was intended to prevent a further escalation of hostilities by having the aircraft based within striking distance of targets inside potential contested territory should such actions be required, however, Allied military planners initially decided against taking such offensive actions for fear of provoking Germany into a military response, something they were clearly keen to avoid. Once in France, the BEF took up position to the left of the French First Army, along the Franco-Belgian border, and during the period of uneasy calm which became known as the Phoney war, troops spent their time building up fortified positions, in anticipation of the German onslaught.
Due to the positioning of strong existing French armies and the strength of the impressive French Maginot Line fortified defences, the Allies were expecting any German attack to come through the Netherlands and Belgium, which is exactly where the Germans wanted them to think it was coming. Their battle plan did involve a formidable force striking the BEF in the north, however, this was the top end of a bold pincer movement, one which saw the main mechanised force attacking through the challenging terrain of the Ardennes Forests, an area which the Allies had thought impenetrable to a modern army.
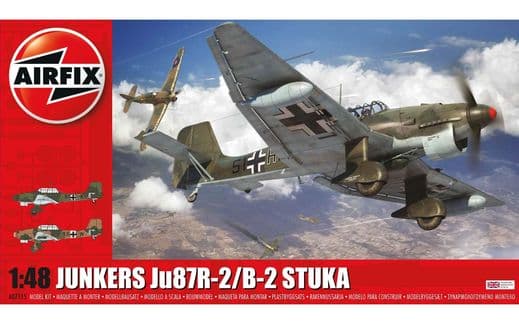
The fearsome air component of Blitzkrieg. Waves of Stukas attacked harbour facilities, troop concentrations and shipping around Dunkirk, but they would suffer at the hands of the Royal Air Force.
When the attack came on the 10th May 1940, it was as ingenious as it was devastating. The attack through the Netherlands drew remaining elements of the main British and French forces to meet the attack, whilst the main force made their way at speed through the heavily forested Ardennes, and cutting through Allied defences at Sedan. The force moved north at speed, seizing most of the channel ports and effectively cutting off the BEF and remaining French and Belgian units around the port city of Dunkirk. The devastatingly effective impact of Blitzkrieg had brought the Wehrmacht to the edge of victory in just over two weeks, and with what remained of the Allied armies now heading for the beaches of Dunkirk, surely this victory would only be the prelude to an even greater one to come, and peace terms being sought by Britain.
At the time of the German attack, the BEF made up ten percent of the entire Allied military strength on the Western Front, so its loss so early in the war could have potentially disastrous consequences. Strong defensive positions were established around Dunkirk, and effective counterattacks were mounted by Allied forces, but with ammunition running out and the hope of re-supply and re-enforcement now dwindling rapidly, surely a crushing defeat was now unavoidable for them.
With hundreds of thousands of troops now congregating on the beaches at Dunkirk, and with German forces gathering for a final assault, the situation was looking desperate. What was worse was the fact that the Germans appeared to be in complete control of the situation and there was little the Allies could do about it. In Britain, a plan was put into motion whereby a seaborne evacuation of the troops would be attempted, using any available vessel, but with smaller craft being commandeered to allow them to get closer to the troops stranded on the beaches.
As the full magnitude of the situation became clear, British officials estimated that their evacuation plan ‘Operation Dynamo’, might allow them to bring around 50,000 troops home at best, but through a combination of factors, what happened during the following few days in May and June 1940 was nothing short of a miracle. With all manner of craft commandeered by Naval personnel for the task, they were joined by hundreds of private boats all determined to bring as many of their boys back home as possible, all leaving ports along the southeast coast of England, some making multiple journeys across the Strait of Dover.
The Allies in France struggled to cope with the speed of the German offensive through the Ardennes, and were encircled in a planned pincer movement at Dunkirk. Image in the public domain.
Most of the BEF’s equipment was left in France, with much of it subsequently pressed into Wehrmacht use. Image in the public domain.
Wrestling a glorious victory from the very jaws of a terrible defeat, the ‘Little Ships’ of the ‘Miracle of Dunkirk’ had helped to prevent a military catastrophe and with it, surely provided Britain with her ‘Finest Hour’, or at least one a few months earlier that the one we usually associate with that phrase. Between 26th May and 4th June 1940, ‘Operation Dynamo’ resulted in the rescue of some 338,000 British, Commonwealth and Allied troops, all of whom had been marooned on the beaches of Dunkirk, a glorious achievement which effectively allowed Britain to remain in the war.
Now, Britain needed the English Channel to come to its protection like never before, as the threat of invasion was very real, and there was only 21 miles of sea between the south coast of England and an all-conquering enemy. Having said that, the BEF’s equipment had been left behind in France, and a great many aircraft and pilots had been lost during the Battle of France, however, amongst the great British populous, there was a sense of jubilation after Dunkirk, a spirit the nation was going to need over the next few months, as these were extremely dark days indeed.
With the Germans seemingly having the fate of the BEF in their hands, and with British military planners only believing they could rescue around 50,000 troops from the beaches at Dunkirk at best, how on earth had ‘Operation Dynamo’ resulted in over 338,000 troops making it back to Britain?
A great many factors brought about the Miracle of Dunkirk, with the Royal Air Force playing a full and heroic role. This Avro Anson Mk.I brought down two Messerschmitt Bf 109 fighters over the English Channel on 1st June 1940.
Although the Dunkirk evacuation stands as one of the most glorious chapters in British history, where the indomitable spirit of the nation showed how they would not be beaten, no matter how great the odds against them, there were several significant factors which all came into play to allow so many troops to make it back to Britain, and for Churchill to turn what was a devastating defeat into a galvanising victory for the nation.
Heroic rearguard actions
Although not a factor which usually receives much media attention, Allied forces fought valiantly in the face of their German opposition, with fierce counterattacks taking a heavy toll of Wehrmacht troops, halting their advance and buying time for those gathered on the beaches at Dunkirk. Significant Allied defensive actions around Lille and Calais delayed the German advance, with Churchill later paying particular tribute to the magnificent actions by the French Army at Lille. He described how their heroic defence held up the Germans for four days, and effectively allowed the evacuation of the BEF to take place.
The Royal Air Force
Despite some inaccurate post war reports being written about the contribution of the Royal Air Force during Operation Dynamo and the Battle of Dunkirk, a significant effort was made to keep the Luftwaffe away from the evacuation beaches, however, we will come on to that a little later.
Unusually calm weather
Something we rarely consider when thinking about the success of Operation Dynamo was the weather conditions at the time, which is unusual, bearing in mind just how significant a role it must have played during a seaborne evacuation attempt, particularly as we all know how storms almost derailed invasion attempts in Normandy just four years later. In fact, the weather was unusually calm during the evacuation, which certainly helped the smaller vessels during their Channel crossings, and supported the loading and unloading of thousands of troops.
What winds were experienced blew across the evacuation beaches, keeping waves shallow and inadvertently providing smoke cover for the operation, from the fires which were still burning at Gravelines and Calais. In addition to this, low cloud cover provided further protection for the massed ranks on the beaches, meaning that for long periods during the evacuations, Luftwaffe strike aircraft would be bombing blind, or risking damage by Allied anti-aircraft fire, if venturing below the cloud cover to see their targets. They also had the Royal Air Force to contend with.
Troops packed onto a Destroyer about to arrive back in Britain, but how would they be received by the public? Image in the public domain.
A German halt order
With German panzers rolling to the very outskirts of Dunkirk, why did Hitler issue a halt order to them on the 24th May, when victory was surely within their grasp? There has been much debate about this in the years which followed the end of the Second World War, with some putting it down to a huge tactical blunder, whilst others offered a more reasoned argument.
Certainly, at this stage of the war, nobody could argue against the effectiveness of Germany’s Blitzkrieg tactic, even though attacking at such speeds did place a significant strain of supply and reinforcement lines – could this have been in Hitler’s thinking? Despite the success of Blitzkrieg, the Allies had fought tenaciously, and with those supply lines being stretched and the Allied armies still posing a significant threat, did Hitler fear Allied counter attacks, and the tables being turned on his over-confident forces?
In any case, he had the Luftwaffe and its always confident Commander-in-Chief Hermann Göring, who would have been pleading with Hitler to allow him to finish off the Allies. Whatever the reason, the German’s were holding all the military cards, not to mention the fact that the thousands of troops stranded on the beaches at Dunkirk were going nowhere anytime soon – surely Hitler had time on his hands.
Was he delaying because he hoped the Allies would come to their senses, and prevent the capture of so many men by seeking peace terms, or was it simply a question of military logistics?
Big ships, not little ones
Despite the fact that the ‘Little Ships’ of Dunkirk play one of the most galvanizing and patriotic roles in modern British history, and are remembered with great fondness during any Dunkirk evacuation commemoration, even though their contribution was indeed important, it wasn’t the most significant. The task of sailing the smaller ships close to shore and have a handful of exhausted men clamber aboard was a painfully slow process, with the journey back to Britain being equally long and arduous. Had this been the only option available to the rescue attempt, the number of troops making it back to Britain would have been closer to the modest 50,000 initially anticipated.
With the general location of the stricken troops on the beaches, and the main harbour facilities either destroyed or inaccessible to them, the commander of the evacuation attempt Captain Bill Tennant knew that a more robust means of embarkation was going to be needed. He could see two breakwaters protruding out towards the sea, and whilst these were not really suitable for such a sizeable task, they did offer an opportunity which simply had to be explored.
He arranged for the cross-Channel steamer ‘Queen of the Channel’ to moor alongside the eastern mole, which it did without causing damage to either vessel or the breakwater, revealing itself to be the lifeline the operation needed. Over the course of the next five days and nights, thousands of troops were able to board hundreds of ships directly from the eastern mole, in a quick and orderly manner, ensuring the operation was as efficient as it possibly could be under the circumstances.
Troops disembarking at a station in London. They were fed and watered, and overwhelmed by the outpouring of public elation at their salvation. Image in the public domain.
Miraculously, the eastern mole remained undamaged by either Luftwaffe attack, or by the constant docking of larger vessels against it, and this arrangement was responsible for supporting the evacuation of no fewer than 239,555 troops from Dunkirk, the vast majority of the total number of men the boats managed to bring home.
After such a crushing defeat, the men rescued from the beaches of Dunkirk were a little concerned about the reception they would be given on arrival back in Britain, but as it transpired, they needn’t have worried. The panic and disorder of Dunkirk was replaced by hot food and smiles when they arrived back in Britain, and whilst they had left all their weapons and equipment in northern France, they were back home, and Britain was still in the war.
With members of the public joining the military in the execution of a seemingly futile plan, a great victory had been gained from the very jaws of a crushing defeat, and rather than a feeling of desperation, the Dunkirk evacuations galvanised a nation in its darkest hour, with the population feeling that if the nation could prevail in a situation as desperate as this, the Germans had better watch out when we eventually gained the upper hand.
As you might well imagine, both the government of the day and the national press promoted the heroism of the Dunkirk evacuation to the fullest, taking what positives they could from what was essentially a crushing defeat, in an attempt to keep the public morale of the nation as buoyant as possible. They were only too aware that these were dangerous times for Britain, and there were possibly worse times to come. Although the vast majority of the BEF troops had made it home by some miracle, their weapons and equipment had been left behind in northern France, to be used by the Germans, mainly during their strike east and Operation Barbarossa the following year.
Despite Dunkirk allowing Britain, her Commonwealth and her allies to remain in the war, they were still very much on the defensive, and it would be many months before they were in a position to put Germans forces on the back foot, from a strategic perspective.
Contrary to the view which became popular in the years which followed the end of the Second World War, the Royal Air Force played a full and vital role during Operation Dynamo.
Although Operation Dynamo and the Dunkirk evacuations have historically been regarded as incredibly successful, almost miraculous, perhaps the most contentious aspect of the entire operation in the years which followed was the role played by the Royal Air Force, particularly following some printed news comments reputedly made by evacuated troops themselves.
Before looking at the role of the RAF, it’s probably appropriate if we first look at the conditions in which they were being asked to operate, as this will allow for a clearer picture of the situation. The comments made earlier regarding the weather conditions and low cloud cover relate as much to the RAF as they did the Luftwaffe, with low cloud and drifting smoke reducing visibility and therefore probably also reducing flight operations above those areas. In addition to this, if the troops had seen RAF fighters above the beaches themselves, then surely that would have been too late!
It also has to be accepted that RAF pilots flying over France were at a significant strategic disadvantage, not to mention the fact that they were all relatively inexperienced airmen, in terms of combat experience. The Luftwaffe, on the other hand, were battle hardened, supremely confident and had much greater numbers of aircraft available to them, so would have no doubt relished the opportunity to have more enemy aircraft to engage.
Again, RAF pilots would have only had fuel enough for limited combat operations over France, even after having re-located to bases close to the south coast for the duration of Operation Dynamo. If they suffered combat damage, or mechanical failure, they knew it was unlikely they would make it back across the Channel, and couldn’t rule out the fact that even at this early stage in the war, they would become prisoners of the Germans. Interestingly, this situation would be reversed when the Luftwaffe began mounting operations across the Channel at the start of the Battle of Britain just a few weeks later.
At the start of the evacuation operation, the Royal Air Force began flying patrols from Boulogne to Dunkirk, initially attempting to maintain constant air cover, but soon running into problems in doing so. The Luftwaffe had already successfully destroyed the main harbour facilities at Dunkirk, meaning that German forces were probably right in assuming that the large scale evacuation of Allied troops was now impossible, and how any large ships venturing too close to the beaches would be easy targets for their Stukas.
Bristol Blenheims were also in operation during the 9 days of the Dunkirk evacuations.
Again, returning to the weather, the most successful air operations would have required good weather for aircraft to operate in, and even then, the smoke covering the evacuation beaches would have obscured the view of strategic targets, resulting in less effective, but no less terrifying for those on the receiving end, random bombing.
RAF fighter operations were not particularly looking to provide direct air cover over the beaches themselves, but more to keep the Luftwaffe occupied before they could get there, but always with a view to fully supporting the evacuation plan. Ultimately, over the nine days of Operation Dynamo, the Royal Air Force flew 2,739 fighter sorties, 651 bombing missions and a further 171 reconnaissance flights. These were backed up by numerous sorties mounted by Coastal Command and the Fleet Air Arm, where they attempted to protect Allied shipping in the English Channel by disrupting possible U and E boat activity.
A great many RAF pilots and pilot/gunner crews would score their first air combat victories during the period of Operation Dynamo, with some even securing ‘Ace’ status, but with far too many valuable pilots and their aircraft being lost on both sides. It would also prove to be a successful introduction for the RAF’s unusual Boulton Paul Defiant turret fighter, however, these successes over Dunkirk would be sort lived for Defiant crews, particularly in respect of daytime combat operations.
It's interesting to note that the Boulton Paul Defiant was the most modern fighter type available to Fighter Command at the time of the Dunkirk evacuations, having made both its first flight, and squadron introduction after both the much more famous Hawker Hurricane and Supermarine Spitfire. During early combat operations, the new British turret fighter proved to be rather successful, with its unique firing position proving to be a very unwelcome surprise for Luftwaffe crews.
The usual method of attack adopted by fighter pilots in securing an aerial victory, was to close in behind their intended victim, where he would both find it difficult to see you and was not in a position to defend himself – if they managed to take up a position such as this, they had their enemy right where they wanted them. Indeed, it could be argued that any position behind a single engined fighter adversary put you in an incredibly advantageous combat situation.
The Boulton Paul Defiant turret fighter would prove to be a nasty shock for the Luftwaffe, and would enjoy its most successful period of combat flying during the air support for Operation Dynamo.
When executing these well practiced tactics over the evacuation beaches at Dunkirk, Luftwaffe fighter pilots would have been expecting to chalk up their latest victory, when taking up a position above and behind this strange looking new RAF fighter, however, this fighter had a sting in its tail. When they were caught in a hail of bullets from the four 0.303 inch Browning machine guns in the Defiant’s dorsal turret, they would have soon realised the mistake they had just made, one from which they would be lucky to escape with their lives. As an unfamiliar enemy aircraft type, initially at least, significant numbers of Luftwaffe aircraft would fall to the turret guns of the Boulton Paul Defiant, but it wouldn’t take long for them to learn from their mistake.
The most successful day for RAF Defiants would come on 29th May 1940. Flying operations in support of the evacuation of troops stranded on the beaches of Dunkirk, Defiants of No.264 Squadron claimed an impressive 37 Luftwaffe aircraft destroyed during two operational sorties that day. Amongst the enemy aircraft claimed were nineteen Junkers Ju-87 Stukas, the majority of which were destroyed as they pulled out of their bombing dives, but also nine Messerschmitt Bf 110 heavy fighters, eight Messerschmitt Bf 109 single engined fighters and a Junkers Ju-88 bomber. Significantly, these impressive figures were obtained for the loss of just one Defiant air gunner, a fact which is worthy of further investigation.
The Defiant crew in question was involved in combat with a Messerschmitt Bf 109 fighter, which was proving to be particularly persistent with his pursuit. In order to try and shake it from the tail of his aircraft, the Defiant pilot executed a series of violent evasive manoeuvres, which went on for much longer than he had anticipated, due to the skill of their Luftwaffe pursuer. The turret gunner was either struggling to get a clear shot at the enemy fighter, or his guns, or powered turret were jammed, but whichever the case was, he was caught in a hail of bullets flashing past the Perspex of his turret.
As he could not contact, or even see his pilot in that moment, he must have assumed that the violent manoeuvres the aircraft was performing was a result of his pilot having been hit by enemy fire, which caused him to release his harness, and take to his parachute. The Defiant finally managed to evade the attentions of the Luftwaffe fighter and make it back to its temporary forward operating base at Manston. It was later patched up and returned to flight operations, but as a result of shaking off the pursuing Bf 109 fighter, no RAF No. 264 Squadron Defiants were lost on that day.
Famous RAF Ace pilot Douglas Bader would claim his first victory over Dunkirk, when he dispatched a Messerschmitt Bf 109 fighter.
Unquestionably one of the most famous military pilots to have ever lived, the story of Douglas Bader’s life is nothing short of extraordinary, and could even be likened to reading about some mythical heroic figure from the pages of a ‘Boys’ own’ magazine. Born in London in February 1910, Bader’s father was a commissioned officer in the Royal Engineers, who died not long after the end of the Great War following complications with a shrapnel injury, leaving the young Bader to be brought up without the guidance of a strong father figure.
Sent away to boarding school, Bader channelled his energy into sports, where he excelled at both rugby and cricket. Always fascinated by aeroplanes and flying, Bader was accepted into the RAF College as a cadet in 1928, and despite some problems with both attitude and discipline, he was commissioned as a pilot officer two years later, joining RAF No.23 Squadron at Kenley to fly the Gloster Gamecock fighter, but later converting to the new Bristol Bulldog. It was whilst flying the Bulldog that Bader was involved in the incident which would shape his life and ensure his enduring place in British history.
Perhaps the most famous incident involving a Bristol Bulldog fighter proved to be a rather unfortunate one, when an accomplished, but rather headstrong RAF pilot performed unauthorised low altitude aerobatics for a group of onlookers and a private civilian aerodrome in Berkshire. Flying so low that the wingtip of his fighter struck the ground during a manoeuvre, the Bulldog cartwheeled across the airfield, inflicting catastrophic injuries on its unfortunate, if incredibly reckless pilot - that pilot was future WWII RAF ace and inspirational national hero Douglas Bader. Both his legs had to be amputated, and although these drastic actions undoubtedly saved his life, the operation and its outcome were just the beginning of Bader’s incredibly inspirational story.
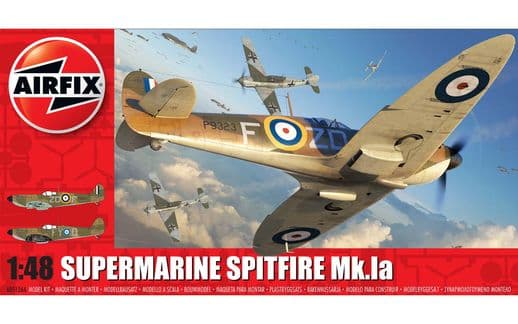
After several unsuccessful attempts to be allowed to re-join the RAF, the outbreak of the Second World War brought with it a desperation which saw Bader finally being allowed back into its ranks. After the successful completion of a refresher course, he was initially posted to No.19 Squadron at Duxford, then on to No.222 Squadron at Hornchurch as a Flight Leader, both to fly the Spitfire Mk.I. Supermarine Spitfire Mk.I P9443 was the 606th Spitfire built and subsequently delivered to the Royal Air Force on 1st April 1940. She was initially flown to No.6 Maintenance Unit at Brize Norton, then on to No.222 Squadron at Hornchurch on 4th June. She was a standard mid-production Mk.I Spitfire, presented in the standard markings of an Operation Dynamo fighter, with Night/White and Aluminium undersides.
Bader would use this aircraft to score his first aerial victory over a Luftwaffe Messerschmitt Bf 109 on 1st June 1940, when what he thought must have been a novice pilot flew straight in front of his Spitfire, taking no evasive action whatsoever as he opened fire on it. Later that same day, he would also be credited with a ‘probable’ Messerschmitt Bf 110, even though he actually claimed to have shot down five enemy aircraft that day.
With his indomitable spirit and fierce sense of duty, Bader would soon be given command of his own unit, No.242 Squadron flying Hurricanes, a unit which he would stay with throughout the Battle of Britain. Having served through the Battle of France, pilots from this unit were suffering from low morale which was affecting their combat effectiveness, and it was thought that Bader would be the ideal man to lick them into shape.
Both the Royal Air Force and the Luftwaffe lost valuable aircraft they could ill-afford to lose during the 9 days of Operation Dynamo.
Douglas Bader was a man who overcame adversity to become an inspiration to millions of people, one of the most famous pilots the world has ever known and a man whose fighting spirit galvanised a nation in its darkest hour. Spitfire Mk.I P9443 was the aircraft which gave him his first taste of aerial combat and indeed, his first aerial victory over his most feared adversary, the Messerschmitt Bf 109. He most definitely possessed the ‘Dunkirk Spirit’.
Although combat claims and losses were both difficult to corroborate and subject to propaganda manipulation at this time, both the RAF and Luftwaffe lost aircraft and pilots they could ill-afford to lose during the air operations covering the Dunkirk evacuations, and there was no hiding that fact. Churchill later claimed that the RAF had shot down four times more aircraft than they had lost themselves, but with an even more intense air battle to come, Operation Dynamo left Fighter Command dangerously exposed. It has even since been argued that these air operations were the opening skirmishes of the Battle of Britain, but whether that be the case of not, the Luftwaffe and RAF would clash again in just a few short weeks.
In summary, the success of Operation Dynamo came as a result of a great many contributory factors, but mainly because of actions taken by brave and selfless people, who fought in the air, on land and at sea. They were determined to play their part in providing salvation for thousands of troops stranded on the beaches of Dunkirk, and at the mercy of the merciless Wehrmacht – they were simply not prepared to leave them there.
The Dunkirk evacuation allowed a brief period of celebration in Britain, at a time when everything about the war to that point had been bad news. Although Churchill described how deliverance should not be confused with victory and how you don’t win wars with evacuations, he did also go on to tell the German leadership that Britain would continue to ‘fight them on the beaches’ and how the nation ‘would never surrender’. Significantly, the watching American’s were full of admiration for the British and their resourcefulness in securing a glorious victory from the closing jaws of defeat.
Britain was still in the fight, and to this day, possessing the ‘Dunkirk Spirit’ is something every Britain would be proud to have associated with their name.
The Airfix website currently includes an impressive Operation Dynamo 85th Anniversary Bundle offering.
We are afraid that's all we have for you in this latest edition, but we will be back next Friday with more project development updates and the very latest Airfix kit exclusives. In the meantime, we are always keen to hear your views on all things Airfix and in particular, any thoughts and opinions you may have regarding our Workbench blog. If you would like to drop us a quick line, could we please ask that you use our workbench@airfix.com email for all correspondence.
To re-visit any of the Airfix blogs we have produced over the past seven years or so, please head to our main Workbench hub, where you will find our entire blog back catalogue and all the Airfix design projects we have already covered.
All our dedicated official social media sites can be accessed by clicking the respective link icons at the foot of this page, or by heading to the Airfix homepage. Other useful Airfix links are:
Facebook, YouTube, Twitter and Instagram official sites
Please join us for more Airfix updates next week and thank you for your continued support.